Canon C83-1004 ImageBrowser_v1x_guide.pdf
Canon C83-1004 - PowerShot G1 Digital Camera Manual
 |
UPC - 082966162169
View all Canon C83-1004 manuals
Add to My Manuals
Save this manual to your list of manuals |
Canon C83-1004 manual content summary:
- Canon C83-1004 | ImageBrowser_v1x_guide.pdf - Page 1
1 ImageBrowser Software Guide - Canon C83-1004 | ImageBrowser_v1x_guide.pdf - Page 2
Camera Window Opening the Camera Window 36 Importing Images 37 Deleting Images on the Camera 39 Rotating Images 40 Copying Images to a Camera 41 Checking and Modifying the Camera Settings 43 Other Functions of the Camera (RemoteCapture) 61 Using Other Programs 62 2 ImageBrowser Software Guide - Canon C83-1004 | ImageBrowser_v1x_guide.pdf - Page 3
63 Supported File Formats 64 Preventing ImageBrowser from Starting Automatically ------- 65 Customizing Preferences 66 Playing Movie 70 Converting RAW Images 71 Setting up Slide Shows on the Camera 73 Setting up DPOF Prints 74 Troubleshooting 76 Index Index 77 3 ImageBrowser Software Guide - Canon C83-1004 | ImageBrowser_v1x_guide.pdf - Page 4
camera. ImageBrowser. IMPORTANT 2 Make the camera ready for communication with your computer. This manual the camera to your computer through a USB port. When you connect the camera through camera that you are using appears here. If the window above does not appear, see the Troubleshooting - Canon C83-1004 | ImageBrowser_v1x_guide.pdf - Page 5
camera, or when you want to start ImageBrowser again after you exit it. Double-click the [Canon the selections you make during installation, the Canon ImageBrowser icon may not appear on the the following sequence. Locate and open the [Canon Utilities] folder, then open the [ImageBrowser] folder - Canon C83-1004 | ImageBrowser_v1x_guide.pdf - Page 6
for communication with your computer, the Camera Window appears. If you make the camera ready for communication with your computer and the Camera Window does not appear, click [Canon Camera] at the lower left of the Browser Window. 6 ImageBrowser Software Guide Explorer View Section The disks that - Canon C83-1004 | ImageBrowser_v1x_guide.pdf - Page 7
(copy) images to the newly created folder on your computer. 1 Click the Camera Window to bring it to the front. 2 Click the image that you want that you want to copy. • To download all images in the Camera Window, click [Select] in the toolbar below the images, choose [Select All], - Canon C83-1004 | ImageBrowser_v1x_guide.pdf - Page 8
the corresponding images appear in the Browser Area of the Browser Window. Try to import all the images that you want. Image imported from the camera 8 ImageBrowser Software Guide Next, let's try to print the images. REFERENCE • For detailed information on how to use the - Canon C83-1004 | ImageBrowser_v1x_guide.pdf - Page 9
window opens and the print layout is displayed automatically. For the moment, just print the images without making any changes. 9 ImageBrowser Software Guide The Print Settings dialog box appears. Select the print options that you want and start printing. REFERENCE For details on print operations - Canon C83-1004 | ImageBrowser_v1x_guide.pdf - Page 10
. If You Have a Problem ImageBrowser comes with online Help camera.) The Camera Window then appears. If the Camera Window does not appear, click [Canon Camera] in the Browser Window. However, if the Camera Window is already open, click [Connect Camera] in the window. 10 ImageBrowser Software Guide - Canon C83-1004 | ImageBrowser_v1x_guide.pdf - Page 11
on the camera (available with some models only). • Import images stored in the camera to your computer. • Save images from your computer to the camera. By control the shutter operation of a camera connected through a USB port from your computer (not available on some camera models). • You can specify - Canon C83-1004 | ImageBrowser_v1x_guide.pdf - Page 12
Chapter 2 What is ImageBrowser ? What happens to the image file when you import images from a camera, or move or copy them using ImageBrowser? Where are images stored? You can use the following ImageBrowser, files are moved or copied accordingly in the Finder. 12 ImageBrowser Software Guide - Canon C83-1004 | ImageBrowser_v1x_guide.pdf - Page 13
images in the selected folder are displayed. Image Name: This is where the file names of each individual images are displayed. 13 ImageBrowser Software Guide You can drag this line to change the position of the boundary between the Explorer View Section and the Browser Area. Control Panel: This - Canon C83-1004 | ImageBrowser_v1x_guide.pdf - Page 14
this. Changing the size of thumbnails By clicking or you can change the size of the thumbnails displayed in the Browser Area. 14 ImageBrowser Software Guide - Canon C83-1004 | ImageBrowser_v1x_guide.pdf - Page 15
Display Preview above the thumbnails. Display Preview Sound Panel The shooting date is displayed as well as the file name. Control Panel 15 ImageBrowser Software Guide - Canon C83-1004 | ImageBrowser_v1x_guide.pdf - Page 16
with ImageBrowser, try using the contextual menus in different situations and you will be impressed with their convenience. Note that, in general, this manual does not cover operations using contextual menus. (This is because explaining the many menu variations would take too many pages.) Click the - Canon C83-1004 | ImageBrowser_v1x_guide.pdf - Page 17
releasing the mouse button to drop the image. 1. Drag the image that you want to move. 2. Drop it at the desired location. 17 ImageBrowser Software Guide - Canon C83-1004 | ImageBrowser_v1x_guide.pdf - Page 18
can be open simultaneously. 1. Drag the image that you want to move. 2. Drop it at the desired location. The first Browser Window 18 ImageBrowser Software Guide The Second Browser Window - Canon C83-1004 | ImageBrowser_v1x_guide.pdf - Page 19
folder. sCopying to a camera You can copy images to a camera. When you open the Camera Window and drag an image from the Browser Area into the Camera Window, the image is copied to the camera. For details on this images that have been selected in the Browser Area. 19 ImageBrowser Software Guide - Canon C83-1004 | ImageBrowser_v1x_guide.pdf - Page 20
, click [Send to Trash] on the [File] menu to delete the image. 1. Click the image that you want to delete. 2. Click here. 20 ImageBrowser Software Guide - Canon C83-1004 | ImageBrowser_v1x_guide.pdf - Page 21
how to rotate images to the desired orientation. This is useful for images taken by holding the camera sideways. IMPORTANT • Rotating an image in ImageBrowser changes (rotates) the image in file on your the image that you want to rotate. 2. Click a rotation angle. 21 ImageBrowser Software Guide - Canon C83-1004 | ImageBrowser_v1x_guide.pdf - Page 22
[File] menu click [Duplicate]. The complete folder is duplicated. 1. Click the image that you want to duplicate. 2. Click here. The duplicated image. 22 ImageBrowser Software Guide - Canon C83-1004 | ImageBrowser_v1x_guide.pdf - Page 23
the image. Type the new name and press [return]. Click here, and wait a moment, then type the new name and press [return]. 23 ImageBrowser Software Guide - Canon C83-1004 | ImageBrowser_v1x_guide.pdf - Page 24
dialog box contains such information as the camera model, the date the image was shot, and the camera settings at the time of shooting. To depends on the camera used. REFERENCE When an image taken by the camera is modified and saved by another program, information about the camera might be lost - Canon C83-1004 | ImageBrowser_v1x_guide.pdf - Page 25
the next page. • When you create a new folder in ImageBrowser, a new folder of the same name appears in the Finder. New folder 25 ImageBrowser Software Guide - Canon C83-1004 | ImageBrowser_v1x_guide.pdf - Page 26
on your computer. Click the name of the folder and wait a moment. Type the new name for the folder and press [return]. 26 ImageBrowser Software Guide - Canon C83-1004 | ImageBrowser_v1x_guide.pdf - Page 27
folder that you want to delete. On the [File] menu, click [Send to Trash]. 1. Click the folder to be deleted. 2. Click here. 27 ImageBrowser Software Guide - Canon C83-1004 | ImageBrowser_v1x_guide.pdf - Page 28
Click to collapse a folder. Click to expand a folder. REFERENCE • If you want, you can click [Canon Camera] in the Explorer View Section to open the Camera Window. (This is possible only if the camera is connected and ready to communicate with your computer.) • You can open a folder in the Finder - Canon C83-1004 | ImageBrowser_v1x_guide.pdf - Page 29
the image. You can also click [Close] on the [File] menu. The size of the image (vertical x horizontal, in pixels) appears here. 29 ImageBrowser Software Guide Click here to display or hide the toolbar at the bottom of the image window. - Canon C83-1004 | ImageBrowser_v1x_guide.pdf - Page 30
] menu, or by clicking [Enlarge] or [Reduce]. REFERENCE You can select a zoom ratio of [25%] to [200%]. Reduce Enlarge Current zoom ratio 30 ImageBrowser Software Guide - Canon C83-1004 | ImageBrowser_v1x_guide.pdf - Page 31
back. • If you feel that you have undone too many steps, you can reverse it by clicking [Redo] on the [Edit] menu. 31 ImageBrowser Software Guide - Canon C83-1004 | ImageBrowser_v1x_guide.pdf - Page 32
that you selected (horizontal × vertical, in pixels) These are the coordinates of the mouse pointer in the cropped area 2. Click this button. 32 ImageBrowser Software Guide - Canon C83-1004 | ImageBrowser_v1x_guide.pdf - Page 33
box, you can adjust the hue, saturation and lightness, and click [OK]. Click here. Decrease Hue Increase Hue Decrease Saturation Decrease Lightness 33 ImageBrowser Software Guide Increase Saturation Increase Lightness - Canon C83-1004 | ImageBrowser_v1x_guide.pdf - Page 34
file format that you want to use. Then, click [Save]. If you do not want to save the changes, click [Don't Save]. 34 ImageBrowser Software Guide - Canon C83-1004 | ImageBrowser_v1x_guide.pdf - Page 35
If you have not installed an image editing program such as the one that may have been supplied with your Canon digital camera, then you cannot select this function. If this is the case, you need to install the program. the name of the program that you want to use. 35 ImageBrowser Software Guide - Canon C83-1004 | ImageBrowser_v1x_guide.pdf - Page 36
[Canon Camera] to open the Camera Window. Using the Canon Camera button Click (Canon Camera) to display the Camera Window. Click here. REFERENCE • If the "No camera detected" message appears, refer to the Troubleshooting section in the Appendices for information on how to solve the problem. • If - Canon C83-1004 | ImageBrowser_v1x_guide.pdf - Page 37
the Browser Window. • The name of the camera you are using as well as thumbnails of the images on the camera appear in the Camera Window. Therefore, your computer screen may differ to the one that appears in this guide. Representation of your camera Camera name 1. Select an image. 2. Click here - Canon C83-1004 | ImageBrowser_v1x_guide.pdf - Page 38
Camera Window. The image is then imported into ImageBrowser. sDrag-and-drop Drag an image in the Camera an image in the Camera Window and dropping it camera models do not come with this feature), it appears in the Camera some camera models do not come with this feature), it appears in the Camera - Canon C83-1004 | ImageBrowser_v1x_guide.pdf - Page 39
This section describes how to delete images stored on the camera (CF card). How to delete an image on the camera Select the image that you want to delete and click to delete it. (Delete) an image. 2. Click here. A message appears, click [OK]. The image is deleted. 39 ImageBrowser Software Guide - Canon C83-1004 | ImageBrowser_v1x_guide.pdf - Page 40
right is a clockwise rotation. • The Rotate function affects only the image displayed in the Camera Window. The image stored on the camera is not changed at all. However, when you import the image, the change is reflected at the same time at the same rotation angle. 40 ImageBrowser Software Guide - Canon C83-1004 | ImageBrowser_v1x_guide.pdf - Page 41
. Then, click [Save to Camera]. The selected image is copied to the camera. Specify the size of the image. Specify how to adjust size of the image. Click here. A dialog box appears. In the dialog box, select an image you want to copy to the camera and click [Open]. 41 ImageBrowser Software Guide - Canon C83-1004 | ImageBrowser_v1x_guide.pdf - Page 42
in JPEG format when stored on the camera.) For detailed information on file formats, see the Supported File Formats section in the Appendices. Other ways of copying images sUsing the menu You can copy images to a camera by clicking [Upload Images] on the [Canon Camera] menu. sDrag-and-drop In the - Canon C83-1004 | ImageBrowser_v1x_guide.pdf - Page 43
camera settings Click (Setup Options) to display a menu. On the menu, click [Camera Settings]. Click [Camera Settings] on the [Setup Options] menu. The Camera right. Type the name of the owner of the camera here. Use this button to synchronize the camera clock and your computer clock. You can set - Canon C83-1004 | ImageBrowser_v1x_guide.pdf - Page 44
can make the communication settings of the communication port between the camera and your computer. Click this button to reestablish the connection between the camera and your computer after breaking it. 44 ImageBrowser Software Guide Click this button to print the selected image. (For detailed - Canon C83-1004 | ImageBrowser_v1x_guide.pdf - Page 45
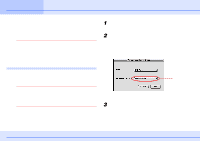
when you actually compress the image. (The file size appears next to "Total Size after compression.") 6 Click [Next]. The last window appears. 45 ImageBrowser Software Guide - Canon C83-1004 | ImageBrowser_v1x_guide.pdf - Page 46
in the [Email Images] folder can be located in the "ImageBrowser.mail" subfolder of the [ImageBrowser] folder. New folder for e-mail images. 46 ImageBrowser Software Guide - Canon C83-1004 | ImageBrowser_v1x_guide.pdf - Page 47
Select the "Control with Mouse or keypad" option if you want to control the progress of the slide show manually. Select the transition effect to be used when moving from one slide to another. (When you click an effect completed the slide show settings, click [OK]. 47 ImageBrowser Software Guide - Canon C83-1004 | ImageBrowser_v1x_guide.pdf - Page 48
using the contextual menu illustrated below.) REFERENCE If you want to view all the images contained in the folder, click (Select All). 48 ImageBrowser Software Guide - Canon C83-1004 | ImageBrowser_v1x_guide.pdf - Page 49
, the sound file (the .snd extension is affixed to AIFF format file name) is copied to the same folder as the image. 49 ImageBrowser Software Guide - Canon C83-1004 | ImageBrowser_v1x_guide.pdf - Page 50
all of the images in a folder by clicking the (Select All) button. • You can also start printing by clicking the (Print Layout) button in the Camera Window. • When either [Shooting Date] or [File Name] are selected on the [Print] tab of the [Preferences] dialog box (on the [Edit] menu), this - Canon C83-1004 | ImageBrowser_v1x_guide.pdf - Page 51
an image to be printed, drag it from the Browser Area or the Camera Window to the Print window. The image is added to the Print window. sCanon Perforated Paper You can only use Canon Perforated Paper in some Canon BJ printers that support Canon Perforated Paper media. You can obtain Software Guide - Canon C83-1004 | ImageBrowser_v1x_guide.pdf - Page 52
and click a rotation angle on the menu. REFERENCE You can also select a rotation angle on the [Rotate] submenu on the [Edit] menu. 52 ImageBrowser Software Guide - Canon C83-1004 | ImageBrowser_v1x_guide.pdf - Page 53
. Free layout: Fixed Photo Size layout: Specify the style of the font. Specify spacing between characters. Specify the color of the characters. 53 ImageBrowser Software Guide - Canon C83-1004 | ImageBrowser_v1x_guide.pdf - Page 54
. Another way to open this window is to double-click the text box. The text appears in the center of the page. 54 ImageBrowser Software Guide - Canon C83-1004 | ImageBrowser_v1x_guide.pdf - Page 55
appears, specify the area for clipping by dragging a box around it. Click (Close). The header appears at the top of the page. 55 ImageBrowser Software Guide Clipping area REFERENCE You can also clip an image by double-clicking it. - Canon C83-1004 | ImageBrowser_v1x_guide.pdf - Page 56
number and size of your images. REFERENCE To start printing, on the [File] menu, point to [Print] and click [Print]. Click here. 56 ImageBrowser Software Guide - Canon C83-1004 | ImageBrowser_v1x_guide.pdf - Page 57
the resolution, the larger the image is printed. Similarly, the larger you make the print resolution, the smaller the image is printed. 57 ImageBrowser Software Guide - Canon C83-1004 | ImageBrowser_v1x_guide.pdf - Page 58
along the time line. Click to display the control panel menu. (How to use the menu is explained on the next page.) 58 ImageBrowser Software Guide - Canon C83-1004 | ImageBrowser_v1x_guide.pdf - Page 59
the TimeTunnel rings octagonal. Select this option to make the TimeTunnel look curved Allows you to change the number of TimeTunnel rings. 59 ImageBrowser Software Guide - Canon C83-1004 | ImageBrowser_v1x_guide.pdf - Page 60
to PhotoStitch Help (accessible from the [Help] menu). • If the camera has the Stitch Assist mode, you can use this mode to take pictures together. On the [Edit] menu, click [PhotoStitch]. Then, follow the instructions on the upper part of the PhotoStitch window, and stitch your images together - Canon C83-1004 | ImageBrowser_v1x_guide.pdf - Page 61
and the communication between them is ready. (Some camera models do not support this function). REFERENCE For detailed information on how form. 61 ImageBrowser Software Guide By clicking [Shooting Settings], you can change the camera settings (may not be available on some camera models). On the - Canon C83-1004 | ImageBrowser_v1x_guide.pdf - Page 62
so far. Plug-In Module By installing a Canon Digital Camera Plug-In Module for the Canon camera, you can use programs such as Adobe stored on the camera. Click to download the selected images to your computer. A list of the images stored on the camera is displayed. 62 ImageBrowser Software Guide - Canon C83-1004 | ImageBrowser_v1x_guide.pdf - Page 63
Subsequent operations are identical to when you are using a USB connection. 63 ImageBrowser Software Guide Double-click this folder. Connecting the camera using a serial port You can connect some Canon digital cameras to your computer through its serial port. When the connection is set up correctly - Canon C83-1004 | ImageBrowser_v1x_guide.pdf - Page 64
proprietary file format provided by Canon. It allows the output of the image pixels from a digital camera without any deterioration in the quality of the image. Some cameras might not support this file format. sPICT must install QuickTime Player before you can use it.) 64 ImageBrowser Software Guide - Canon C83-1004 | ImageBrowser_v1x_guide.pdf - Page 65
automatically when you connect a camera to your computer and [Control Panels] and click [Canon USB Camera]. Clear the selection from "The starts automatically when you connect the camera to your computer and make it However, if no other programs supported by the camera are installed, the list only - Canon C83-1004 | ImageBrowser_v1x_guide.pdf - Page 66
menu, click [Preferences] to open the Preferences dialog box. Then, use the tabs to customize the preferences. Browser tab Click here. 66 ImageBrowser Software Guide Allows you to set the background color of the Preview window. Allows you to set the color of each area in the Browser Area. If - Canon C83-1004 | ImageBrowser_v1x_guide.pdf - Page 67
. (The thumbnails are not actually deleted until the next time you start ImageBrowser.) Camera tab Allows you to set the color for the image frame of images selected in the Camera Window. If the camera is connected through a USB port and you want to start RemoteCapture instead of ImageBrowser - Canon C83-1004 | ImageBrowser_v1x_guide.pdf - Page 68
Print tab Use this to specify the output format to use when converting RAW images. Note that only some cameras support the "TIFF 16bits/channel" format. 68 ImageBrowser Software Guide Use this to select the information displayed as the caption for each image when you open the Print Layout window - Canon C83-1004 | ImageBrowser_v1x_guide.pdf - Page 69
Appendices Units tab Customizing Preferences (4/4) Use this to set the units used for measuring the paper size in the Print window. 69 ImageBrowser Software Guide - Canon C83-1004 | ImageBrowser_v1x_guide.pdf - Page 70
you drag a movie for importation in the Browser Area from a window other than the Camera Window, depending on the computer environment and movie format, the thumbnail might not appear at once with movie mark 70 ImageBrowser Software Guide QuickTime Player window Use this button to play the movie. - Canon C83-1004 | ImageBrowser_v1x_guide.pdf - Page 71
Appendices Converting RAW Images (1/2) If your camera supports RAW files, you can obtain high quality images. However, programs cannot open RAW files. You must menu, click [Convert RAW Images] to start the conversion. 1. Select a RAW image. 2. Click this command. 71 ImageBrowser Software Guide - Canon C83-1004 | ImageBrowser_v1x_guide.pdf - Page 72
you want to adjust the white balance manually, click this button. Then, click the white portion of the image. Preview the full size image. Return to the camera settings used for shooting. Specify the dialog box. 2. Click this command. 1. Select a RAW image. 72 ImageBrowser Software Guide - Canon C83-1004 | ImageBrowser_v1x_guide.pdf - Page 73
select a slide show number. Select a slide show number. 73 ImageBrowser Software Guide From the image list on the left, drag image to the right area and slide show. When you are done arranging the slide sequence, click [Save to Camera] to save the slide show setup. REFERENCE • If you want to change - Canon C83-1004 | ImageBrowser_v1x_guide.pdf - Page 74
images. If you want to print RAW images, you need to convert them first, then copy them to the camera and perform this operation. REFERENCE • DPOF is a print information saving standard (such as images to print and image date and file number in the prints. 74 ImageBrowser Software Guide Click here. - Canon C83-1004 | ImageBrowser_v1x_guide.pdf - Page 75
the information. REFERENCE The procedure described above also applies when the print type is Both (Standard/Index). 75 ImageBrowser Software Guide Select the check box to include the image in the index print. When you are done with your selections, click [Save to Camera] to save the information. - Canon C83-1004 | ImageBrowser_v1x_guide.pdf - Page 76
how to troubleshoot problems. The event dialog box does not appear. If the event dialog box does not appear, even though the camera is connected Automatic launching of ImageBrowser upon connection to the camera via interface cable is only supported on Macintosh computers that are equipped with a - Canon C83-1004 | ImageBrowser_v1x_guide.pdf - Page 77
start 65 B Browser Area 6, 13 Browser tab 66 Browser Window 6, 13 C Camera Settings 43 Camera Window 36 Canon Camera 36 Canon Perforated Paper 51 Caption 53 CF card reader 63 Clipping 55 Close image 29 New Folder 25 O Open image 29 Owner's Name 43 77 ImageBrowser Software Guide - Canon C83-1004 | ImageBrowser_v1x_guide.pdf - Page 78
28 Send to Trash 20, 27 Serial port 63 Setup Options 43 Shooting Settings 61 Slide Show on Camera 73 on Computer 47 Slide Show Options 47 Sound 49 Standard print 75 Start 4 Stitch Assist mode 38 69 Upload image 41 W Windows Bitmap file 64 Z Zoom ratio 30 78 ImageBrowser Software Guide - Canon C83-1004 | ImageBrowser_v1x_guide.pdf - Page 79
guide is accurate and complete, no liability can be accepted for anyerrors or omissions. Canon Inc camera, the software, the CompactFlash™ cards (CF cards), personal computers, peripheral devices, or use of non-Canon CF cards. Trademark Acknowledgments • Canon and PowerShot are trademarks of Canon
-
 1
1 -
 2
2 -
 3
3 -
 4
4 -
 5
5 -
 6
6 -
 7
7 -
8
-
9
-
10
-
11
-
12
-
13
-
14
-
15
-
16
-
17
-
18
-
19
-
20
-
21
-
22
-
23
-
24
-
25
-
26
-
27
-
28
-
29
-
30
-
31
-
32
-
33
-
34
-
35
-
36
-
37
-
38
-
39
-
40
-
41
-
42
-
43
-
44
-
45
-
46
-
47
-
48
-
49
-
50
-
51
-
52
-
53
-
54
-
55
-
56
-
57
-
58
-
59
-
60
-
61
-
62
-
63
-
64
-
65
-
66
-
67
-
68
-
69
-
70
-
71
-
72
-
73
-
74
-
75
-
76
-
77
-
78
-
79
 |
 |

1
ImageBrowser Software Guide