Canon Color imageCLASS MF8450c imageCLASS MF9170c/MF9150c/MF8450c Starter Guid
Canon Color imageCLASS MF8450c Manual
 |
View all Canon Color imageCLASS MF8450c manuals
Add to My Manuals
Save this manual to your list of manuals |
Canon Color imageCLASS MF8450c manual content summary:
- Canon Color imageCLASS MF8450c | imageCLASS MF9170c/MF9150c/MF8450c Starter Guid - Page 1
Starter Guide Overview of Machine Functions Set Up the Machine to Suit Your Purposes Set Up the Machine Set Up Computers and Software Appendix Please read this guide before operating this product. After you finish reading this guide, store it in a safe place for future reference. - Canon Color imageCLASS MF8450c | imageCLASS MF9170c/MF9150c/MF8450c Starter Guid - Page 2
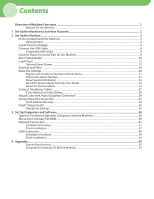
Manuals for the Machine...1 1 Set Up the Machine to Suit Your Purposes 2 2 Set Up the Machine...3 Items Included with the Machine...3 Optional Items...3 Install Toner Cartridges...4 Connect the LAN Cable...8 Compatible LAN Cables...8 Connect Power Cord and Turn on the Machine...9 Start "Setup Guide - Canon Color imageCLASS MF8450c | imageCLASS MF9170c/MF9150c/MF8450c Starter Guid - Page 3
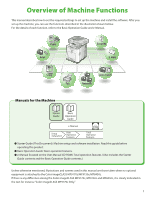
the Basic Operation Guide and e-Manual. Manuals for the Machine ● Starter Guide (This Document): Machine setup and software installation. Read this guide before operating this product. ● Basic Operation Guide: Basic operation features. ● e-Manual (located on the User Manual CD-ROM): Total operation - Canon Color imageCLASS MF8450c | imageCLASS MF9170c/MF9150c/MF8450c Starter Guid - Page 4
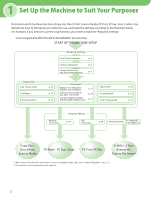
1 Set Up the Machine to Suit Your Purposes Determine which machine functions (Copy, Fax, Direct Print, Scan to Media, PC Print, PC Fax, Scan, E-Mail, I-Fax, Remote UI, Scan to File Server) you intend to use, and make the settings according to the flowchart below. For example, if you intend to use - Canon Color imageCLASS MF8450c | imageCLASS MF9170c/MF9150c/MF8450c Starter Guid - Page 5
Items Cassette Paper Drawer ● Toner Cartridge×4 (black, yellow, cyan, magenta) (Stored in the machine) ● Customize Labels ● Power Cord ● Limited Warranty Notice ● Cartridge Warranty ● Unpacking Instruction ● Starter Guide (This Document) ● Basic Operation Guide ● UFRII LT/FAX User Software - Canon Color imageCLASS MF8450c | imageCLASS MF9170c/MF9150c/MF8450c Starter Guid - Page 6
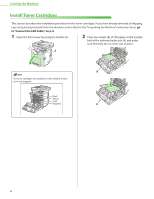
2 Set Up the Machine Install Toner Cartridges This section describes the installation procedure for the toner cartridges. If you have already removed all shipping tape and packing materials from the machine as described in the "Unpacking the Machine" instruction sheet, go to "Connect the LAN Cable - Canon Color imageCLASS MF8450c | imageCLASS MF9170c/MF9150c/MF8450c Starter Guid - Page 7
(B), as this may result in damage to the printer. 3 Hold the blue tabs on the both sides of toner cartridge, and pull it horizontally. 4 Gently rock the toner cartridge 5 or 6 times to evenly distribute the toner inside. If toner is not distributed evenly, this may result in deterioration - Canon Color imageCLASS MF8450c | imageCLASS MF9170c/MF9150c/MF8450c Starter Guid - Page 8
cold water. Do not use hot water. Doing so may cause the toner to set permanently. 7 Hook your finger into the tab and remove the packing material (A) located at right side of the toner cartridge. 9 Align the guides (A) of the toner cartridge that you want to replace with the slots (B) to which the - Canon Color imageCLASS MF8450c | imageCLASS MF9170c/MF9150c/MF8450c Starter Guid - Page 9
10 After removing all the packing materials from each toner cartridge and installing the cartridges, remove the papers on the transfer belt of the delivery feeder unit. When removing the paper, be careful not to touch or damage the transfer - Canon Color imageCLASS MF8450c | imageCLASS MF9170c/MF9150c/MF8450c Starter Guid - Page 10
2 Set Up the Machine Connect the LAN Cable Connect a LAN cable that is compatible with the LAN connector of this machine. Compatible LAN Cables A category 5 of greater twisted pair LAN cable is compatible with the machine. Connect one end to the 10Base-T/100Base-TX port on the right side of the - Canon Color imageCLASS MF8450c | imageCLASS MF9170c/MF9150c/MF8450c Starter Guid - Page 11
the Cassette Feeding Unit-AC1, see "Cassette Feeding UnitAC1 Setup Instruction.") ● is displayed: Make sure that the front cover is closed properly. (See "Install Toner Cartridges," on p. 4.) ● is displayed: Make sure that the tabs are removed - Canon Color imageCLASS MF8450c | imageCLASS MF9170c/MF9150c/MF8450c Starter Guid - Page 12
." 2 Make sure the following screen is displayed on the display, then press [OK] to proceed to the "Setup Guide." The screen explains how to operate the "Setup Guide" using the keys on the operation panel. For details on the key operation, see "Information About the Keys," above. 3 Make sure the - Canon Color imageCLASS MF8450c | imageCLASS MF9170c/MF9150c/MF8450c Starter Guid - Page 13
cartridges. If not, refer to the instruction sheet "Unpacking the Machine" and remove them all. 4 Make sure the following screen is displayed on the display, then press [OK] to proceed to the "Setup Guide." Do not connect the USB cable at this point even if you use the machine as a local printer - Canon Color imageCLASS MF8450c | imageCLASS MF9170c/MF9150c/MF8450c Starter Guid - Page 14
the following screen is displayed on the display, then press [OK] to proceed to the "Setup Guide." 4 Press [OK] to proceed to the "Setup Guide." 5 Hold the lock release lever of the side paper guides (A) and slide the guides to the mark for the size of the paper to be loaded. The side paper - Canon Color imageCLASS MF8450c | imageCLASS MF9170c/MF9150c/MF8450c Starter Guid - Page 15
details on loading paper in the stack bypass tray, see "Introduction of the Machine," in the e-Manual. - If you loaded a size and/or type of paper that is different from what you registered in the "Setup Guide," you need to change the paper settings on the machine. See "Change the Settings," on - Canon Color imageCLASS MF8450c | imageCLASS MF9170c/MF9150c/MF8450c Starter Guid - Page 16
2 Set Up the Machine 16 Use or (Scroll Wheel) to select the paper size you loaded, then press [OK]. 18 Make sure the following screen is displayed on the display. If you use inch size paper, press the left Any key to select and the paper size you want to use. 17 Use or (Scroll Wheel) - Canon Color imageCLASS MF8450c | imageCLASS MF9170c/MF9150c/MF8450c Starter Guid - Page 17
until it stops. 2 Set Up the Machine 4 Hold the lock release lever of the side paper guides (A) and slide the guides to the mark for the size of the paper to be loaded. The side paper guides move together. 2 Hold the optional paper drawer with both hands and remove it from the machine - Canon Color imageCLASS MF8450c | imageCLASS MF9170c/MF9150c/MF8450c Starter Guid - Page 18
details on loading paper in the stack bypass tray, see "Introduction of the Machine," in the e-Manual. - If you loaded a size and/or type of paper that is different from what you registered in the "Setup Guide," you need to change the paper settings on the machine. See "Change the Settings," on - Canon Color imageCLASS MF8450c | imageCLASS MF9170c/MF9150c/MF8450c Starter Guid - Page 19
paper drawer (Standard mode of copy) will be the paper drawer 1 (paper drawer). (For details on the standard mode of copy, see "Copy," in the e-Manual.) 18 Make sure the following screen is displayed on the display. Go to "Set Date and Time," on p. 18. 17 - Canon Color imageCLASS MF8450c | imageCLASS MF9170c/MF9150c/MF8450c Starter Guid - Page 20
screen. ‒ Press (Clear) to delete the entire entry. 1 Make sure the following screen displayed on the display, then press [OK] to proceed to the "Setup Guide." 2 Use - (numeric keys) to enter the date (month/day/year) and time (in 24-hour/military time format), then press [OK]. 18 - Canon Color imageCLASS MF8450c | imageCLASS MF9170c/MF9150c/MF8450c Starter Guid - Page 21
3 Make sure the screen on the left is shown on the display. Go to "Make Fax Settings," p. 20. - By default, in the menu is set to . - If you want to set to , see "Change the Settings," on p. 36. - In the next setting, - Canon Color imageCLASS MF8450c | imageCLASS MF9170c/MF9150c/MF8450c Starter Guid - Page 22
2 Set Up the Machine Make Fax Settings This section describes the fax settings in the "Setup Guide." 1 Make sure the following screen is displayed on the display. Use or (Scroll Wheel) to select or . 2 - Canon Color imageCLASS MF8450c | imageCLASS MF9170c/MF9150c/MF8450c Starter Guid - Page 23
2 Set Up the Machine Register User Telephone Number and Unit Name This section describes the procedure for registering the user telephone number and unit name. Refer to the "Information About the Keys" below. Information About the Keys Use the keys shown below to enter information in the machine. - Canon Color imageCLASS MF8450c | imageCLASS MF9170c/MF9150c/MF8450c Starter Guid - Page 24
3 Make sure the following screen is displayed on the display, then press [OK] to proceed to the "Setup Guide." 2 Use - (numeric keys) to enter your fax number (up to 20 digits). To confirm your entry, press the right Any key to select or use or (Scroll Wheel) to select register, then - Canon Color imageCLASS MF8450c | imageCLASS MF9170c/MF9150c/MF8450c Starter Guid - Page 25
5 Make sure the following screen is displayed on the display. 2 Set Up the Machine In the next setting, you will set the receive mode. About Sender Information Before sending documents, you MUST register your fax number, unit name, and the current date and time in the machine. The sender - Canon Color imageCLASS MF8450c | imageCLASS MF9170c/MF9150c/MF8450c Starter Guid - Page 26
The telephone with built‑in answering machine rings and records voice messages. Rings for every call, whether it is a fax call or a voice call. For a fax call, you have to manually activate the machine to receive the fax. ˔When Receiving FAX The external phone - Canon Color imageCLASS MF8450c | imageCLASS MF9170c/MF9150c/MF8450c Starter Guid - Page 27
Receive Modes," on p. 24. 1 Make sure the screen on the left side is displayed on the display, then press [OK] to proceed to the "Setup Guide." 2 Use or (Scroll Wheel) to select or for the question on the screen, the press [OK]. YES NO Go to "Connect Telephone Cables - Canon Color imageCLASS MF8450c | imageCLASS MF9170c/MF9150c/MF8450c Starter Guid - Page 28
and pressing a two-digit remote reception ID (the default setting is 25). For details, see "Fax," in the e-Manual. - Your telephone with select . - Voice mail is not supported with . - DRPD (Distinctive Ring Pattern Detection) service assigns two or more telephone numbers with - Canon Color imageCLASS MF8450c | imageCLASS MF9170c/MF9150c/MF8450c Starter Guid - Page 29
is displayed on the display, then press [OK] to proceed to the "Setup Guide." When mode The other receive modes 2 Check the socket on the side of the main unit, then press [OK] to proceed to the "Setup Guide." 3 Connect the supplied telephone cable to the telephone line jack (A) on the - Canon Color imageCLASS MF8450c | imageCLASS MF9170c/MF9150c/MF8450c Starter Guid - Page 30
pulse dialing, follow the procedure below after you finish the "Setup Guide," and change the telephone line type setting on the machine to Line Type Selection>, then press [OK]. 7 Use or (Scroll Wheel) to select , then press [OK]. 8 Use or (Scroll Wheel) to select telephone line type, - Canon Color imageCLASS MF8450c | imageCLASS MF9170c/MF9150c/MF8450c Starter Guid - Page 31
less complete adjustment between regular full corrections. 1 Make sure the following screen is displayed on the display, then press [OK] to proceed to the "Setup Guide." 2 Make sure the following screen is displayed on the display, then press [OK] to proceed to the "Setup - Canon Color imageCLASS MF8450c | imageCLASS MF9170c/MF9150c/MF8450c Starter Guid - Page 32
2 Set Up the Machine 3 Use or (Scroll Wheel) to select or , then press [OK]. 4 Make sure the following screen is displayed on the display, then press [OK] to print the first test page. - It is recommended that you select - Canon Color imageCLASS MF8450c | imageCLASS MF9170c/MF9150c/MF8450c Starter Guid - Page 33
setting, you will set the network connection. If you do not set the network connection, select , then go to "Finish 'Setup Guide'," p. 35. Place the test print face down on the platen glass, with the black bands along the top left edge of the platen glass. Stack - Canon Color imageCLASS MF8450c | imageCLASS MF9170c/MF9150c/MF8450c Starter Guid - Page 34
2 Set Up the Machine Set Up Network Connection To use the machine by connecting to the network, you must set up the IP address. An IP (Internet Protocol) address is an identification number assigned to each individual computer connected to the Internet. To use the following functions, you must set - Canon Color imageCLASS MF8450c | imageCLASS MF9170c/MF9150c/MF8450c Starter Guid - Page 35
OK]. (Go to "Finish 'Setup Guide'," on p. 35.) - If the LAN cable is not connected to the machine, a screen instructing you to connect the LAN cable will press [OK] to proceed to the "Setup Guide." The setting for IPv6 is not supported with the "Setup Guide." When you want to use the machine on - Canon Color imageCLASS MF8450c | imageCLASS MF9170c/MF9150c/MF8450c Starter Guid - Page 36
displayed on the display, then press [OK] to proceed to the "Setup Guide." 6 Make sure the following screen is displayed on the display. If the on the display, then press [OK] to proceed to the "Setup Guide." Go to "Finish 'Setup Guide'," on p. 35. If there are any unestablished items, a screen - Canon Color imageCLASS MF8450c | imageCLASS MF9170c/MF9150c/MF8450c Starter Guid - Page 37
For more information on this setting, see "Network Settings," in the e-Manual. Finish "Setup Guide" All the settings with the "Setup Guide" are complete. Follow the procedure below to finish the "Setup Guide." After finishing the "Setup Guide," you need to set up the computer and software for the - Canon Color imageCLASS MF8450c | imageCLASS MF9170c/MF9150c/MF8450c Starter Guid - Page 38
When you change the settings on the machine after finishing the "Setup Guide," refer to the following items. ● Paper Size/Type: (Main Menu return to the Main Menu screen. (See "Introduction of the Machine," in the e-Manual.) ● Date and Time: (Main Menu) → → - Canon Color imageCLASS MF8450c | imageCLASS MF9170c/MF9150c/MF8450c Starter Guid - Page 39
2 Set Up the Machine ● Network (Manual): (See "Set IP Address Manually," on p. 35.) ● Restart the "Setup Guide": → → → . (See "Introduction of the Machine," in the e-Manual.) The machine may enter or the Standby mode (default - Canon Color imageCLASS MF8450c | imageCLASS MF9170c/MF9150c/MF8450c Starter Guid - Page 40
. PC Print → "Print," in the e-Manual Remote UI → "Settings from a PC," in the e-Manual PC Fax → "Fax," in the e-Manual Scan → "Scan," in the e-Manual E-Mail/I-Fax → "E-mail"/"Fax," in the e-Manual Scan to File Server → "Scan," in the e-Manual USB Connection (For details about the set - Canon Color imageCLASS MF8450c | imageCLASS MF9170c/MF9150c/MF8450c Starter Guid - Page 41
PCL5c, and PCL6 drivers. The PCL5c printer driver is for color printers, while the PCL6 printer driver is for black-andwhite printer. PCL6 is an advanced version of PCL5c and offers superior printing quality and speed. This machine supports the PCL5c and PCL6 printer drivers. Color Network ScanGear - Canon Color imageCLASS MF8450c | imageCLASS MF9170c/MF9150c/MF8450c Starter Guid - Page 42
this program. Printer Driver Installation Guide The Printer Driver Installation Guide describes UFR II driver installation, updating shared printer information, uninstallation, configuration, and printing. Canon Products Supported by UFR II Driver The Canon Products Supported by UFR II - Canon Color imageCLASS MF8450c | imageCLASS MF9170c/MF9150c/MF8450c Starter Guid - Page 43
• Make sure an IP address is assigned to the machine. (See "Network Settings," in the e-Manual.) Installation Procedure 3 4 1 Connect the machine to the network correctly, and confirm that the power is Check the boxes next to the UFR II Printer Driver, FAX Driver and Color Network ScanGear. 41 - Canon Color imageCLASS MF8450c | imageCLASS MF9170c/MF9150c/MF8450c Starter Guid - Page 44
and Print) environment, it is necessary to install the Canon Driver Information Assist Service in the server PC to set up the printer configuration automatically or use the Job Accounting feature. - If the Canon Driver Information Assist Service is already installed on your computer, this screen is - Canon Color imageCLASS MF8450c | imageCLASS MF9170c/MF9150c/MF8450c Starter Guid - Page 45
and Print) environment, it is necessary to install the Canon Driver Information Assist Service in the server PC to set up the printer configuration automatically or use the Job Accounting feature. - If the Canon Driver Information Assist Service is already installed on your computer, this screen is - Canon Color imageCLASS MF8450c | imageCLASS MF9170c/MF9150c/MF8450c Starter Guid - Page 46
CD-ROM. The Color Network ScanGear installation screen appears. Follow the on-screen instructions. 26 - If you are using Color imageCLASS MF9150c or MF8450c, installation is complete. - If you want to install PCL Driver (Color imageCLASS MF9170c Only), go to the next step (step 29). 29 Insert - Canon Color imageCLASS MF8450c | imageCLASS MF9170c/MF9150c/MF8450c Starter Guid - Page 47
system equipped with Windows Firewall, the following message box may appear. If you want to use Canon Driver Information Assist Service, click [Yes]. If you select [No], you cannot use Canon Driver Information Assist Service. 38 Select [PCL5e/5c Printer Driver] or [PCL6 Printer Driver]. 45 - Canon Color imageCLASS MF8450c | imageCLASS MF9170c/MF9150c/MF8450c Starter Guid - Page 48
3 Set Up Computers and Software 39 43 44 40 41 42 45 Remove the PCL User Software CDROM. Installation is complete. 46 - Canon Color imageCLASS MF8450c | imageCLASS MF9170c/MF9150c/MF8450c Starter Guid - Page 49
, click [Start] → [Settings] → [Control Panel] → double-click [Printers]. Verify that the corresponding printer driver icon is displayed. 2 Set your machine as the default printer. Verify that printer icon for this machine. Select [Set as Default Printer] from the [File] menu. 3 Verify that [Color - Canon Color imageCLASS MF8450c | imageCLASS MF9170c/MF9150c/MF8450c Starter Guid - Page 50
(PnP)> → → /. After changing the machine settings, proceed to step 4 to install the driver using the same procedure as for the UFR II Printer Driver. Also refer to the PCL Driver installation Guide (located on the PCL CD-ROM). - If the amount of free disk space is insufficient to - Canon Color imageCLASS MF8450c | imageCLASS MF9170c/MF9150c/MF8450c Starter Guid - Page 51
3 Set Up Computers and Software 4 8 11 9 5 Remove the attachment (A) that covers the USB port on the back of the machine. 10 Remove the attachment (A) by pulling the strap. 6 12 If the dialog box shown above appears, press [Retry] to continue the installation. 7 Connect the machine and - Canon Color imageCLASS MF8450c | imageCLASS MF9170c/MF9150c/MF8450c Starter Guid - Page 52
and Print) environment, it is necessary to install the Canon Driver Information Assist Service in the server PC to set up the printer configuration automatically or use the Job Accounting feature. - If the Canon Driver Information Assist Service is already installed on your computer, this screen is - Canon Color imageCLASS MF8450c | imageCLASS MF9170c/MF9150c/MF8450c Starter Guid - Page 53
28 The Color Network ScanGear installation screen appears. Follow the on-screen instructions. 26 Remove the UFRII LT/FAX User Software CD-ROM. - If MF9150c or MF8450c, installation is complete. - If you want to install PCL Driver (Color imageCLASS MF9170c Only), go to the next step (step 29). 29 - Canon Color imageCLASS MF8450c | imageCLASS MF9170c/MF9150c/MF8450c Starter Guid - Page 54
exe]). 31 33 34 Select the PCL Printer Driver. 35 52 36 - If you are using a shared printer in the Print Server (Point and Print) environment, it is necessary to install the Canon Driver Information Assist Service in the server PC to set up the printer configuration automatically or use the Job - Canon Color imageCLASS MF8450c | imageCLASS MF9170c/MF9150c/MF8450c Starter Guid - Page 55
38 42 39 43 Select the USB port you want to use from the [Port] drop-down list. If you want to add a port, click [Add Port] and then select the printer port that you want to add. 40 44 41 45 3 Set Up Computers and Software 46 Remove the PCL User Software CDROM. Installation is complete. 53 - Canon Color imageCLASS MF8450c | imageCLASS MF9170c/MF9150c/MF8450c Starter Guid - Page 56
, click [Start] → [Settings] → [Control Panel] → double-click [Printers]. Verify that the corresponding printer driver icon is displayed. 2 Set your machine as the default printer. Verify that printer icon for this machine. Select [Set as Default Printer] from the [File] menu. 3 Verify that [Color - Canon Color imageCLASS MF8450c | imageCLASS MF9170c/MF9150c/MF8450c Starter Guid - Page 57
on the CD-ROM via your computer screen. The e-Manual describes all of the functions and troubleshooting for the machine. Follow the instructions below to use the User Manual CD-ROM (e-Manual). System Requirements The User Manual CD-ROM (e-Manual) can be used in the following system environments - Canon Color imageCLASS MF8450c | imageCLASS MF9170c/MF9150c/MF8450c Starter Guid - Page 58
Explorer for Windows XP, ActiveX blocks pop-ups in the background. If the e-Manual is not displayed properly, look for an information bar at the top of functions, such as the maintenance and troubleshooting topics. I [Office Locations] Click to display Canon contact details in a separate window. - Canon Color imageCLASS MF8450c | imageCLASS MF9170c/MF9150c/MF8450c Starter Guid - Page 59
problem with your machine and you cannot solve it even after referring to the manuals or online help, please contact our Canon Authorized Service Facilities or the Canon in this document is subject to change without notice. CANON INC. MAKES NO WARRANTY OF ANY KIND WITH REGARD TO THIS MATERIAL, EITHER - Canon Color imageCLASS MF8450c | imageCLASS MF9170c/MF9150c/MF8450c Starter Guid - Page 60
CHINA CO., LTD. 15F Jinbao Building No.89 Jinbao Street, Dongcheng District, Beijing 100005, China CANON SINGAPORE PTE. LTD. 1 HarbourFront Avenue #04-01 Keppel Bay Tower, Singapore 098632 CANON HONGKONG CO., LTD. 19/F., The Metropolis Tower, 10 Metropolis Drive, Hunghom, Kowloon, Hong Kong FT5
-
 1
1 -
 2
2 -
 3
3 -
 4
4 -
 5
5 -
 6
6 -
 7
7 -
8
-
9
-
10
-
11
-
12
-
13
-
14
-
15
-
16
-
17
-
18
-
19
-
20
-
21
-
22
-
23
-
24
-
25
-
26
-
27
-
28
-
29
-
30
-
31
-
32
-
33
-
34
-
35
-
36
-
37
-
38
-
39
-
40
-
41
-
42
-
43
-
44
-
45
-
46
-
47
-
48
-
49
-
50
-
51
-
52
-
53
-
54
-
55
-
56
-
57
-
58
-
59
-
60
 |
 |
Starter Guide
Overview of Machine Functions
Set Up the Machine to Suit Your Purposes
Set Up the Machine
Set Up Computers and Software
Appendix
Please read this guide before operating this product.
After you finish reading this guide, store it in a safe place for future reference.