Canon EOS Digital Rebel XTi EF-S 18-55 Kit Digital Photo Professional Instruct - Page 39
Editing While Comparing with the Original Image, Changing How the Window is Split
 |
View all Canon EOS Digital Rebel XTi EF-S 18-55 Kit manuals
Add to My Manuals
Save this manual to your list of manuals |
Page 39 highlights
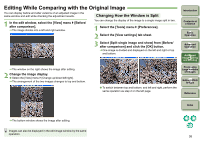
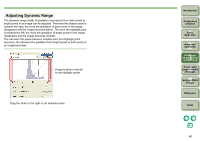
Editing While Comparing with the Original Image You can display before and after versions of an adjusted image in the same window and edit while checking the adjustment results. 1 In the edit window, select the [View] menu ` [Before/ after comparison]. ¿ The image divides into a left and right window. Changing How the Window is Split You can change the display of the image to a single image split in two. 1 Select the [Tools] menu ` [Preferences]. 2 Select the [View settings] tab sheet. 3 Select [Split single image and show] from [Before/ after comparison] and click the [OK] button. ¿ One image is divided and displayed on the left and right or top and bottom. Introduction Contents at a Glance 1Basic Operation 2Advanced Operation 3Advanced Image Editing and Printing ¿ The window on the right shows the image after editing. 2 Change the image display. O Select the [View] menu ` [Change up/down/left/right]. ¿ The arrangement of the two images changes to top and bottom. 4 Processing Large Numbers of Images O To switch between top and bottom, and left and right, perform the same operation as step 2 on the left page. 5 Editing JPEG Images Reference Index ¿ The bottom window shows the image after editing. Images can also be displayed in the edit image window by the same operation. 38
-
 1
1 -
2
-
3
-
4
-
5
-
6
-
7
-
8
-
9
-
10
-
11
-
12
-
13
-
14
-
15
-
16
-
17
-
18
-
19
-
20
-
21
-
22
-
23
-
24
-
25
-
26
-
27
-
28
-
29
-
30
-
31
-
32
-
33
-
 34
34 -
 35
35 -
 36
36 -
 37
37 -
 38
38 -
 39
39 -
 40
40 -
 41
41 -
 42
42 -
 43
43 -
 44
44 -
45
-
46
-
47
-
48
-
49
-
50
-
51
-
52
-
53
-
54
-
55
-
56
-
57
-
58
-
59
-
60
-
61
-
62
-
63
-
64
-
65
-
66
-
67
-
68
-
69
-
70
-
71
-
72
-
73
-
74
-
75
-
76
-
77
-
78
-
79
-
80
-
81
-
82
-
83
-
84
-
85
-
86
-
87
-
88
-
89
-
90
-
91
-
92
-
93
-
94
-
95
 |
 |
