Canon MF4690 Scanner Driver Guide MF4600 Series - Page 57
Scanning from the [Windows FAX & Scan] Dialog Box (Windows Vista Only) - support
 |
UPC - 013803076820
View all Canon MF4690 manuals
Add to My Manuals
Save this manual to your list of manuals |
Page 57 highlights
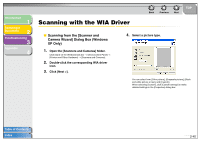
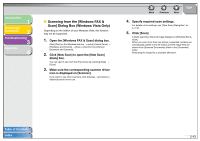
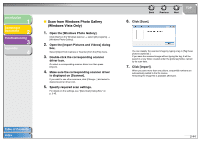
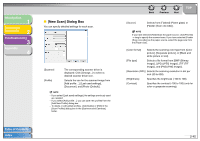
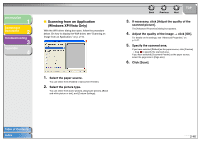
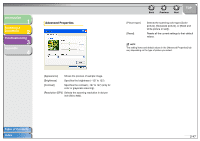
Introduction 1 Scanning a Document 2 Troubleshooting 3 Appendix 4 ■ Scanning from the [Windows FAX & Scan] Dialog Box (Windows Vista Only) Depending on the edition of your Windows Vista, this function may not be supported. 1. Open the [Windows FAX & Scan] dialog box. Click [Start] on the Windows task bar → select [Control Panel] → [Hardware and Sounds] → [Scan a document or picture] in [Scanners and Cameras]. 2. Click [New Scan] to open the [New Scan] dialog box. You can open it also from the [File] menu by selecting [New] → [Scan]. 3. Make sure the corresponding scanner driver icon is displayed on [Scanner]. If you want to use other scanners, click [Change...] and select a desired scanner driver icon. Back Previous Next TOP 4. Specify required scan settings. For details on the settings, see "[New Scan] Dialog Box," on p. 2-45. 5. Click [Scan]. It starts scanning. Scanned image displays on [Windows Fax & Scan]. When you scan more than one picture, sequential numbers are automatically added to the file names and the image files are saved in the [Scanned Documents] folder in the [Document] folder. Renaming the image file is available afterward. Table of Contents Index 2-43
-
 1
1 -
2
-
3
-
4
-
5
-
6
-
7
-
8
-
9
-
10
-
11
-
12
-
13
-
14
-
15
-
16
-
17
-
18
-
19
-
20
-
21
-
22
-
23
-
24
-
25
-
26
-
27
-
28
-
29
-
30
-
31
-
32
-
33
-
34
-
35
-
36
-
37
-
38
-
39
-
40
-
41
-
42
-
43
-
44
-
45
-
46
-
47
-
48
-
49
-
50
-
51
-
 52
52 -
 53
53 -
 54
54 -
 55
55 -
 56
56 -
 57
57 -
 58
58 -
 59
59 -
 60
60 -
 61
61 -
 62
62 -
63
-
64
-
65
-
66
-
67
-
68
-
69
-
70
-
71
-
72
-
73
-
74
-
75
-
76
-
77
-
78
-
79
-
80
 |
 |