Canon MF4690 Scanner Driver Guide MF4600 Series - Page 60
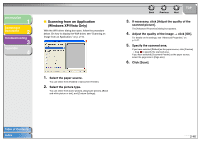
Scanning from an Application (Windows XP/Vista Only), Click [Scan].
 |
UPC - 013803076820
View all Canon MF4690 manuals
Add to My Manuals
Save this manual to your list of manuals |
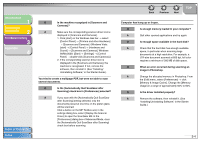
Page 60 highlights
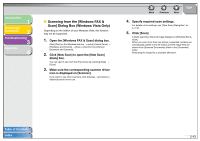
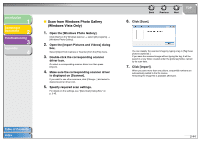
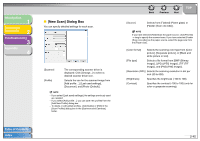
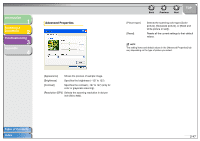
Introduction 1 Scanning a Document 2 Troubleshooting 3 Appendix 4 ■ Scanning from an Application (Windows XP/Vista Only) With the WIA driver dialog box open, follow the procedure below. On how to display the WIA driver, see "Scanning an Image from an Application," on p. 2-15. 1. Select the paper source. You can select from [Flatbed] or [Document Feeder]. 2. Select the picture type. You can select from [Color picture], [Grayscale picture], [Black and white picture or text], and [Custom Settings]. Back Previous Next TOP 3. If necessary, click [Adjust the quality of the scanned picture]. The [Advanced Properties] dialog box appears. 4. Adjust the quality of the image → click [OK]. For details on the settings, see "Advanced Properties," on p. 2-47. 5. Specify the scanned area. If you have selected [Flatbed] as the paper source, click [Preview] → drag to specify the scanned area. If you have selected [Document Feeder] as the paper source, select the page size in [Page size]. 6. Click [Scan]. Table of Contents Index 2-46
-
 1
1 -
2
-
3
-
4
-
5
-
6
-
7
-
8
-
9
-
10
-
11
-
12
-
13
-
14
-
15
-
16
-
17
-
18
-
19
-
20
-
21
-
22
-
23
-
24
-
25
-
26
-
27
-
28
-
29
-
30
-
31
-
32
-
33
-
34
-
35
-
36
-
37
-
38
-
39
-
40
-
41
-
42
-
43
-
44
-
45
-
46
-
47
-
48
-
49
-
50
-
51
-
52
-
53
-
54
-
 55
55 -
 56
56 -
 57
57 -
 58
58 -
 59
59 -
 60
60 -
 61
61 -
 62
62 -
 63
63 -
 64
64 -
 65
65 -
66
-
67
-
68
-
69
-
70
-
71
-
72
-
73
-
74
-
75
-
76
-
77
-
78
-
79
-
80
 |
 |
