Canon MF7280 imageCLASS MF7280 Easy Operation Guide - Page 10
Sending a Fax
 |
UPC - 013803056129
View all Canon MF7280 manuals
Add to My Manuals
Save this manual to your list of manuals |
Page 10 highlights
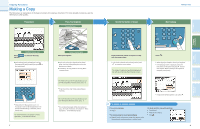
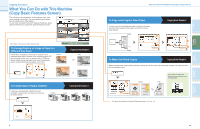
Send Functions Sending a Fax The following is an explanation of the basic procedure for sending a fax. For more information on the settings, see the references in each step. Preparations Place Your Originals Placed in the feeder Send Basic Features screen Press SEND to switch to the fax mode. If Department ID Management is set, it is necessary to enter an ID and password. (If an optional card reader is attached, insert a control card.) For more information, see Chapter 2, "Basic Operations," in the Reference Guide. Placed on the platen glass Place your originals. For bound or irregular sized originals, place them on the platen glass. Specifying the Fax Number Using an Address Book You can also specify the fax destination using an address book if you have registered a fax destination in the address book in advance. 2 1 For instructions on registering destinations in the address 3 book, see p.43. Specifying the Fax Number Using a One-touch Dialing You can also specify the fax destination using a one- touch dialing if you have registered a fax destination in the address book in advance. 2 1 For more information on registering destinations for the one- 3 touch dialing, see p.44. 17 Sending a Fax Enter the Fax Number ABC DEF 123 Serial No. Reset GHI JKL MNO 456 PQRS 7 TUV WXYZ 89 Additional Functions Display Contrast 0 Log In/Out Clear Stop Start Enter the fax number manually. To specify two or more destinations, use the Address Book, one-touch buttons, or favorites buttons. You can enter one destination using the numeric keys. Start Sending the Fax PQRS 7 TUV WXYZ 89 itional ctions Display Contrast 0 Log In/Out Clear Stop Start Processing/ Data Error Power Press . When scanning is complete, remove your originals. By pressing [One-touch Buttons], you can also specify destinations you have registered in advance. By pressing [New Address], you can enter one new destination. By pressing [Address Book], you can also specify destinations you have registered in advance. For more information on registering fax destinations, see p.43. For information on useful fax features, see p. 21. To send a clear fax, set a high resolution. You can set the resolution by pressing [Scan Settings]. 2 1 18 Other Useful Features Additional Functions Send Functions Copying Functions Preface
-
 1
1 -
2
-
3
-
4
-
 5
5 -
 6
6 -
 7
7 -
 8
8 -
 9
9 -
 10
10 -
 11
11 -
 12
12 -
 13
13 -
 14
14 -
 15
15 -
16
-
17
-
18
-
19
-
20
-
21
-
22
-
23
-
24
-
25
-
26
-
27
-
28
 |
 |
