Canon MF7280 imageCLASS MF7280 Easy Operation Guide - Page 11
Sending a Document
 |
UPC - 013803056129
View all Canon MF7280 manuals
Add to My Manuals
Save this manual to your list of manuals |
Page 11 highlights
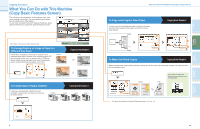
Send Functions Sending a Document Send is function to send a document via a Internet network. The following is an explanation of the basic procedure for scanning an original to a file server. For more information on the settings, see the references in each step. Diverse Sending Methods Place Your Originals Placed in the feeder You can easily scan paper documents and send them to one or multiple recipients through e-mail, or I-fax, bringing to your work environment increased efficiency in the arena of document exchange. I-fax enables you to send a fax or e-mail via an Internet network. The ability to send documents to FTP and SMB file servers also serves to help digitize paper documents for convenient data access and management. 19 Placed on the platen glass Press SEND to switch to the send mode. Place your originals. For instructions on sending a document, see Chapter 4, "Sending Documents," in the Sending Guide. You can register destinations that you send to often, in Address Book or One-touch Buttons. For instructions on registering destinations for I-fax or e-mail in the address book, see p.43. For instructions on registering destinations for I-fax or e-mail in the one-touch dialing, see p.44. For instructions on registering file paths in the address book or the one-touch dialing, see Chapter 8, "Storing/Editing Address Book Settings," in the Reference Guide. Sending a document Specify Scan Settings 1 2 3 Select a folder to send. This procedure is specifying a file path from Address Book. You can specify various scan settings from the Scan screen. For more information on scan settings, see p.21 and p.24. Specifying new file path by using the Keyboard 1 2 Start Scanning PQRS 7 TUV WXYZ 89 itional ctions Display Contrast 0 Log In/Out Clear Stop Start Processing/ Data Error Power Press . When scanning is complete, remove your originals. Specifying new flie path by using the Browse Key 1 2 Specify 'User' and 'Password' when the folder setting up a password. If you do not know the password, consult your network administrator. For instructions on specifying a file path, see Chapter 2, "Basic Sending Methods," in the Sending Guide. 3 If a password has been set for the folder, the Enter Network Password screen is displayed. If you do not know the password, consult your network administrator. 20 Other Useful Features Additional Functions Send Functions Copying Functions Preface
-
 1
1 -
2
-
3
-
4
-
5
-
 6
6 -
 7
7 -
 8
8 -
 9
9 -
 10
10 -
 11
11 -
 12
12 -
 13
13 -
 14
14 -
 15
15 -
 16
16 -
17
-
18
-
19
-
20
-
21
-
22
-
23
-
24
-
25
-
26
-
27
-
28
 |
 |
