Canon MultiPASS C555 User Manual - Page 179
Understanding the Menu System, Accessing the Menus
 |
View all Canon MultiPASS C555 manuals
Add to My Manuals
Save this manual to your list of manuals |
Page 179 highlights
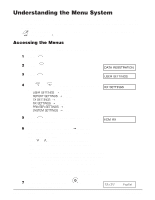
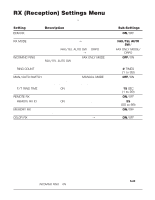
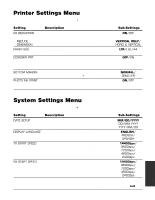
Understanding the Menu System The MultiPASS menu system allows you to customize the way your unit operates. It consists of six menus, each containing settings that control different functions of your MultiPASS. n If your MultiPASS is connected to a PC, we recommend you use the MultiPASS Suite to adjust settings. (1 p. 3-2) Accessing the Menus Follow this procedure to access the different menus: Function 1 Press . 01 2 Press . Data Registration Set 3 Press . DATA REGSTRATION USER SETTINGS 08 02 4 Use or to select the menu you want. • You can select from the following: Ex: RX SETTINGS -USER SETTINGS (1 p. 14-3) -REPORT SETTINGS (1 p. 14-4) -TX SETTINGS (1 p. 14-5) -RX SETTINGS (1 p. 14-6) -PRINTER SETTINGS (1 p. 14-7) -SYSTEM SETTINGS (1 p. 14-7) Set 5 Press to access the settings under the menu you selected. Ex: ECM RX 6 Refer to the appropriate table (2 following pages) and use these guidelines to select and register settings: „ Use d or u to move through the settings. „ To register a setting or access sub-settings, press Set. „ To return to a previous level, press Data Registration. • In order for your settings to be registered, be sure to press Set after making a selection or entering information. • If at any stage you wish to return to standby mode, press Stop. • If you pause for more than 60 seconds while accessing a menu, the unit will automatically return to standby mode. Stop 7 When you are finished, press to return to standby mode. 14-2 Summary of Settings Ex: 12/27 FaxTel Chapter 14
-
 1
1 -
2
-
3
-
4
-
5
-
6
-
7
-
8
-
9
-
10
-
11
-
12
-
13
-
14
-
15
-
16
-
17
-
18
-
19
-
20
-
21
-
22
-
23
-
24
-
25
-
26
-
27
-
28
-
29
-
30
-
31
-
32
-
33
-
34
-
35
-
36
-
37
-
38
-
39
-
40
-
41
-
42
-
43
-
44
-
45
-
46
-
47
-
48
-
49
-
50
-
51
-
52
-
53
-
54
-
55
-
56
-
57
-
58
-
59
-
60
-
61
-
62
-
63
-
64
-
65
-
66
-
67
-
68
-
69
-
70
-
71
-
72
-
73
-
74
-
75
-
76
-
77
-
78
-
79
-
80
-
81
-
82
-
83
-
84
-
85
-
86
-
87
-
88
-
89
-
90
-
91
-
92
-
93
-
94
-
95
-
96
-
97
-
98
-
99
-
100
-
101
-
102
-
103
-
104
-
105
-
106
-
107
-
108
-
109
-
110
-
111
-
112
-
113
-
114
-
115
-
116
-
117
-
118
-
119
-
120
-
121
-
122
-
123
-
124
-
125
-
126
-
127
-
128
-
129
-
130
-
131
-
132
-
133
-
134
-
135
-
136
-
137
-
138
-
139
-
140
-
141
-
142
-
143
-
144
-
145
-
146
-
147
-
148
-
149
-
150
-
151
-
152
-
153
-
154
-
155
-
156
-
157
-
158
-
159
-
160
-
161
-
162
-
163
-
164
-
165
-
166
-
167
-
168
-
169
-
170
-
171
-
172
-
173
-
 174
174 -
 175
175 -
 176
176 -
 177
177 -
 178
178 -
 179
179 -
 180
180 -
 181
181 -
 182
182 -
 183
183 -
 184
184 -
185
-
186
-
187
-
188
-
189
-
190
-
191
-
192
-
193
-
194
-
195
-
196
-
197
-
198
-
199
-
200
-
201
-
202
-
203
-
204
-
205
-
206
-
207
-
208
-
209
-
210
-
211
-
212
 |
 |