Canon PIXMA MP460 User's Guide - Page 94
Align the FINE Cartridge.
 |
View all Canon PIXMA MP460 manuals
Add to My Manuals
Save this manual to your list of manuals |
Page 94 highlights
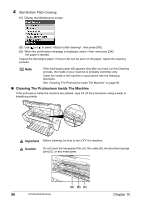
3 Align the FINE Cartridge. (1) Beginning from column A on the printout, fill in the appropriate circles ( dark pencil to select the most solid image (1) ) with a (2) (3) (1) Column A (2) Good example (Most solid box) (3) Bad example (Least solid box) (2) Load the checked sheet on the Platen Glass. When loading the checked sheet, place the front side down, and align the upper left corner of the sheet with the alignment mark on the lower right corner of the Platen Glass. (3) Press [OK]. The machine scans the pattern and aligns the FINE Cartridge automatically. Note If you select in step 2-(2), the machine prints the current FINE Cartridge Alignment setting. 92 Routine Maintenance Chapter 10
-
 1
1 -
2
-
3
-
4
-
5
-
6
-
7
-
8
-
9
-
10
-
11
-
12
-
13
-
14
-
15
-
16
-
17
-
18
-
19
-
20
-
21
-
22
-
23
-
24
-
25
-
26
-
27
-
28
-
29
-
30
-
31
-
32
-
33
-
34
-
35
-
36
-
37
-
38
-
39
-
40
-
41
-
42
-
43
-
44
-
45
-
46
-
47
-
48
-
49
-
50
-
51
-
52
-
53
-
54
-
55
-
56
-
57
-
58
-
59
-
60
-
61
-
62
-
63
-
64
-
65
-
66
-
67
-
68
-
69
-
70
-
71
-
72
-
73
-
74
-
75
-
76
-
77
-
78
-
79
-
80
-
81
-
82
-
83
-
84
-
85
-
86
-
87
-
88
-
 89
89 -
 90
90 -
 91
91 -
 92
92 -
 93
93 -
 94
94 -
 95
95 -
 96
96 -
 97
97 -
 98
98 -
 99
99 -
100
-
101
-
102
-
103
-
104
-
105
-
106
-
107
-
108
-
109
-
110
-
111
-
112
-
113
-
114
-
115
-
116
-
117
-
118
-
119
-
120
-
121
-
122
-
123
-
124
-
125
-
126
-
127
-
128
-
129
-
130
-
131
-
132
-
133
-
134
-
135
-
136
-
137
-
138
-
139
-
140
 |
 |

92
Chapter 10
Routine Maintenance
3
Align the FINE Cartridge.
(1)
Beginning from column A on the printout, fill in the appropriate circles (
) with a
dark pencil to select the most solid image
(1)
Column A
(2)
Good example (Most solid box)
(3)
Bad example (Least solid box)
(2)
Load the checked sheet on the Platen Glass.
When loading the checked sheet, place the front side down, and align the upper left
corner of the sheet with the alignment mark on the lower right corner of the Platen Glass.
(3)
Press [OK].
The machine scans the pattern and aligns the FINE Cartridge automatically.
Note
If you select <Head alignment print> in step 2-(2), the machine prints the
current FINE Cartridge Alignment setting.
(1)
(2)
(3)