Canon PIXMA MP810 Quick Start Guide - Page 7
Other Buttons, NAVI Button, Function Buttons - ink
 |
View all Canon PIXMA MP810 manuals
Add to My Manuals
Save this manual to your list of manuals |
Page 7 highlights
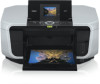
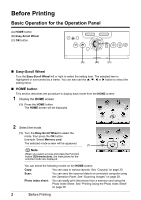
Settings: Easy photo reprint: Film print: Memory card: You can perform the maintenance or change the various settings of the machine. See "When Printing Becomes Faint or Colors Are Incorrect" on page 54, "Cleaning Your Machine" on page 67, or "Changing the Machine Settings" in the User's Guide on-screen manual. You can scan printed photos and then print them. See "Photo Printing from Photo or Film" on page 37. You can scan the image data on the 35 mm film strips and slides and then print them. See "Photo Printing from Photo or Film" on page 37. Print the photo data stored in a memory card of a digital camera. See "Printing from a Memory Card" on page 32. „ Other Buttons (A) NAVI button (B) Function buttons (A) (B) z NAVI Button You can easily reach the function that you want to perform. Select what you want to do on the navigation menu, then press the OK button. z Function Buttons Two Function buttons enable you to select menus displayed at the bottom of the LCD. The screen that appears when you press a Function button depends on the screen that is displayed and which Function button you press. (A) (B) (A) Function button (f1): When you press the Function button (f1/Remaining ink vol) on the HOME screen, the remaining ink volume screen is displayed. (B) Function button (f2): When you press the Function button (f2/Introduction) on the HOME screen, the introductions for the selected mode functions are displayed. When you press them on screens other than the HOME screen, an operation procedure or menus is displayed. Before Printing 3
-
 1
1 -
 2
2 -
 3
3 -
 4
4 -
 5
5 -
 6
6 -
 7
7 -
 8
8 -
 9
9 -
 10
10 -
 11
11 -
 12
12 -
13
-
14
-
15
-
16
-
17
-
18
-
19
-
20
-
21
-
22
-
23
-
24
-
25
-
26
-
27
-
28
-
29
-
30
-
31
-
32
-
33
-
34
-
35
-
36
-
37
-
38
-
39
-
40
-
41
-
42
-
43
-
44
-
45
-
46
-
47
-
48
-
49
-
50
-
51
-
52
-
53
-
54
-
55
-
56
-
57
-
58
-
59
-
60
-
61
-
62
-
63
-
64
-
65
-
66
-
67
-
68
-
69
-
70
-
71
-
72
-
73
-
74
-
75
-
76
-
77
-
78
-
79
-
80
-
81
-
82
-
83
-
84
-
85
-
86
-
87
-
88
-
89
-
90
-
91
-
92
-
93
-
94
-
95
-
96
-
97
-
98
-
99
-
100
-
101
-
102
-
103
-
104
-
105
-
106
-
107
-
108
-
109
-
110
-
111
-
112
 |
 |
