Canon PIXMA MP810 Quick Start Guide - Page 86
Maintenance, View Printer Status, Display Print Queue, Cancel All Documents, Purge Print Documents - mac
 |
View all Canon PIXMA MP810 manuals
Add to My Manuals
Save this manual to your list of manuals |
Page 86 highlights
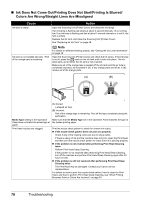
Cause Action Ink tank not installed in proper position. Open the Scanning Unit (Printer Cover) and check the ink lamps. If there is still sufficient ink but its ink lamp is flashing red, an ink tank may be installed in a wrong position. Confirm that the ink tanks are installed in the appropriate positions. See "Replacing an Ink Tank" on page 48. Ink tank is not installed securely. / Part of the orange tape is remaining. Open the Scanning Unit (Printer Cover) and check the ink lamps. If the ink lamp is not lit, press the mark on the ink tank until it clicks into place. The ink lamp lights up red when the ink tank is fully inserted. Make sure all of the orange tape is peeled off the ink tank and the air hole is completely exposed, as illustrated in (A). If any orange parts are left as in (B), remove all of the orange parts. (A) (B) Unnecessary print jobs are left in queue. / Computer problems. (A) Correct L-shaped air hole. (B) Incorrect Part of the orange tape is remaining. Peel off the tape completely along the perforation. Restarting your computer may solve the problem. If there are any unnecessary print jobs, follow the procedure below to delete them. (1)Open the printer properties dialog box. Refer to "Opening the Printer Properties Dialog Box Directly from the Start Menu" in "Opening the Printer Properties Dialog Box (Windows)" of the User's Guide on-screen manual. (2)Click the Maintenance tab and then View Printer Status. (3)Click Display Print Queue. (4)Select Cancel All Documents (Purge Print Documents in Windows Me or Windows 98) on the Printer menu. You may not be able to select individual print jobs in Windows XP or Windows 2000. (5)When the confirmation message is displayed, click Yes. The print jobs are deleted. (1)Click the printer icon in the Dock to display the list of print jobs in progress. In Mac® OS X v.10.2.8, click the printer icon in the Dock to start up the Print Center and double-click the name of your machine in the Printer List. (2)Select the print job to delete and click . The print jobs are deleted. 82 Troubleshooting
-
 1
1 -
2
-
3
-
4
-
5
-
6
-
7
-
8
-
9
-
10
-
11
-
12
-
13
-
14
-
15
-
16
-
17
-
18
-
19
-
20
-
21
-
22
-
23
-
24
-
25
-
26
-
27
-
28
-
29
-
30
-
31
-
32
-
33
-
34
-
35
-
36
-
37
-
38
-
39
-
40
-
41
-
42
-
43
-
44
-
45
-
46
-
47
-
48
-
49
-
50
-
51
-
52
-
53
-
54
-
55
-
56
-
57
-
58
-
59
-
60
-
61
-
62
-
63
-
64
-
65
-
66
-
67
-
68
-
69
-
70
-
71
-
72
-
73
-
74
-
75
-
76
-
77
-
78
-
79
-
80
-
 81
81 -
 82
82 -
 83
83 -
 84
84 -
 85
85 -
 86
86 -
 87
87 -
 88
88 -
 89
89 -
 90
90 -
 91
91 -
92
-
93
-
94
-
95
-
96
-
97
-
98
-
99
-
100
-
101
-
102
-
103
-
104
-
105
-
106
-
107
-
108
-
109
-
110
-
111
-
112
 |
 |
