Canon PIXMA SELPHY DS810 DS810 Photo Printing Guide - Page 9
Installing an Ink Tank
 |
View all Canon PIXMA SELPHY DS810 manuals
Add to My Manuals
Save this manual to your list of manuals |
Page 9 highlights
Installing an Ink Tank Easy Setup Instructions • For safety reasons, store an Ink Tank out of the reach of small children. • Do not drop or shake an Ink Tank as this may cause the ink to leak out and stain your clothes and hands. 1 Unpack a new Ink Tank and remove the orange protective cap. Ink ports Dispose of the protective cap. Notes • Do not touch the ink port. • Do not attempt to reattach the protective cap once it has been removed. 2 Insert the Ink Tank slant into the slot aligning the X mark with the W mark. 3 Press the until it clicks into place. 4 Close the Cover. Note Wait until the preparatory operation is complete: It takes about 80 seconds. 7
-
 1
1 -
2
-
3
-
 4
4 -
 5
5 -
 6
6 -
 7
7 -
 8
8 -
 9
9 -
 10
10 -
 11
11 -
 12
12 -
 13
13 -
 14
14 -
15
-
16
-
17
-
18
-
19
-
20
-
21
-
22
-
23
-
24
-
25
-
26
-
27
-
28
-
29
-
30
-
31
-
32
-
33
-
34
-
35
-
36
-
37
-
38
-
39
-
40
-
41
-
42
-
43
-
44
-
45
-
46
-
47
-
48
-
49
-
50
-
51
-
52
-
53
-
54
-
55
-
56
-
57
-
58
-
59
-
60
-
61
-
62
-
63
-
64
-
65
-
66
-
67
-
68
-
69
-
70
-
71
-
72
-
73
-
74
-
75
-
76
-
77
-
78
-
79
-
80
-
81
-
82
-
83
-
84
-
85
-
86
-
87
-
88
-
89
-
90
-
91
-
92
-
93
-
94
-
95
-
96
 |
 |

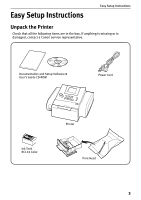
Easy Setup Instructions
7
Installing an Ink Tank
•
For safety reasons, store an Ink Tank out of the reach of small children.
•
Do not drop or shake an Ink Tank as this may cause the ink to leak out and stain your
clothes and hands.
1
Unpack a new Ink Tank and remove
the orange protective cap.
Dispose of the protective cap.
Notes
•
Do not touch the ink port.
•
Do not attempt to reattach the protective
cap once it has been removed.
Ink ports
2
Insert the Ink Tank slant into the
slot aligning the
mark with the
mark.
3
Press the
until it clicks into
place.
4
Close the Cover.
Note
Wait until the preparatory operation is
complete: It takes about 80 seconds.