Canon PowerShot A70 PowerShot A70/A60 Camera User Guide - Page 4
About this Camera User Guide
 |
View all Canon PowerShot A70 manuals
Add to My Manuals
Save this manual to your list of manuals |
Page 4 highlights
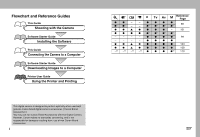
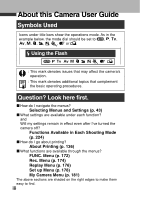
About this Camera User Guide Symbols Used Icons under title bars show the operations mode. As in the example below, the mode dial should be set to , , , , , , , , , or . Using the Flash : This mark denotes issues that may affect the camera's operation. : This mark denotes additional topics that complement the basic operating procedures. Question? Look here first. 3 How do I navigate the menus? Selecting Menus and Settings (p. 43) 3 What settings are available under each function? and Will my settings remain in effect even after I've turned the camera off? Functions Available in Each Shooting Mode (p. 224) 3 How do I go about printing? About Printing (p. 136) 3 What functions are available through the menus? FUNC. Menu (p. 172) Rec. Menu (p. 174) Replay Menu (p. 176) Set up Menu (p. 178) My Camera Menu (p. 181) The above sections are shaded on the right edges to make them easy to find. iii
-
 1
1 -
 2
2 -
 3
3 -
 4
4 -
 5
5 -
 6
6 -
 7
7 -
 8
8 -
 9
9 -
 10
10 -
11
-
12
-
13
-
14
-
15
-
16
-
17
-
18
-
19
-
20
-
21
-
22
-
23
-
24
-
25
-
26
-
27
-
28
-
29
-
30
-
31
-
32
-
33
-
34
-
35
-
36
-
37
-
38
-
39
-
40
-
41
-
42
-
43
-
44
-
45
-
46
-
47
-
48
-
49
-
50
-
51
-
52
-
53
-
54
-
55
-
56
-
57
-
58
-
59
-
60
-
61
-
62
-
63
-
64
-
65
-
66
-
67
-
68
-
69
-
70
-
71
-
72
-
73
-
74
-
75
-
76
-
77
-
78
-
79
-
80
-
81
-
82
-
83
-
84
-
85
-
86
-
87
-
88
-
89
-
90
-
91
-
92
-
93
-
94
-
95
-
96
-
97
-
98
-
99
-
100
-
101
-
102
-
103
-
104
-
105
-
106
-
107
-
108
-
109
-
110
-
111
-
112
-
113
-
114
-
115
-
116
-
117
-
118
-
119
-
120
-
121
-
122
-
123
-
124
-
125
-
126
-
127
-
128
-
129
-
130
-
131
-
132
-
133
-
134
-
135
-
136
-
137
-
138
-
139
-
140
-
141
-
142
-
143
-
144
-
145
-
146
-
147
-
148
-
149
-
150
-
151
-
152
-
153
-
154
-
155
-
156
-
157
-
158
-
159
-
160
-
161
-
162
-
163
-
164
-
165
-
166
-
167
-
168
-
169
-
170
-
171
-
172
-
173
-
174
-
175
-
176
-
177
-
178
-
179
-
180
-
181
-
182
-
183
-
184
-
185
-
186
-
187
-
188
-
189
-
190
-
191
-
192
-
193
-
194
-
195
-
196
-
197
-
198
-
199
-
200
-
201
-
202
-
203
-
204
-
205
-
206
-
207
-
208
-
209
-
210
-
211
-
212
-
213
-
214
-
215
-
216
-
217
-
218
-
219
-
220
-
221
-
222
-
223
-
224
-
225
-
226
-
227
-
228
-
229
-
230
 |
 |
