Canon PowerShot G3 X Digital Photo Professional Ver.4.2 for Macintosh Instruct - Page 51
Adjusting Dynamic Range, Filter effect, Toning effect, Filter, Example of effect
 |
View all Canon PowerShot G3 X manuals
Add to My Manuals
Save this manual to your list of manuals |
Page 51 highlights
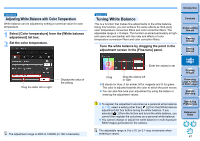
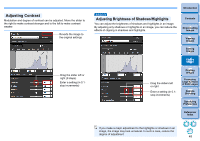
Filter effect: Creates a monochrome photograph where the white of clouds and the green of trees are emphasized. Filter None Example of effect General monochrome image without filter effect. Yellow Blue sky is reproduced more naturally and white clouds emerge clearly. Orange Blue sky becomes somewhat darker. The brightness of the setting sun increases further. Red Green Blue sky becomes quite dark. Autumn leaves become clear and bright. Human skin tones and lips become softer. The green leaves of trees become clear and bright. Toning effect: Creates a monochrome photograph to which a single color has been added. You can choose from [None], [Sepia], [Blue], [Purple] and [Green]. Increase the [Contrast] to emphasize the filter effect To emphasize the filter effect, set the [Contrast] slider to the right. Advanced Adjusting Dynamic Range Dynamic range (width of gradation expression) from dark points to bright points in an image can be adjusted. Move downwards Output white points Move to the left or right Input white points Move to the left or right Mid (medium tone) point Move upwards Output black points You can also adjust the dynamic range by entering values Move to the left or right Input black points The horizontal axis shows the input level and the vertical axis shows the output level. Checkmark the [Move with mid-point] checkbox to link the midpoint to your adjustments to the input white points and input black points. Introduction Contents 1 Downloading Images 2Viewing Images 3Sorting Images 4Editing Images 5Printing Images 6 Processing Large Numbers of RAW Images 7Remote Shooting 8 Specifying Preferences Reference/ Index 50
-
 1
1 -
2
-
3
-
4
-
5
-
6
-
7
-
8
-
9
-
10
-
11
-
12
-
13
-
14
-
15
-
16
-
17
-
18
-
19
-
20
-
21
-
22
-
23
-
24
-
25
-
26
-
27
-
28
-
29
-
30
-
31
-
32
-
33
-
34
-
35
-
36
-
37
-
38
-
39
-
40
-
41
-
42
-
43
-
44
-
45
-
 46
46 -
 47
47 -
 48
48 -
 49
49 -
 50
50 -
 51
51 -
 52
52 -
 53
53 -
 54
54 -
 55
55 -
 56
56 -
57
-
58
-
59
-
60
-
61
-
62
-
63
-
64
-
65
-
66
-
67
-
68
-
69
-
70
-
71
-
72
-
73
-
74
-
75
-
76
-
77
-
78
-
79
-
80
-
81
-
82
-
83
-
84
-
85
-
86
-
87
-
88
-
89
-
90
-
91
-
92
-
93
-
94
-
95
-
96
-
97
-
98
-
99
-
100
-
101
-
102
-
103
-
104
-
105
-
106
-
107
-
108
-
109
-
110
-
111
-
112
-
113
-
114
-
115
-
116
-
117
-
118
-
119
-
120
-
121
-
122
-
123
-
124
-
125
-
126
-
127
-
128
-
129
-
130
-
131
-
132
-
133
-
134
-
135
-
136
-
137
 |
 |
