Canon PowerShot SX100 IS Silver PowerShot SX 100 IS Camera User Guide - Page 146
Red-Eye Correction Function
 |
View all Canon PowerShot SX100 IS Silver manuals
Add to My Manuals
Save this manual to your list of manuals |
Page 146 highlights
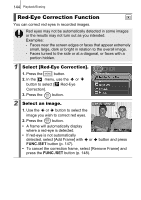
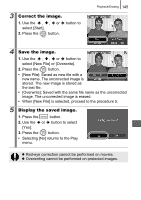
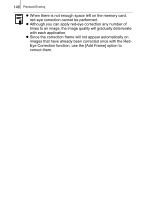
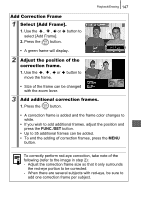
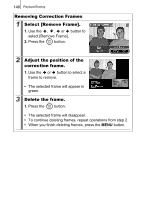
144 Playback/Erasing Red-Eye Correction Function You can correct red eyes in recorded images. Red eyes may not be automatically detected in some images or the results may not turn out as you intended. Examples: - Faces near the screen edges or faces that appear extremely small, large, dark or bright in relation to the overall image. - Faces turned to the side or at a diagonal, or faces with a portion hidden. 1 Select [Red-Eye Correction]. 1. Press the button. 2. In the menu, use the or button to select [ Red-Eye Correction]. 3. Press the button. 2 Select an image. 1. Use the or button to select the image you wish to correct red eyes. 2. Press the button. • A frame will automatically display where a red-eye is detected. • If red-eye is not automatically detected, select [Add Frame] with or button and press FUNC./SET button (p. 147). • To cancel the correction frame, select [Remove Frame] and press the FUNC./SET button (p. 148).
-
 1
1 -
2
-
3
-
4
-
5
-
6
-
7
-
8
-
9
-
10
-
11
-
12
-
13
-
14
-
15
-
16
-
17
-
18
-
19
-
20
-
21
-
22
-
23
-
24
-
25
-
26
-
27
-
28
-
29
-
30
-
31
-
32
-
33
-
34
-
35
-
36
-
37
-
38
-
39
-
40
-
41
-
42
-
43
-
44
-
45
-
46
-
47
-
48
-
49
-
50
-
51
-
52
-
53
-
54
-
55
-
56
-
57
-
58
-
59
-
60
-
61
-
62
-
63
-
64
-
65
-
66
-
67
-
68
-
69
-
70
-
71
-
72
-
73
-
74
-
75
-
76
-
77
-
78
-
79
-
80
-
81
-
82
-
83
-
84
-
85
-
86
-
87
-
88
-
89
-
90
-
91
-
92
-
93
-
94
-
95
-
96
-
97
-
98
-
99
-
100
-
101
-
102
-
103
-
104
-
105
-
106
-
107
-
108
-
109
-
110
-
111
-
112
-
113
-
114
-
115
-
116
-
117
-
118
-
119
-
120
-
121
-
122
-
123
-
124
-
125
-
126
-
127
-
128
-
129
-
130
-
131
-
132
-
133
-
134
-
135
-
136
-
137
-
138
-
139
-
140
-
 141
141 -
 142
142 -
 143
143 -
 144
144 -
 145
145 -
 146
146 -
 147
147 -
 148
148 -
 149
149 -
 150
150 -
 151
151 -
152
-
153
-
154
-
155
-
156
-
157
-
158
-
159
-
160
-
161
-
162
-
163
-
164
-
165
-
166
-
167
-
168
-
169
-
170
-
171
-
172
-
173
-
174
-
175
-
176
-
177
-
178
-
179
-
180
-
181
-
182
-
183
-
184
-
185
-
186
-
187
-
188
-
189
-
190
-
191
-
192
-
193
-
194
-
195
-
196
-
197
-
198
-
199
-
200
-
201
-
202
-
203
-
204
-
205
-
206
-
207
-
208
-
209
-
210
-
211
-
212
-
213
-
214
-
215
-
216
-
217
-
218
-
219
-
220
-
221
-
222
-
223
-
224
-
225
-
226
-
227
 |
 |
