Canon SELPHY CP740 SELPHY CP750 / CP740 Printing Guide - Page 10
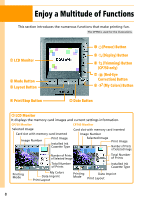
Trimming Button CP750 only, My Colors Button CP750 only, Red-Eye Correction Button, Display Button,
 |
View all Canon SELPHY CP740 manuals
Add to My Manuals
Save this manual to your list of manuals |
Page 10 highlights
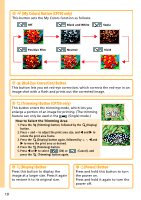
h (My Colors) Button (CP750 only) This button sets the My Colors function as follows: Off Black and White Sepia Positive Film Neutral Vivid i (Red-Eye Correction) Button This button lets you set red-eye correction, which corrects the red-eye in an image shot with a flash and prints out the corrected image. j (Trimming) Button (CP750 only) This button enters the trimming mode, which lets you enlarge a portion of an image for printing. (The trimming feature can only be used in the (Single) mode.) How to Select the Trimming Area 1. Press the (Trimming) button, followed by the (Display) button. 2. Press + and - to adjust the print area size, and W and X to rotate the print area frame. 3. Press the (Display) button again, followed by +, -, W and X to move the print area as desired. 4. Press the (Trimming) button. 5. Press W or X to select (OK) or (Cancel), and press the (Trimming) button again. k (Display) Button Press this button to display the image at a larger size. Press it again to restore it to its original size. l (Power) Button Press and hold this button to turn the power on. Press and hold it again to turn the power off. 10
-
 1
1 -
2
-
3
-
4
-
 5
5 -
 6
6 -
 7
7 -
 8
8 -
 9
9 -
 10
10 -
 11
11 -
 12
12 -
 13
13 -
 14
14 -
 15
15 -
16
 |
 |
