Canon SELPHY CP740 SELPHY CP750 / CP740 Printing Guide - Page 9
Mode Button, Layout Button, Print/Stop Button, Date Button - instructions
 |
View all Canon SELPHY CP740 manuals
Add to My Manuals
Save this manual to your list of manuals |
Page 9 highlights
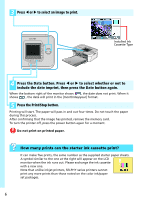
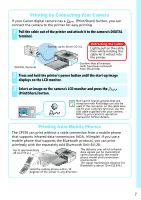
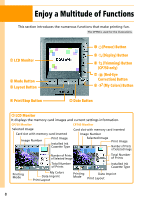
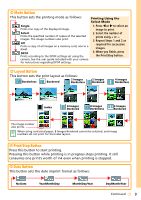
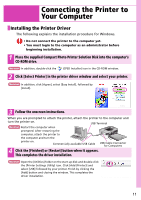
d Mode Button This button sets the printing mode as follows: Single Prints one copy of the displayed image. Select Prints the specified number of copies of the selected images. The image numbers also print. All Prints a copy of all images on a memory card, one to a sheet. DPOF Prints according to the DPOF settings set using the camera. See the user guide included with your camera for instructions regarding DPOF settings. Printing Using the Select Mode 1. Press W or X to select an image to print. 2. Select the number of prints using + or -. 3. Repeat Steps 1 and 2 as required for successive images. 4. When you finish, press the Print/Stop button. e Layout Button This button sets the print layout as follows: Borderless Bordered 2 Images Borderless 2 Images Bordered 4 Images Borderless Index 8 Images Bordered 8 Images Borderless 4 Images Bordered xxxxxx xxxxxx xxxxxx xxxxxx The image number also prints. xxxxxx xxxxxx xxxxxx xxxxxx When using card sized paper, 8 Images Bordered cannot be selected, and image numbers do not print for the Index layout. f Print/Stop Button Press this button to start printing. Pressing this button while printing is in progress stops printing. It still consumes one print's worth of ink even when printing is stopped. g Date Button This button sets the date imprint format as follows: No Date Year/Month/Day Month/Day/Year Day/Month/Year Continued 9
-
 1
1 -
2
-
3
-
 4
4 -
 5
5 -
 6
6 -
 7
7 -
 8
8 -
 9
9 -
 10
10 -
 11
11 -
 12
12 -
 13
13 -
 14
14 -
15
-
16
 |
 |
