Canon SELPHY ES40 SELPHY ES40 Printer User Guide - Page 77
Handling Precautions, Using the Cleaner Unit to Care for SELPHY
 |
View all Canon SELPHY ES40 manuals
Add to My Manuals
Save this manual to your list of manuals |
Page 77 highlights
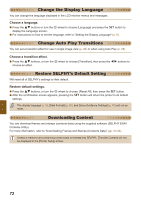
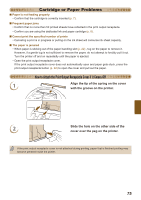
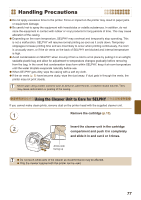
Handling Precautions Do not apply excessive force to the printer. Force or impact on the printer may result in paper jams or equipment damage. Be careful not to spray the equipment with insecticides or volatile substances. In addition, do not store the equipment in contact with rubber or vinyl products for long periods of time. This may cause alteration of the casing. Depending on the room temperature, SELPHY may overheat and temporarily stop operating. This is not a malfunction. SELPHY will resume normal printing as soon as it cools down. Temporary stoppages increase printing time and are most likely to occur when printing continuously, if a room is unusually warm, or if the air vents on the back of SELPHY are blocked and internal temperature is high. Avoid condensation on SELPHY when moving it from a cold to a hot place by putting it in an airtight, sealable plastic bag and allow for adjustment to temperature changes gradually before removing from the bag. In the event that condensation does form within SELPHY, keep it at room temperature until the water droplets evaporate naturally before use. When SELPHY gets dirty, wipe the casing with a soft dry cloth. If the air vents (p. 8) have become dusty, wipe the dust away. If dust gets in through the vents, the printer may not print clearly. Never wipe using volatile solvents such as benzine, paint thinner, or diluted neutral solvent. They may cause deformation or peeling of the casing. Using the Cleaner Unit to Care for SELPHY If you cannot make clean prints, remove dust on the printer head with the supplied cleaner unit. 1 Remove the cartridge (p.13). 2 Insert the cleaner unit in the cartridge compartment and push it in completely and slide it in and out 2 or 3 times. Arrow side facing up Do not touch white parts of the cleaner as its performance may be affected. Only the cleaner supplied with this printer can be used. 77
-
 1
1 -
2
-
3
-
4
-
5
-
6
-
7
-
8
-
9
-
10
-
11
-
12
-
13
-
14
-
15
-
16
-
17
-
18
-
19
-
20
-
21
-
22
-
23
-
24
-
25
-
26
-
27
-
28
-
29
-
30
-
31
-
32
-
33
-
34
-
35
-
36
-
37
-
38
-
39
-
40
-
41
-
42
-
43
-
44
-
45
-
46
-
47
-
48
-
49
-
50
-
51
-
52
-
53
-
54
-
55
-
56
-
57
-
58
-
59
-
60
-
61
-
62
-
63
-
64
-
65
-
66
-
67
-
68
-
69
-
70
-
71
-
 72
72 -
 73
73 -
 74
74 -
 75
75 -
 76
76 -
 77
77 -
 78
78 -
 79
79 -
 80
80 -
 81
81 -
 82
82
 |
 |