Canon XF205 XF200 XF205 Instruction Manual - Page 183
Browser Remote: Controlling the Camcorder from a Network Device, Setting Up Browser Remote
 |
View all Canon XF205 manuals
Add to My Manuals
Save this manual to your list of manuals |
Page 183 highlights
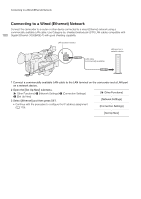
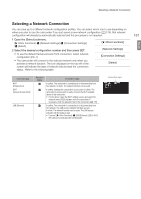
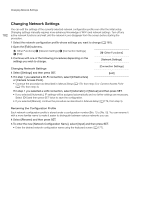
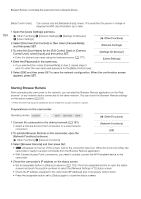
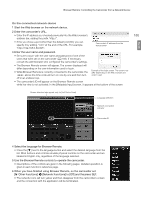
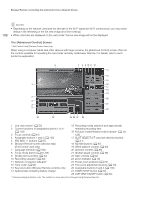
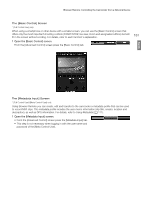
Browser Remote: Controlling the Camcorder from a Network Device Browser Remote: Controlling the Camcorder from a Network Device After connecting the camcorder to a network (Wi-Fi or using the LAN terminal), you can control the camcorder remotely from the Web browser of a connected network device* using the Browser Remote application. Browser Remote lets you monitor the image through live view, start and stop recording and remotely control the shutter speed, gain and other settings. You can also create, edit and transfer a metadata profile** and check the recording media, remaining recording time, time code, etc. * For details about compatible devices, operating systems, Web browsers, etc., please visit your local Canon Web site. **MXF clips only. Operating modes: 183 English Setting Up Browser Remote Initially, basic default network settings for a browser connection (camera ID, user names and passwords) are already saved in the camcorder. You can check these settings on the status screens (A 220). With the following procedures you can change the default settings, if you prefer. Camcorder Settings You can set a unique camcorder identification code and designate the port that the Browser Remote application should use when accessing the camcorder through a network. The port number (HTTP protocol) used by Browser Remote is usually set to port 80, but you can change it if necessary. The camcorder ID will appear on the Browser Remote screen, making it easy to identify which camcorder the application is controlling in case of a multi-camera shooting setup. 1 Open the [Camera Settings] submenu. [w Other Functions] > [Network Settings] > [Settings for Browser] > [Camera Settings] 2 Push the joystick up/down to select a value for the first digit of the port number and then press SET to move to the next digit. 3 After completing all the digits, select [Set] and then press SET to confirm the port number. 4 To enter the [Camera ID], select [Input] and then press SET. • Enter the desired camcorder ID using the keyboard screen (A 177). 5 Select [OK] and then press SET to save the network configuration. 6 When the confirmation message appears, press SET. [w Other Functions] [Network Settings] [Settings for Browser] [Camera Settings] User Settings A user name and password are required before the Browser Remote application can access and operate the camcorder. You can set up to three different users and select whether you want to allow single-user operation (full control) or two-user operation (one controlling camcorder functions and another in charge of metadata input for MXF clips). [Full Control User] Can access all 3 Browser Remote screens: [Advanced Control], [Basic Control] and [Metadata Input]. [Camera Control User] Can access only the [Advanced Control] screen. This would be the main operator controlling the camcorder.
-
 1
1 -
2
-
3
-
4
-
5
-
6
-
7
-
8
-
9
-
10
-
11
-
12
-
13
-
14
-
15
-
16
-
17
-
18
-
19
-
20
-
21
-
22
-
23
-
24
-
25
-
26
-
27
-
28
-
29
-
30
-
31
-
32
-
33
-
34
-
35
-
36
-
37
-
38
-
39
-
40
-
41
-
42
-
43
-
44
-
45
-
46
-
47
-
48
-
49
-
50
-
51
-
52
-
53
-
54
-
55
-
56
-
57
-
58
-
59
-
60
-
61
-
62
-
63
-
64
-
65
-
66
-
67
-
68
-
69
-
70
-
71
-
72
-
73
-
74
-
75
-
76
-
77
-
78
-
79
-
80
-
81
-
82
-
83
-
84
-
85
-
86
-
87
-
88
-
89
-
90
-
91
-
92
-
93
-
94
-
95
-
96
-
97
-
98
-
99
-
100
-
101
-
102
-
103
-
104
-
105
-
106
-
107
-
108
-
109
-
110
-
111
-
112
-
113
-
114
-
115
-
116
-
117
-
118
-
119
-
120
-
121
-
122
-
123
-
124
-
125
-
126
-
127
-
128
-
129
-
130
-
131
-
132
-
133
-
134
-
135
-
136
-
137
-
138
-
139
-
140
-
141
-
142
-
143
-
144
-
145
-
146
-
147
-
148
-
149
-
150
-
151
-
152
-
153
-
154
-
155
-
156
-
157
-
158
-
159
-
160
-
161
-
162
-
163
-
164
-
165
-
166
-
167
-
168
-
169
-
170
-
171
-
172
-
173
-
174
-
175
-
176
-
177
-
 178
178 -
 179
179 -
 180
180 -
 181
181 -
 182
182 -
 183
183 -
 184
184 -
 185
185 -
 186
186 -
 187
187 -
 188
188 -
189
-
190
-
191
-
192
-
193
-
194
-
195
-
196
-
197
-
198
-
199
-
200
-
201
-
202
-
203
-
204
-
205
-
206
-
207
-
208
-
209
-
210
-
211
-
212
-
213
-
214
-
215
-
216
-
217
-
218
-
219
-
220
-
221
-
222
-
223
-
224
-
225
-
226
-
227
-
228
-
229
-
230
-
231
-
232
-
233
-
234
-
235
-
236
-
237
-
238
-
239
-
240
-
241
-
242
-
243
-
244
-
245
-
246
-
247
-
248
-
249
-
250
 |
 |
