Casio WK500DX User Guide - Page 16
Using Reverb, Using Chorus
 |
View all Casio WK500DX manuals
Add to My Manuals
Save this manual to your list of manuals |
Page 16 highlights
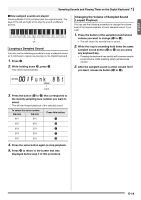
Controlling the Keyboard Sounds 5. Pressing cp again to unsplit the keyboard (so it plays only the tone you selected in step 1). • Each press of cp toggles between split (two tones) and unsplit (one tone). Disappears • If you turn on both layer and split, layering will be applied to the right side range of the keyboard only. To change the split point 1. While holding down cp, press the keyboard key where you want the split point to be. The key you press will become the lowest note of the right side range of the split keyboard. Example: Setting middle C (C4) as the split point. Key name C4 Using Reverb Reverb adds reverberation to notes. You can change the duration of the reverb. 1. Press ct and then use the bs (10-key) [4] ( ) and [6] ( ) keys to display "Reverb" (page E-6). Reve r b 2. Use the bs (10-key) [-] and [+] keys to select the reverb setting you want. Off (oFF) 1 to 10 Turns off reverb. The larger the number selected, the longer the reverb duration. Reve r b Indicator disappears when reverb is turned off. Using Chorus Chorus is a function that adds depth and breadth to notes. It makes you sound as if you are playing multiple instruments. 1. Press ct and then use the bs (10-key) [4] ( ) and [6] ( ) keys to display "Chorus" (page E-6). Cho r us 2. Use the bs (10-key) [-] and [+] keys to select the chorus type you want. There are five chorus types, plus an off setting. Cho r us Indicator disappears when chorus is turned off. • The actual effect produced by chorus depends on the tone you are using. E-14
-
 1
1 -
2
-
3
-
4
-
5
-
6
-
7
-
8
-
9
-
10
-
 11
11 -
 12
12 -
 13
13 -
 14
14 -
 15
15 -
 16
16 -
 17
17 -
 18
18 -
 19
19 -
 20
20 -
 21
21 -
22
-
23
-
24
-
25
-
26
-
27
-
28
-
29
-
30
-
31
-
32
-
33
-
34
-
35
-
36
-
37
-
38
-
39
-
40
-
41
-
42
-
43
-
44
-
45
-
46
-
47
-
48
-
49
-
50
-
51
-
52
-
53
-
54
-
55
-
56
-
57
-
58
-
59
-
60
-
61
-
62
-
63
-
64
-
65
-
66
-
67
-
68
-
69
-
70
-
71
-
72
-
73
-
74
-
75
-
76
-
77
-
78
-
79
-
80
 |
 |
