Celestron Deluxe Handheld Digital Microscope Instruction Manual - Page 6
Icroscope, Iewing, Maging - driver
 |
View all Celestron Deluxe Handheld Digital Microscope manuals
Add to My Manuals
Save this manual to your list of manuals |
Page 6 highlights
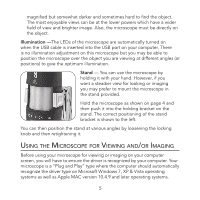
magnified but somewhat darker and sometimes hard to find the object. The most enjoyable views can be at the lower powers which have a wider field of view and brighter image. Also, the microscope must be directly on the object. Illumination -The LEDs of the microscope are automatically turned on when the USB cable is inserted into the USB port on your computer. There is no illumination adjustment on this microscope but you may be able to position the microscope over the object you are viewing at different angles (or positions) to give the optimum illumination. Stand - You can use the microscope by holding it with your hand. However, if you want a steadier view for looking or imaging you may prefer to mount the microscope in the stand provided. Hold the microscope as shown on page 4 and then push it into the holding bracket on the stand. The correct positioning of the stand bracket is shown to the left. You can then position the stand at various angles by loosening the locking knob and then retightening it. Using the Microscope for Viewing and/or Imaging Before using your microscope for viewing or imaging on your computer screen, you will have to ensure the driver is recognized by your computer. Your microscope is a "Plug and Play" type where the computer should automatically recognize the driver type on Microsoft Windows 7, XP & Vista operating systems as well as Apple MAC version 10.4.9 and later operating systems. 5
-
 1
1 -
 2
2 -
 3
3 -
 4
4 -
 5
5 -
 6
6 -
 7
7 -
 8
8 -
 9
9 -
 10
10 -
 11
11 -
 12
12 -
13
-
14
-
15
-
16
-
17
-
18
-
19
-
20
-
21
-
22
-
23
-
24
-
25
-
26
-
27
-
28
-
29
-
30
-
31
-
32
-
33
-
34
-
35
-
36
-
37
-
38
-
39
-
40
-
41
-
42
-
43
-
44
-
45
-
46
-
47
-
48
-
49
-
50
-
51
-
52
-
53
-
54
-
55
-
56
-
57
-
58
-
59
-
60
 |
 |
