Celestron Deluxe Handheld Digital Microscope Instruction Manual - Page 7
USB cable until the installation is complete. You can also use other image/photo - software
 |
View all Celestron Deluxe Handheld Digital Microscope manuals
Add to My Manuals
Save this manual to your list of manuals |
Page 7 highlights
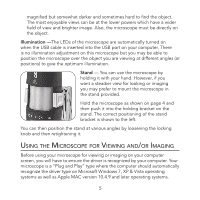
Plug the USB cable of the microscope into the USB port of your computer. Each computer system will have slightly different messages. For example, on some Vista OSs when plugged in the message may say "Installing Device Driver Software" and shortly thereafter you may see a message "Your Devices Are Ready to Use." Just follow any instructions shown on the screen. You will need to install the Digital Microscope Suite software (on Windows OS's) to actually view and/or image. Prior to doing this you will need to unplug the USB cable until the installation is complete. You can also use other image/photo capture software that you may have on your Windows system if you desire. To use the microscope with MAC operating systems you will need to have MAC Version 10.4.9 and higher - must use a MAC compatible image/photo capture program (iChat with PhotoBooth, etc). To find Photobooth on a Mac, go to your hard drive and click on Applications. Choose Photobooth from the list of applications. If a camera is already attached to computer, Photobooth will show up as your default. You will need to change this to "Celestron Microscope." You will then be able to take photos with your microscope using the capture button. Please note: Many keyboards on Macs have a USB port. The microscope will not work through this USB port because it does not have enough power. You will have to connect the USB directly to your computer tower. When viewing or imaging, you can change the orientation of the image on the computer screen by rotating the microscope to the position you desire. 6
-
 1
1 -
 2
2 -
 3
3 -
 4
4 -
 5
5 -
 6
6 -
 7
7 -
 8
8 -
 9
9 -
 10
10 -
 11
11 -
 12
12 -
13
-
14
-
15
-
16
-
17
-
18
-
19
-
20
-
21
-
22
-
23
-
24
-
25
-
26
-
27
-
28
-
29
-
30
-
31
-
32
-
33
-
34
-
35
-
36
-
37
-
38
-
39
-
40
-
41
-
42
-
43
-
44
-
45
-
46
-
47
-
48
-
49
-
50
-
51
-
52
-
53
-
54
-
55
-
56
-
57
-
58
-
59
-
60
 |
 |
