Cisco ASR1006-10G-SHA/K9 Installation Guide - Page 13
Attaching the Rear Rack-Mount Brackets to the Cisco ASR 1006 Router, Step 2, Caution
 |
View all Cisco ASR1006-10G-SHA/K9 manuals
Add to My Manuals
Save this manual to your list of manuals |
Page 13 highlights
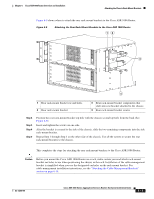
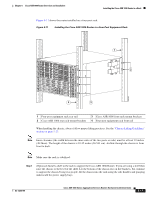
Chapter 6 Cisco ASR 1006 Router Overview and Installation Attaching the Chassis Rack-Mount Brackets Figure 6-9 shows where to attach the rear rack-mount brackets to the Cisco ASR 1006 Router. Figure 6-9 Attaching the Rear Rack-Mount Brackets to the Cisco ASR 1006 Router 12 1 3 1 0 0 280038 4 1 Rear rack-mount bracket ear and holes 2 Rear rack-mount bracket 3 Rear rack-mount bracket components that slide into rear bracket attached to the chassis 4 Rear rack-mount bracket screws Step 2 Step 3 Step 4 Step 5 Position the rear rack-mount bracket top hole with the chassis second top hole from the back (See Figure 6-9). Insert and tighten the screws on one side. After the bracket is secured to the side of the chassis, slide the two remaining components into the side rack-mount bracket. Repeat Step 1 through Step 3 on the other side of the chassis. Use all the screws to secure the rear rack-mount brackets to the chassis. This completes the steps for attaching the rear rack-mount brackets to the Cisco ASR 1006 Router. Caution Before you mount the Cisco ASR 1006 Router on a rack, make certain you read which rack-mount bracket ear holes to use when positioning the chassis in the rack. Installation of the cable-management bracket is simplified when you use the designated ear holes on the rack-mount bracket. For cable-management installation instructions, see the "Attaching the Cable-Management Brackets" section on page 6-18. OL-13208-09 Cisco ASR 1000 Series Aggregation Services Routers Hardware Installation Guide 6-13
-
 1
1 -
2
-
3
-
4
-
5
-
6
-
7
-
 8
8 -
 9
9 -
 10
10 -
 11
11 -
 12
12 -
 13
13 -
 14
14 -
 15
15 -
 16
16 -
 17
17 -
 18
18 -
19
-
20
-
21
-
22
-
23
-
24
-
25
-
26
-
27
-
28
-
29
-
30
-
31
-
32
-
33
-
34
-
35
-
36
 |
 |
