Cisco SG102-24 Quick Start Guide
Cisco SG102-24 Manual
 |
View all Cisco SG102-24 manuals
Add to My Manuals
Save this manual to your list of manuals |
Cisco SG102-24 manual content summary:
- Cisco SG102-24 | Quick Start Guide - Page 1
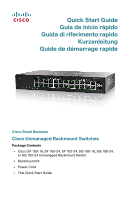
rápido Guida di riferimento rapido Kurzanleitung Guide de démarrage rapide Cisco Small Business Cisco Unmanaged Rackmount Switches Package Contents • Cisco SF 100-16, SF 100-24, SF 102-24, SG 100-16, SG 100-24, or SG 102-24 Unmanaged Rackmount Switch • Rackmount Kit • Power Cord • This Quick Start - Cisco SG102-24 | Quick Start Guide - Page 2
24, or SG 102-24 Unmanaged Rackmount Switch, a Cisco Small Business network communications device. This guide will familiarize you with the layout of the unmanaged rackmount switch and describe how to deploy the device in your network. For additional information, see www.cisco.com/smb. Network Speed - Cisco SG102-24 | Quick Start Guide - Page 3
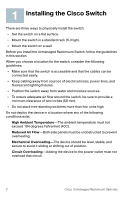
1 Installing the Cisco Switch There are three ways to physically install the switch: • Set the switch on a flat surface. • Mount the switch in a standard rack (1U high). • Mount the switch on a wall. Before you install the Unmanaged Rackmount Switch, follow the guidelines in this section. When you - Cisco SG102-24 | Quick Start Guide - Page 4
21 22 23 24 (Shared with 12) (Shared with 24) miniGBIC1 miniGBIC2 Cisco Small Business SR2024 10/100/1000 24-Port Switch 193086 Wall Mounting A Cisco SF 100-16, SF 100-24, SG 100-16, or SG 102-24 Unmanaged Rackmount Switch can be wall-mounted. If you plan to mount this switch to a wall - Cisco SG102-24 | Quick Start Guide - Page 5
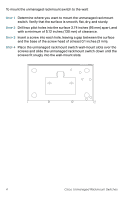
between the surface and the base of the screw head of at least 0.1 inches (3 mm). STEP 4 Place the unmanaged rackmount switch wall-mount slots over the screws and slide the unmanaged rackmount switch down until the screws fit snugly into the wall-mount slots. 276583 4 Cisco Unmanaged Rackmount - Cisco SG102-24 | Quick Start Guide - Page 6
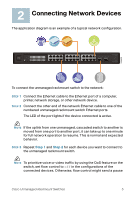
20 21 22 23 24 / miniGBIC2 Gigabit 1 2 3 4 13 14 15 16 5 6 7 8 17 18 19 20 9 10 11 12 21 22 23 24 (Shared with 12) (Shared with 24) miniGBIC1 miniGBIC2 Cisco Small Business SR2024 24-P or t 10/ 100/ 1000 Swit ch To connect the unmanaged rackmount switch to the network - Cisco SG102-24 | Quick Start Guide - Page 7
11 23 12 24 276579 LINK GIGABIT ACT RJ-45 Ethernet Ports -Use these ports to connect network devices, such as computers, printers, and access points, to the switch. The auto-sensing, Ethernet (802.3) ports are used for wired network communications. Each Ethernet port supports network speeds of 10 - Cisco SG102-24 | Quick Start Guide - Page 8
Back Panel The power port is located on the back panel of the unmanaged rackmount switch. POWER Side Panel The Kensington lock is located on the side panel of the unmanaged rackmount switch. (Only the Cisco SF 100-16, SF 100-24, SG 100-16, or SG 102-24 Unmanaged Rackmount Switch has a lock.) 276580 - Cisco SG102-24 | Quick Start Guide - Page 9
switches. Weights and Dimensions Model SF 100-16 16 RJ-45 10/100 ports SF 100-24 24 RJ-45 10/100 ports SF 102-24 24 RJ-45 10/100 ports, 2 shared Gigabit RJ-45/miniGBIC ports SG 100-16 16 RJ-45 10/100/1000 ports SG 100-24 24 RJ-45 10/100/1000 ports SG 102-24 24 8 Cisco Unmanaged Rackmount Switches - Cisco SG102-24 | Quick Start Guide - Page 10
Power Certification Operating Temperature Storage Temperature Operating Humidity Storage Humidity Description IEEE 802.3, 802.3u, 802.3x, 802.3ab, 802.3z, and 802.1p Category 5 or better Kensington security slot on a Cisco SF 100-16, SF 100-24, SG 100-16, or SG 102-24 Unmanaged Rackmount Switch - Cisco SG102-24 | Quick Start Guide - Page 11
/guide/ 78-19225-01.pdf Regulatory, Compliance, and Safety Information www.cisco.com/en/US/products/ps10007/ tsd_products_support_series_home.html Warranty Information www.cisco.com/go/warranty Cisco Small Business Cisco Partner Central for Small Business (Partner Login Required) www.cisco - Cisco SG102-24 | Quick Start Guide - Page 12
Gracias por elegir el Switch no administrado para montaje en rack SF 100-16, SF 100-24, SF 102-24, SG 100-16, SG 100-24 o SG 102-24 de Cisco, un dispositivo de comunicación de redes para la PYME de Cisco. Esta guía lo familiarizará con la disposición del switches no administrados para montaje - Cisco SG102-24 | Quick Start Guide - Page 13
1 Instalación del switch Cisco Existen tres maneras de instalar físicamente el switch: • Ubicar el switch en una superficie plana. • Montar el switch en un rack estándar (1U de alto). • Montar el switch en la pared. Antes de instalar el Switch no administrado para montaje en rack, siga las pautas de - Cisco SG102-24 | Quick Start Guide - Page 14
10 11 12 21 22 23 24 (Shared with 12) (Shared with 24) miniGBIC1 miniGBIC2 Cisco Small Business SR2024 10/100/1000 24-Port Switch 193086 Montaje en pared El Switches no administrados para montaje en rack SF 100-16, SF 100-24, SG 100-16 o SG 102-24 de Cisco se puede montar en la pared - Cisco SG102-24 | Quick Start Guide - Page 15
: PASO 1 Decida el sitio donde quiere montar el switches no administrados para montaje en rack. Compruebe que la superficie sea lisa, plana, maciza pared sobre los tornillos y deslice el switches no administrados para montaje en rack hacia abajo hasta que los tornillos queden firmes dentro de las - Cisco SG102-24 | Quick Start Guide - Page 16
22 23 24 / miniGBIC2 Gigabit 1 2 3 4 13 14 15 16 5 6 7 8 17 18 19 20 9 10 11 12 21 22 23 24 (Shared with 12) (Shared with 24) miniGBIC1 miniGBIC2 Cisco Small Business SR2024 24-P or t 10/ 100/ 1000 Swit ch Para conectar el switches no administrados para montaje en rack - Cisco SG102-24 | Quick Start Guide - Page 17
en rack que proporciona conmutación sin bloqueos y a velocidad de cable para los clientes de red. Puertos del panel frontal Los puertos e indicadores luminosos se encuentran en el panel frontal del switch. 1 13 2 14 3 15 4 16 5 17 6 18 7 19 8 20 9 21 10 22 11 23 12 24 276579 LINK GIGABIT ACT - Cisco SG102-24 | Quick Start Guide - Page 18
MiniGBIC (si hubiera): los puertos miniGBIC (conversor de interfaz gigabit) son puntos de conexión para módulos miniGBIC a fin de que el switches no administrados para montaje en rack pueda enlazarse con otros switches mediante fibra óptica. • Los puertos miniGBIC son compatibles con los módulos - Cisco SG102-24 | Quick Start Guide - Page 19
del switches no administrados para montaje en rack. POWER Panel lateral El bloqueo Kensignton está ubicado en el panel lateral del switches no administrados para montaje en rack. (Sólo Switches no administrados para montaje en rack SF 100-16, SF 100-24, SG 100-16 o SG 102-24 de Cisco tienen - Cisco SG102-24 | Quick Start Guide - Page 20
102-24 24 puertos RJ-45 10/100, 2 Gigabit compartidos puertos RJ-45/miniGBIC SG 100-16 16 puertos RJ-45 10/100/ 1000 SG 100-24 24 puertos RJ-45 10/100/ 1000 SG 102-24 24 Kensington en el Switches no administrados para montaje en rack SF 100-16, SF 100-24, SG 100-16 o SG 102-24 de Cisco 100 V - 240 - Cisco SG102-24 | Quick Start Guide - Page 21
go/warranty Cisco Small Business Central para socios Cisco para la PYME (se debe iniciar sesión como socio) www.cisco.com/web/partners/sell/smb Página principal de Cisco Small www.cisco.com/smb Business Mercado www.cisco.com/go/marketplace 10 Switches no administrados para montaje en rack de - Cisco SG102-24 | Quick Start Guide - Page 22
per aver scelto lo Switch Cisco per montaggio in rack non gestito SF 100-16, SF 100-24, SF 102-24, SG 100-16, SG 100-24 o SG 102-24, un dispositivo di comunicazione di rete Cisco Small Business. Questa guida farà familiarizzare con il layout dello switch per montaggio in rack non gestito e descriver - Cisco SG102-24 | Quick Start Guide - Page 23
1 Installazione dello switch Cisco È possibile installare fisicamente lo switch in tre modi: • Installare lo switch su una superficie piana. • Montare lo switch in un rack standard (alto 1U). • Montare lo switch su una parete. Prima di installare lo Switch per montaggio in rack non gestito, seguire - Cisco SG102-24 | Quick Start Guide - Page 24
9 10 11 12 21 22 23 24 (Shared with 12) (Shared with 24) miniGBIC1 miniGBIC2 Cisco Small Business SR2024 10/100/1000 24-Port Switch Montaggio a parete Uno Switch Cisco per montaggio in rack non gestito SF 100-16, SF 100-24, SG 100-16 o SG 102-24 può essere montato a parete. Prima di - Cisco SG102-24 | Quick Start Guide - Page 25
alla parete: PASSAGGIO1 Determinare dove si desidera montare lo switch per montaggio in rack non gestito. Verificare che la superficie sia liscia, il montaggio a parete dello switch per montaggio in rack non gestito con le viti e spingere lo switch per montaggio in rack non gestito verso il basso - Cisco SG102-24 | Quick Start Guide - Page 26
22 23 24 / miniGBIC2 Gigabit 1 2 3 4 13 14 15 16 5 6 7 8 17 18 19 20 9 10 11 12 21 22 23 24 (Shared with 12) (Shared with 24) miniGBIC1 miniGBIC2 Cisco Small Business SR2024 24-P or t 10/ 100/ 1000 Swit ch Per collegare lo switch per montaggio in rack non gestito alla - Cisco SG102-24 | Quick Start Guide - Page 27
in rack non gestito che offrono uno switching senza blocchi e wire speed per i clienti della rete. Porte del pannello frontale Le porte e i LED sono posizionati sul pannello frontale dello switch. 1 13 2 14 3 15 4 16 5 17 6 18 7 19 8 20 9 21 10 22 11 23 12 24 LINK GIGABIT ACT Porte Ethernet - Cisco SG102-24 | Quick Start Guide - Page 28
presente): le porte di conversione dell'interfaccia Gigabit sono punti di connessione per i moduli miniGBIC, quindi lo switch per montaggio in rack non gestito può collegare altri switch attraverso una fibra ottica. • Le porte miniGBIC sono compatibili con i moduli miniGBIC di Cisco MGBSX1, MGBLH1 - Cisco SG102-24 | Quick Start Guide - Page 29
switch per montaggio in rack non gestito. Pesi e dimensioni Modello Porte SF 100-16 16 RJ-45 10/100 Porte SF 100-24 24 RJ-45 10/100 Porte SF 102-24 24 RJ-45 10/100, 2 Gigabit condivisi porte RJ-45/miniGBIC Porte SG 100-16 16 RJ-45 10/100/1000 Porte SG 100-24 24 RJ-45 10/100/1000 Porte SG 102-24 24 - Cisco SG102-24 | Quick Start Guide - Page 30
.3u, 802.3x, 802.3ab, 802.3z e 802.1p Categoria 5 o di qualità superiore Slot di sicurezza Kensington su uno Switch Cisco per montaggio in rack non gestito SF 100-16, SF 100-24, SG 100-16 o SG 102-24 100V-240V~ 1A 50-60 Hz Classe A FCC, CE Da 32 a 104 ºF (da 0 a 40 ºC) Da -4 a 158 ºF (da -20 a 70 - Cisco SG102-24 | Quick Start Guide - Page 31
/guide/ rack non gestito 78-19225-01.pdf Conformità alle normative e informazioni sulla sicurezza www.cisco.com/en/US/products/ps10007/ tsd_products_support_series_home.html Informazioni sulla garanzia www.cisco.com/go/warranty Cisco Small Business Cisco Partner Central per Small Business - Cisco SG102-24 | Quick Start Guide - Page 32
, dass Sie sich für den Cisco SF 100-16, SF 100-24, SF 102-24, SG 100-16, SG 100-24 oder SG 102-24 Unmanaged Rackmount Switch entschieden haben, ein Netzwerkkommunikationsgerät von Cisco Small Business. In dieser Anleitung wird der Aufbau des Unmanaged Rackmount Switch beschrieben und wie Sie das - Cisco SG102-24 | Quick Start Guide - Page 33
1 Installation des Cisco Switch Es gibt drei Möglichkeiten, den Switch zu installieren: • Legen Sie den Switch auf eine flache Oberfläche. • Montieren Sie den Switch in einem Standard-Rack (1 HE hoch). • Montieren Sie den Switch an einer Wand. Beachten Sie die Hinweise in diesem Abschnitt, bevor Sie - Cisco SG102-24 | Quick Start Guide - Page 34
19 20 9 10 11 12 21 22 23 24 (Shared with 12) (Shared with 24) miniGBIC1 miniGBIC2 Cisco Small Business SR2024 10/100/1000 24-Port Switch 193086 Wandmontage Ein Cisco SF 100-16, SF 100-24, SG 100-16 oder SG 102-24 Unmanaged Rackmount Switch kann an der Wand befestigt werden. Bevor - Cisco SG102-24 | Quick Start Guide - Page 35
SCHRITT 1 Legen Sie fest, wo Sie den Unmanaged Rackmount Switch befestigen möchten. Vergewissern Sie sich, dass die Oberfläche glatt Führen Sie die Montageschlitze des Unmanaged Rackmount Switch über die Schrauben und schieben Sie den Unmanaged Rackmount Switch nach unten, bis die Schrauben fest in - Cisco SG102-24 | Quick Start Guide - Page 36
22 23 24 / miniGBIC2 Gigabit 1 2 3 4 13 14 15 16 5 6 7 8 17 18 19 20 9 10 11 12 21 22 23 24 (Shared with 12) (Shared with 24) miniGBIC1 miniGBIC2 Cisco Small Business SR2024 24-P or t 10/ 100/ 1000 Swit ch So verbinden Sie den Unmanaged Rackmount Switch mit dem Netzwerk - Cisco SG102-24 | Quick Start Guide - Page 37
-Clients Non-Blocking-, WireSpeed-Switching bieten. Ports an der Vorderseite Die Ports und LEDs befinden sich an der Vorderseite des Switch. 1 13 2 14 3 15 4 16 5 17 6 18 7 19 8 20 9 21 10 22 11 23 12 24 276579 LINK GIGABIT ACT RJ-45-Ethernet-Ports - Verwenden Sie diese Ports, um Netzwerkgeräte - Cisco SG102-24 | Quick Start Guide - Page 38
(sofern vorhanden) - Die MiniGBIC-Ports (GBIC, Gigabit Interface Converter) sind Anschlusspunkte für MiniGBIC-Module, sodass der Unmanaged Rackmount Switch über einen Lichtwellenleiter eine UplinkVerbindung mit anderen Switches herstellen kann. • MiniGBIC-Ports sind kompatibel mit den MiniGBIC - Cisco SG102-24 | Quick Start Guide - Page 39
befindet sich auf der Rückseite des Unmanaged Rackmount Switch. POWER Seitenteil Das Kensington-Schloss befindet sich am Seitenteil des Unmanaged Rackmount Switch. (Nur das Cisco SF 100-16, SF 100-24, SG 100-16 oder SG 102-24 Unmanaged Rackmount Switch verfügt über ein Schloss.) 276580 276581 - Cisco SG102-24 | Quick Start Guide - Page 40
45-10/100/1000-Ports SG 100-24 24 RJ-45-10/100/1000-Ports SG 102-24 24 RJ-45-10/100/1000-Ports, 2 MiniGBIC-UplinkVerbindungen Gewicht 5 oder besser Vorrichtung für Kensington-Schloss bei einem Cisco SF 100-16, SF 100-24, SG 100-16 oder SG 102-24 Unmanaged Rackmount Switch 100 V - 240 V~ 1A 50 - 60 - Cisco SG102-24 | Quick Start Guide - Page 41
/switches/lan/ csbus/sf10x-xx_sg10x-xx/quick_start/guide/ 78-19225-01.pdf Gesetzliche Bestimmungen und www.cisco.com/en/US/products/ps10007/ Sicherheitsinformationen tsd_products_support_series_home.html Garantiebestimmungen www.cisco.com/go/warranty Cisco Small Business Cisco Partnerzentrale - Cisco SG102-24 | Quick Start Guide - Page 42
Bienvenue Merci d'avoir choisi le Commutateur non géré SF 100-16, SF 100-24, SF 102-24, SG 100-16, SG 100-24 ou SG 102-24 Cisco montable en rack, un appareil de communication en réseau de Cisco Small Business. Ce guide a pour objectif de vous aider à vous familiariser avec la disposition du - Cisco SG102-24 | Quick Start Guide - Page 43
Cisco Pour installer le commutateur, vous disposez de trois possibilités : • Placez le commutateur sur une surface plane. • Installez le commutateur dans une armoire rack l'installation du Commutateur non géré montable en rack, suivez les instructions de cette section. Lorsque vous choisissez un - Cisco SG102-24 | Quick Start Guide - Page 44
9 10 11 12 21 22 23 24 (Shared with 12) (Shared with 24) miniGBIC1 miniGBIC2 Cisco Small Business SR2024 10/100/1000 24-Port Switch 193086 Montage mural Vous pouvez fixer un Commutateur non géré SF 100-16, SF 100-24, SG 100-16 ou SG 102-24 Cisco montable en rack au mur. Avant de proc - Cisco SG102-24 | Quick Start Guide - Page 45
commutateur non géré montable en rack : ÉTAPE 1 Déterminez l'endroit où vous souhaitez installer le commutateur non géré montable en rack. Assurez-vous que la surface non géré montable en rack au-dessus des vis, puis faites glisser le commutateur non géré montable en rack vers le bas jusqu'à - Cisco SG102-24 | Quick Start Guide - Page 46
23 24 / miniGBIC2 Gigabit 1 2 3 4 13 14 15 16 5 6 7 8 17 18 19 20 9 10 11 12 21 22 23 24 (Shared with 12) (Shared with 24) miniGBIC1 miniGBIC2 Cisco Small Business SR2024 24-P or t 10/ 100/ 1000 Swit ch Pour connecter le commutateur non géré montable en rack au réseau - Cisco SG102-24 | Quick Start Guide - Page 47
en rack qui offre une commutation à vitesse filaire non bloquante pour les clients de votre réseau. Ports situés sur le panneau avant Les ports et les LED sont situés sur le panneau avant du commutateur. 1 13 2 14 3 15 4 16 5 17 6 18 7 19 8 20 9 21 10 22 11 23 12 24 276579 LINK GIGABIT ACT Ports - Cisco SG102-24 | Quick Start Guide - Page 48
(gigabit interface converter) représentent les points de connexion pour les modules MiniGBIC. Le commutateur non géré montable en rack peut ainsi établir une liaison montante vers d'autres commutateurs via une fibre optique. • Les ports MiniGBIC sont compatibles avec les modules MiniGBIC Cisco - Cisco SG102-24 | Quick Start Guide - Page 49
ère Le port d'alimentation est situé sur le panneau arrière du commutateur non géré montable en rack. POWER Panneau latéral Le verrou Kensington est situé sur le panneau latéral du commutateur non géré montable en rack. Seul le Commutateur non géré SF 100-16, SF 100-24, SG 100-16 ou SG 102-24 Cisco - Cisco SG102-24 | Quick Start Guide - Page 50
Modèle Poids SF 102-24 24 ports RJ-45 10/100, 2 ports Gigabit 1, 995 kg 4, 398 livres RJ-45/MiniGBIC partagés SG 100-16 1, 429 kg 16 ports RJ-45 10/100/1000 3, 150 livres SG 100-24 2, 292 kg 24 ports RJ-45 10/100/1000 2, 292 livres SG 102-24 1, 629 kg 24 ports RJ-45 10/100/1000, 3, 591 - Cisco SG102-24 | Quick Start Guide - Page 51
guide/ 78-19225-01.pdf Informations relatives aux réglementations, à la compatibilité et à la sécurité www.cisco.com/en/US/products/ps10007/ tsd_products_support_series_home.html Informations relatives à la garantie www.cisco.com/go/warranty Cisco Small Business Cisco Partner Central for Small - Cisco SG102-24 | Quick Start Guide - Page 52
West Tasman Drive San Jose, CA 95134-1706 USA http://www.cisco.com Tel: 408 526-4000 800 553-NETS (6387) Fax: 408 527-0883 Cisco, Cisco Systems, the Cisco logo, and the Cisco Systems logo are registered trademarks or trademarks of Cisco Systems, Inc. and/or its affiliates in the United States and
-
 1
1 -
 2
2 -
 3
3 -
 4
4 -
 5
5 -
 6
6 -
 7
7 -
8
-
9
-
10
-
11
-
12
-
13
-
14
-
15
-
16
-
17
-
18
-
19
-
20
-
21
-
22
-
23
-
24
-
25
-
26
-
27
-
28
-
29
-
30
-
31
-
32
-
33
-
34
-
35
-
36
-
37
-
38
-
39
-
40
-
41
-
42
-
43
-
44
-
45
-
46
-
47
-
48
-
49
-
50
-
51
-
52
 |
 |
Quick Start Guide
Guía de inicio rápido
Guida di riferimento rapido
Kurzanleitung
Guide de démarrage rapide
Cisco Small Business
Cisco Unmanaged Rackmount Switches
Package Contents
•
Cisco SF 100-16, SF 100-24, SF 102-24, SG 100-16, SG 100-24,
or SG 102-24 Unmanaged Rackmount Switch
•
Rackmount Kit
•
Power Cord
•
This Quick Start Guide