Cisco SPA509G Administration Guide - Page 47
Configuring Extensions, Customizing Cisco SPA and Wireless
 |
View all Cisco SPA509G manuals
Add to My Manuals
Save this manual to your list of manuals |
Page 47 highlights
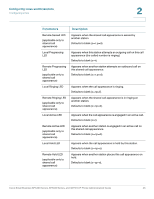
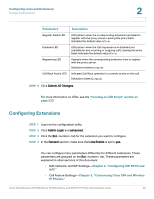
Configuring Lines and Extensions Configuring Extensions 2 Parameters Register Failed LED Disabled LED Registering LED Call Back Active LED Description LED pattern when the corresponding extension has failed to register with the proxy server. Leaving this entry blank indicates the default value of c=a. LED pattern when the Call Appearance is disabled (not available for any incoming or outgoing call). Leaving this entry blank indicates the default value of c=o. Appears when the corresponding extension tries to register with the proxy server. Defaults to blanks (c=r;p=s). Indicates Call Back operation is currently active on this call. Defaults to blank (c=r;p=s). STEP 5 Click Submit All Changes. For more information on LEDs, see the "Creating an LED Script" section on page 225. Configuring Extensions STEP 1 Log in to the configuration utility. STEP 2 Click Admin Login and advanced. STEP 3 Click the Ext tab for the extension you want to configure. STEP 4 In the General section, make sure that Line Enable is set to yes. You can configure many parameters differently for different extensions. These parameters are grouped on the Ext tab. These parameters are explained in other sections of this document: • NAT, Network, and SIP Settings-Chapter 4, "Configuring SIP, SPCP, and NAT." • Call Feature Settings-Chapter 3, "Customizing Cisco SPA and Wireless IP Phones." Cisco Small Business SPA300 Series, SPA500 Series, and WIP310 IP Phone Administration Guide 46
-
 1
1 -
2
-
3
-
4
-
5
-
6
-
7
-
8
-
9
-
10
-
11
-
12
-
13
-
14
-
15
-
16
-
17
-
18
-
19
-
20
-
21
-
22
-
23
-
24
-
25
-
26
-
27
-
28
-
29
-
30
-
31
-
32
-
33
-
34
-
35
-
36
-
37
-
38
-
39
-
40
-
41
-
 42
42 -
 43
43 -
 44
44 -
 45
45 -
 46
46 -
 47
47 -
 48
48 -
 49
49 -
 50
50 -
 51
51 -
 52
52 -
53
-
54
-
55
-
56
-
57
-
58
-
59
-
60
-
61
-
62
-
63
-
64
-
65
-
66
-
67
-
68
-
69
-
70
-
71
-
72
-
73
-
74
-
75
-
76
-
77
-
78
-
79
-
80
-
81
-
82
-
83
-
84
-
85
-
86
-
87
-
88
-
89
-
90
-
91
-
92
-
93
-
94
-
95
-
96
-
97
-
98
-
99
-
100
-
101
-
102
-
103
-
104
-
105
-
106
-
107
-
108
-
109
-
110
-
111
-
112
-
113
-
114
-
115
-
116
-
117
-
118
-
119
-
120
-
121
-
122
-
123
-
124
-
125
-
126
-
127
-
128
-
129
-
130
-
131
-
132
-
133
-
134
-
135
-
136
-
137
-
138
-
139
-
140
-
141
-
142
-
143
-
144
-
145
-
146
-
147
-
148
-
149
-
150
-
151
-
152
-
153
-
154
-
155
-
156
-
157
-
158
-
159
-
160
-
161
-
162
-
163
-
164
-
165
-
166
-
167
-
168
-
169
-
170
-
171
-
172
-
173
-
174
-
175
-
176
-
177
-
178
-
179
-
180
-
181
-
182
-
183
-
184
-
185
-
186
-
187
-
188
-
189
-
190
-
191
-
192
-
193
-
194
-
195
-
196
-
197
-
198
-
199
-
200
-
201
-
202
-
203
-
204
-
205
-
206
-
207
-
208
-
209
-
210
-
211
-
212
-
213
-
214
-
215
-
216
-
217
-
218
-
219
-
220
-
221
-
222
-
223
-
224
-
225
-
226
-
227
-
228
-
229
-
230
-
231
-
232
-
233
-
234
-
235
-
236
-
237
-
238
-
239
-
240
-
241
-
242
-
243
-
244
-
245
-
246
-
247
-
248
-
249
-
250
-
251
-
252
-
253
-
254
-
255
-
256
-
257
-
258
-
259
-
260
-
261
-
262
-
263
-
264
-
265
-
266
-
267
-
268
-
269
-
270
-
271
-
272
-
273
-
274
-
275
-
276
-
277
-
278
-
279
-
280
-
281
-
282
-
283
-
284
-
285
-
286
-
287
-
288
-
289
-
290
-
291
-
292
-
293
-
294
-
295
-
296
-
297
-
298
-
299
-
300
-
301
-
302
-
303
-
304
-
305
-
306
-
307
-
308
-
309
-
310
-
311
-
312
-
313
-
314
-
315
-
316
-
317
-
318
-
319
-
320
-
321
-
322
-
323
-
324
-
325
-
326
-
327
-
328
-
329
-
330
-
331
-
332
 |
 |