Cisco WS-C2950-24 Hardware Installation Guide - Page 94
Grounding the Chassis, Setting the Chassis on a Desktop
 |
View all Cisco WS-C2950-24 manuals
Add to My Manuals
Save this manual to your list of manuals |
Page 94 highlights
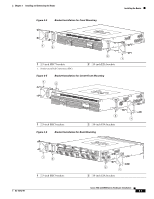
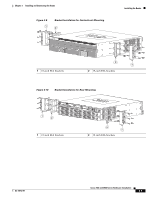
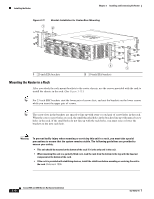
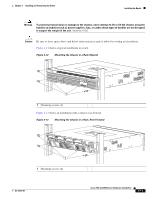
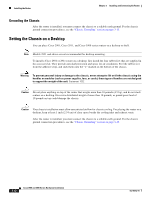
Installing the Router Chapter 3 Installing and Connecting the Router Grounding the Chassis After the router is installed, you must connect the chassis to a reliable earth ground. For the chassis ground connection procedures, see the "Chassis Grounding" section on page 3-15. Setting the Chassis on a Desktop You can place Cisco 2901, Cisco 2911, and Cisco 3900 series routers on a desktop or shelf. Note Models 2921 and above are not recommended for desktop mounting. To install a Cisco 2901 or 2911 router on a desktop, first install the four rubber feet that are supplied in the accessory kit. They provide anti-skid protection and space for air circulation. Peel the rubber feet from the adhesive strip, and stick them onto the "+" marked on the bottom of the chassis. Warning To prevent personal injury or damage to the chassis, never attempt to lift or tilt the chassis using the handles on modules (such as power supplies, fans, or cards); these types of handles are not designed to support the weight of the unit. Statement 1032 Caution Do not place anything on top of the router that weighs more than 10 pounds (4.5 kg), and do not stack routers on a desktop. Excessive distributed weight of more than 10 pounds, or pound point load of 10 pounds on top could damage the chassis. Caution Your chassis installation must allow unrestricted airflow for chassis cooling. For placing the router on a desktop, keep at least 1 inch (2.54 cm) of clear space beside the cooling inlet and exhaust vents. After the router is installed, you must connect the chassis to a reliable earth ground. For the chassis ground connection procedures, see the "Chassis Grounding" section on page 3-15. 3-12 Cisco 2900 and 3900 Series Hardware Installation OL-18712-01
-
 1
1 -
2
-
3
-
4
-
5
-
6
-
7
-
8
-
9
-
10
-
11
-
12
-
13
-
14
-
15
-
16
-
17
-
18
-
19
-
20
-
21
-
22
-
23
-
24
-
25
-
26
-
27
-
28
-
29
-
30
-
31
-
32
-
33
-
34
-
35
-
36
-
37
-
38
-
39
-
40
-
41
-
42
-
43
-
44
-
45
-
46
-
47
-
48
-
49
-
50
-
51
-
52
-
53
-
54
-
55
-
56
-
57
-
58
-
59
-
60
-
61
-
62
-
63
-
64
-
65
-
66
-
67
-
68
-
69
-
70
-
71
-
72
-
73
-
74
-
75
-
76
-
77
-
78
-
79
-
80
-
81
-
82
-
83
-
84
-
85
-
86
-
87
-
88
-
 89
89 -
 90
90 -
 91
91 -
 92
92 -
 93
93 -
 94
94 -
 95
95 -
 96
96 -
 97
97 -
 98
98 -
 99
99 -
100
-
101
-
102
-
103
-
104
-
105
-
106
-
107
-
108
-
109
-
110
-
111
-
112
-
113
-
114
-
115
-
116
-
117
-
118
-
119
-
120
-
121
-
122
-
123
-
124
-
125
-
126
-
127
-
128
-
129
-
130
-
131
-
132
-
133
-
134
-
135
-
136
-
137
-
138
-
139
-
140
-
141
-
142
-
143
-
144
-
145
-
146
-
147
-
148
-
149
-
150
-
151
-
152
-
153
-
154
-
155
-
156
-
157
-
158
-
159
-
160
-
161
-
162
-
163
-
164
-
165
-
166
-
167
-
168
-
169
-
170
-
171
-
172
-
173
-
174
-
175
-
176
-
177
-
178
-
179
-
180
-
181
-
182
-
183
-
184
-
185
-
186
-
187
-
188
-
189
-
190
-
191
-
192
-
193
-
194
-
195
-
196
-
197
-
198
-
199
-
200
-
201
-
202
-
203
-
204
-
205
-
206
-
207
-
208
-
209
-
210
-
211
-
212
-
213
-
214
-
215
-
216
-
217
-
218
-
219
-
220
 |
 |
