Cisco WS-C2960S-48TD-L Software Guide - Page 146
Adding Secure Addresses, Removing Secure Addresses
 |
View all Cisco WS-C2960S-48TD-L manuals
Add to My Manuals
Save this manual to your list of manuals |
Page 146 highlights
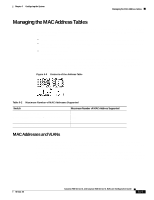
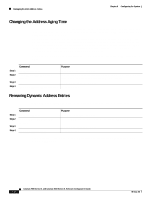
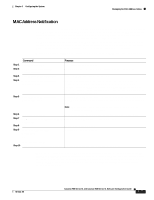
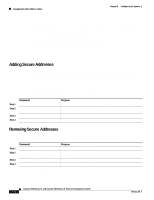
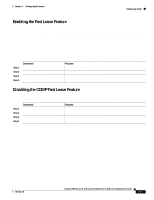
Managing the MAC Address Tables Chapter 6 Configuring the System This example shows how to specify 172.20.10.10 as the NMS, enable the switch to send MAC address notification traps to the NMS, enable the MAC address notification feature, set the interval time to 60 seconds, set the history-size to 100 entries, and enable traps whenever a MAC address is added on Fast Ethernet interface 0/4. Switch(config)# snmp-server host 172.20.10.10 Switch(config)# snmp-server enable traps mac-notification Switch(config)# mac-address-table notification interval 60 Switch(config)# mac-address-table notification history-size 100 Switch(config)# interface fastethernet0/4 Switch(config-if)# snmp trap mac-notification added You can verify the previous commands by entering the show mac-address-table notification privileged EXEC command. Adding Secure Addresses The secure address table contains secure MAC addresses and their associated ports and VLANs. A secure address is a manually entered unicast address that is forwarded to only one port per VLAN. If you enter an address that is already assigned to another port, the switch reassigns the secure address to the new port. You can enter a secure port address even when the port does not yet belong to a VLAN. When the port is later assigned to a VLAN, packets destined for that address are forwarded to the port. Beginning in privileged EXEC mode, follow these steps to add a secure address: Step 1 Step 2 Step 3 Step 4 Command configure terminal mac-address-table secure hw-addr interface vlan vlan-id end show mac-address-table secure Purpose Enter global configuration mode. Enter the MAC address, its associated port, and the VLAN ID. Return to privileged EXEC mode. Verify your entry. Removing Secure Addresses Beginning in privileged EXEC mode, follow these steps to remove a secure address: Step 1 Step 2 Step 3 Step 4 Command configure terminal no mac-address-table secure hw-addr vlan vlan-id end show mac-address-table secure Purpose Enter global configuration mode. Enter the secure MAC address, its associated port, and the VLAN ID to be removed. Return to privileged EXEC mode. Verify your entry. You can remove all secure addresses by using the clear mac-address-table secure command in privileged EXEC mode. 6-18 Catalyst 2900 Series XL and Catalyst 3500 Series XL Software Configuration Guide 78-6511-08
-
 1
1 -
2
-
3
-
4
-
5
-
6
-
7
-
8
-
9
-
10
-
11
-
12
-
13
-
14
-
15
-
16
-
17
-
18
-
19
-
20
-
21
-
22
-
23
-
24
-
25
-
26
-
27
-
28
-
29
-
30
-
31
-
32
-
33
-
34
-
35
-
36
-
37
-
38
-
39
-
40
-
41
-
42
-
43
-
44
-
45
-
46
-
47
-
48
-
49
-
50
-
51
-
52
-
53
-
54
-
55
-
56
-
57
-
58
-
59
-
60
-
61
-
62
-
63
-
64
-
65
-
66
-
67
-
68
-
69
-
70
-
71
-
72
-
73
-
74
-
75
-
76
-
77
-
78
-
79
-
80
-
81
-
82
-
83
-
84
-
85
-
86
-
87
-
88
-
89
-
90
-
91
-
92
-
93
-
94
-
95
-
96
-
97
-
98
-
99
-
100
-
101
-
102
-
103
-
104
-
105
-
106
-
107
-
108
-
109
-
110
-
111
-
112
-
113
-
114
-
115
-
116
-
117
-
118
-
119
-
120
-
121
-
122
-
123
-
124
-
125
-
126
-
127
-
128
-
129
-
130
-
131
-
132
-
133
-
134
-
135
-
136
-
137
-
138
-
139
-
140
-
 141
141 -
 142
142 -
 143
143 -
 144
144 -
 145
145 -
 146
146 -
 147
147 -
 148
148 -
 149
149 -
 150
150 -
 151
151 -
152
-
153
-
154
-
155
-
156
-
157
-
158
-
159
-
160
-
161
-
162
-
163
-
164
-
165
-
166
-
167
-
168
-
169
-
170
-
171
-
172
-
173
-
174
-
175
-
176
-
177
-
178
-
179
-
180
-
181
-
182
-
183
-
184
-
185
-
186
-
187
-
188
-
189
-
190
-
191
-
192
-
193
-
194
-
195
-
196
-
197
-
198
-
199
-
200
-
201
-
202
-
203
-
204
-
205
-
206
-
207
-
208
-
209
-
210
-
211
-
212
-
213
-
214
-
215
-
216
-
217
-
218
-
219
-
220
-
221
-
222
-
223
-
224
-
225
-
226
-
227
-
228
-
229
-
230
-
231
-
232
-
233
-
234
-
235
-
236
-
237
-
238
-
239
-
240
-
241
-
242
-
243
-
244
-
245
-
246
-
247
-
248
-
249
-
250
-
251
-
252
-
253
-
254
-
255
-
256
-
257
-
258
-
259
-
260
-
261
-
262
-
263
-
264
-
265
-
266
-
267
-
268
-
269
-
270
-
271
-
272
-
273
-
274
-
275
-
276
-
277
-
278
-
279
-
280
-
281
-
282
-
283
-
284
-
285
-
286
-
287
-
288
-
289
-
290
-
291
-
292
-
293
-
294
-
295
-
296
-
297
-
298
-
299
-
300
-
301
-
302
-
303
-
304
-
305
-
306
-
307
-
308
-
309
-
310
-
311
-
312
-
313
-
314
-
315
-
316
-
317
-
318
-
319
-
320
-
321
-
322
-
323
-
324
-
325
-
326
-
327
-
328
-
329
-
330
-
331
-
332
-
333
-
334
-
335
-
336
-
337
-
338
-
339
-
340
-
341
-
342
-
343
-
344
-
345
-
346
-
347
-
348
-
349
-
350
-
351
-
352
-
353
-
354
-
355
-
356
-
357
-
358
-
359
-
360
-
361
-
362
-
363
-
364
-
365
-
366
-
367
-
368
 |
 |
