Compaq 17XL260 Presario NA1700XL Series Maintenance and Service Guide - Page 115
Left and Right Speaker Assembly
 |
View all Compaq 17XL260 manuals
Add to My Manuals
Save this manual to your list of manuals |
Page 115 highlights
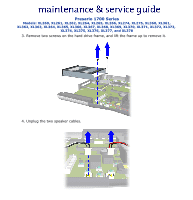
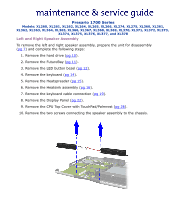
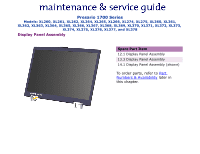
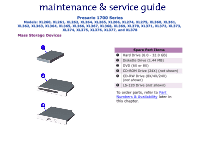
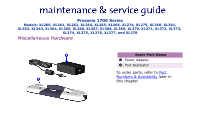
Presario 1700 Series Models: XL260, XL261, XL262, XL264, XL265, XL266, XL274, XL275, XL360, XL361, XL362, XL363, XL364, XL365, XL366, XL367, XL368, XL369, XL370, XL371, XL372, XL373, XL374, XL375, XL376, XL377, and XL378 Left and Right Speaker Assembly To remove the left and right speaker assembly, prepare the unit for disassembly (pg 7) and complete the following steps: 1. Remove the hard drive (pg 10). 2. Remove the FutureBay (pg 11). 3. Remove the LED button bezel (pg 12). 4. Remove the keyboard (pg 14). 5. Remove the Heatspreader (pg 15). 6. Remove the Heatsink assembly (pg 16). 7. Remove the keyboard cable connection (pg 19). 8. Remove the Display Panel (pg 22). 9. Remove the CPU Top Cover with TouchPad/Palmrest (pg 26). 10. Remove the two screws connecting the speaker assembly to the chassis.
-
 1
1 -
2
-
3
-
4
-
5
-
6
-
7
-
8
-
9
-
10
-
11
-
12
-
13
-
14
-
15
-
16
-
17
-
18
-
19
-
20
-
21
-
22
-
23
-
24
-
25
-
26
-
27
-
28
-
29
-
30
-
31
-
32
-
33
-
34
-
35
-
36
-
37
-
38
-
39
-
40
-
41
-
42
-
43
-
44
-
45
-
46
-
47
-
48
-
49
-
50
-
51
-
52
-
53
-
54
-
55
-
56
-
57
-
58
-
59
-
60
-
61
-
62
-
63
-
64
-
65
-
66
-
67
-
68
-
69
-
70
-
71
-
72
-
73
-
74
-
75
-
76
-
77
-
78
-
79
-
80
-
81
-
82
-
83
-
84
-
85
-
86
-
87
-
88
-
89
-
90
-
91
-
92
-
93
-
94
-
95
-
96
-
97
-
98
-
99
-
100
-
101
-
102
-
103
-
104
-
105
-
106
-
107
-
108
-
109
-
 110
110 -
 111
111 -
 112
112 -
 113
113 -
 114
114 -
 115
115 -
 116
116 -
 117
117 -
 118
118 -
 119
119 -
 120
120 -
121
-
122
-
123
-
124
-
125
-
126
-
127
-
128
-
129
-
130
-
131
-
132
-
133
-
134
-
135
 |
 |
