Compaq Armada e500 Compaq Armada E500 Series Reference Guide - Page 84
Using the CD-ROM Drive or DVD-ROM Drive, Inserting a Compact Disc, Removing a Compact Disc
 |
View all Compaq Armada e500 manuals
Add to My Manuals
Save this manual to your list of manuals |
Page 84 highlights
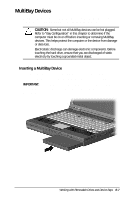
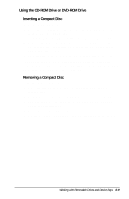
Using the CD-ROM Drive or DVD-ROM Drive Inserting a Compact Disc 1. Turn on the computer. 2. Press the eject button on the bezel of the CD-ROM drive to release the CD loading tray. 3. Slowly pull out the CD loading tray until it is fully extended. 4. Remove the CD from its protective case and place it in the CD loading tray, label side up. Handle the CD by the edges, not by the flat surfaces. 5. Push lightly on the bezel of the CD loading tray to close it. The light on the CD-ROM drive turns on while the computer reads the CD's table of contents. The light turns off when the CDROM drive is ready to receive commands. Removing a Compact Disc 1. Turn on the computer. 2. Press the eject button on the front panel to open the CD loading tray. 3. Slowly pull out the CD loading tray until it is fully extended. 4. Remove the CD from the tray. Handle the CD by the edges, not by the flat surfaces. 5. Place the CD in its protective case. 6. Gently push the front panel of the CD loading tray to close it. Working with Removable Drives and Device Bays 6-9
-
 1
1 -
2
-
3
-
4
-
5
-
6
-
7
-
8
-
9
-
10
-
11
-
12
-
13
-
14
-
15
-
16
-
17
-
18
-
19
-
20
-
21
-
22
-
23
-
24
-
25
-
26
-
27
-
28
-
29
-
30
-
31
-
32
-
33
-
34
-
35
-
36
-
37
-
38
-
39
-
40
-
41
-
42
-
43
-
44
-
45
-
46
-
47
-
48
-
49
-
50
-
51
-
52
-
53
-
54
-
55
-
56
-
57
-
58
-
59
-
60
-
61
-
62
-
63
-
64
-
65
-
66
-
67
-
68
-
69
-
70
-
71
-
72
-
73
-
74
-
75
-
76
-
77
-
78
-
 79
79 -
 80
80 -
 81
81 -
 82
82 -
 83
83 -
 84
84 -
 85
85 -
 86
86 -
 87
87 -
 88
88 -
 89
89 -
90
-
91
-
92
-
93
-
94
-
95
-
96
-
97
-
98
-
99
-
100
-
101
-
102
-
103
-
104
-
105
-
106
-
107
-
108
-
109
-
110
-
111
-
112
-
113
-
114
-
115
-
116
-
117
-
118
-
119
-
120
-
121
-
122
-
123
-
124
-
125
-
126
-
127
-
128
-
129
-
130
-
131
-
132
-
133
-
134
-
135
-
136
-
137
-
138
-
139
-
140
-
141
-
142
-
143
-
144
-
145
-
146
-
147
-
148
-
149
-
150
-
151
-
152
-
153
-
154
-
155
-
156
-
157
-
158
-
159
-
160
-
161
-
162
-
163
-
164
-
165
-
166
-
167
-
168
-
169
-
170
-
171
-
172
-
173
-
174
-
175
-
176
-
177
-
178
-
179
-
180
-
181
-
182
-
183
-
184
-
185
-
186
-
187
-
188
-
189
-
190
-
191
-
192
-
193
-
194
-
195
-
196
-
197
-
198
-
199
-
200
-
201
-
202
-
203
-
204
-
205
 |
 |