Craftsman 11585 Operation Manual - Page 20
Positive
 |
View all Craftsman 11585 manuals
Add to My Manuals
Save this manual to your list of manuals |
Page 20 highlights
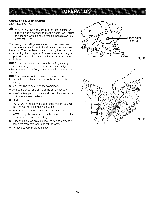
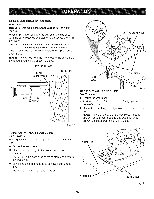
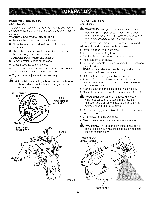
POSITIVE0 ° BEVEL STOP See Figure 23. The saw has a positive 0 ° bevel stop that has been factory adjusted to assure 0 ° angle of the saw blade when making 90 ° cuts. TO CHECK POSiTiVE 0° BEVEL STOP [] Remove the battery pack from the saw. [] Place the saw in an upside down position on a workbench. [] Check the squareness of the saw blade to the base of the saw using a carpenter's square. TO ADJUST POSiTiVE 0° BEVEL STOP [] Remove battery pack from the saw. [] Loosen bevel adjustment knob. [] Turn adjustment screw with a screwdriver and adjust base until it is square with the saw blade. [] Tighten bevel adjustment knob securely. _, WARNING: Attempting a bevel cut without having the bevel adjustment knob securely tightened can result in serious injury. ADJUSTMENT SCREW BEVEL ADJUSTMENT KNOB HEX NUT POSITIVE0° BEVEL STOP BLADE POCKET CUTTING See Figure 24. _ WARNING: Always adjust bevel setting to zero before making a pocket cut. Attempting a pocket cut at any other setting can result in loss of control of the saw possibly causing serious injury. NOTE: The rear laser aids in aligning pocket cuts and following the kerf when exiting the workpiece. [] Remove battery pack from saw. [] Adjust the bevel setting to zero. [] Set the blade to the correct blade depth setting. [] Place battery pack in saw. [] Swing the lower blade guard up using the lower blade guard handle. NOTE: Always raise the lower blade guard with the handle to avoid serious injury. [] Hold the lower blade guard by the handle. [] Rest the front of the base flat against the workpiece with the rear of the handle raised so the blade does not touch the workpiece. [] Start the saw and let the blade reach full speed. [] Guide the saw into the workpiece and make the cut. _ WARNING: Always cut in a forward direction when pocket cutting. Cutting in the reverse direction could cause the saw to climb up on the workpiece and back toward you. [] Release the trigger and allow the blade to come to a complete stop. [] Lift the saw from the workpiece. [] Clear corners out with a hand saw or sabre saw. ,_ WARNING: Never tie the lower blade guard in a raised position. Leaving the blade exposed could lead to serious injury. LOWER BLADE GUARD HANDLE CARPENTER'S SQUARE Fig. 23 20 / POCKETCUT Fig. 24
-
 1
1 -
2
-
3
-
4
-
5
-
6
-
7
-
8
-
9
-
10
-
11
-
12
-
13
-
14
-
 15
15 -
 16
16 -
 17
17 -
 18
18 -
 19
19 -
 20
20 -
 21
21 -
 22
22 -
 23
23 -
 24
24
 |
 |
