Craftsman 17776 Owners Manual - Page 6
Wheel/Caster, Assembly, Float/Cage - parts
 |
UPC - 648846005461
View all Craftsman 17776 manuals
Add to My Manuals
Save this manual to your list of manuals |
Page 6 highlights
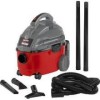
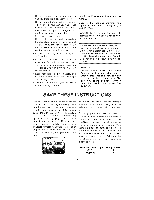
Wheel/Caster Assembly WARNING: For your own safety, never connect plug to power source outlet until all assembly steps are complete and you have read and understood the safety and operation instructions, Do not operate vac with any parts damaged or missing. Locate the two large wheels and the two dual wheel casters in the carton. The casters are designed to fit in the front of your 4=gallon drum and the larger wheels fit the rear of the drum. 1.Place the drum upside down on a flat surface as illustrated. 2. Insert the dual wheel bottom of the drum places). casters into the as shown (two 3. Push the caster until the flange on the caster stem is inserted all the way into the socket. You will be able to hear the flange snap into the socket. The caster will swivel easily when positioning is correct. 4. Position the dove tail portion of one of the large wheels into the drum as illustrated. Tap the wheel support into the drum with a soft mallet. Repeat for the second large wheel. Casters (2) "-Wheels (2) Float/Cage Assembly NOTE: If filter cage needs to be removed, use a flat blade screwdriver and insert the blade near one of the tabs between the filter cage and the center ring of the lid. Pry the tab out of the slot. Tilt the cage and lift away from the lid. To replace, follow the assembly instructions below: 1. Grasp latches on both the right and left side of the power head. Slowly pull latches away from drum and lift the power head off the drum. Flip the power head and place it in the drum. 2. Locate the float. Place the float over the opening in the center of the lid. WARNING: To avoid personal injury or damage to vac be sure to keep hands, fingers, or any other foreign objects out of the center opening when assembling the float. 3. Line up filter cage tabs with the slots in the center ring of the lid. 4. Push on the filter cage until the tabs snap into the slots for a secure fit. (One tab at a time). Lid\ \ ___- \___ _Power Head - Filter Cage ('_-_-- Filter Tab (3) ',--J "_ Float Fi,ter Tab .... Power Head
-
 1
1 -
 2
2 -
 3
3 -
 4
4 -
 5
5 -
 6
6 -
 7
7 -
 8
8 -
 9
9 -
 10
10 -
 11
11 -
 12
12 -
13
-
14
-
15
-
16
-
17
-
18
-
19
-
20
-
21
-
22
-
23
-
24
-
25
-
26
-
27
-
28
 |
 |
