Cub Cadet XT1 LT42e Operation Manual
Cub Cadet XT1 LT42e Manual
 |
View all Cub Cadet XT1 LT42e manuals
Add to My Manuals
Save this manual to your list of manuals |
Cub Cadet XT1 LT42e manual content summary:
- Cub Cadet XT1 LT42e | Operation Manual - Page 1
Table of Contents Safe Operation Practices 2 Assembly 7 Operation 10 Service and Maintenance 13 Troubleshooting 17 Parts/Warranty See Separate Supplement WARNING Read and follow all safety rules and instructions in this manual before attempting to operate this machine. Failure to comply with - Cub Cadet XT1 LT42e | Operation Manual - Page 2
proper instruction. 5. If situations occur which are not covered in this manual, use care and good judgment. Contact your customer service stop the tractor. Restart the tractor. If the system fault problem persists, contact your authorized service dealer. 5. Do not put hands or feet near rotating - Cub Cadet XT1 LT42e | Operation Manual - Page 3
. Allow the tractor to cool for five minutes before attempting any service. 23. Do not turn off tractor and freewheel downhill. Over-speeding Children 14 and over should read and understand the instructions and safe operation practices in this manual and on the tractor and should be trained and - Cub Cadet XT1 LT42e | Operation Manual - Page 4
the equipment is in safe working condition. Review the Maintenance Schedule chart in this manual for service interval information. insulation. If either cord in a cool and dry area. 15. Maintain or replace safety and instruction labels, as necessary. 13. Keep the battery charger and cords away - Cub Cadet XT1 LT42e | Operation Manual - Page 5
Operator's Manual before attempting to service this tractor. WARNING - STORE TRACTOR INDOORS Store tractor indoors at all times when not in use. WARNING Your Responsibility-Restrict the use of this tractor to persons who read, understand and follow the warnings and instructions in this manual and - Cub Cadet XT1 LT42e | Operation Manual - Page 6
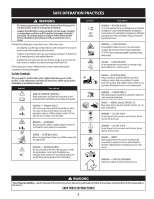
Slope Gauge SLOPE GAUGE 6 (OK) 15˚/25% Slope (TOO STEEP) Figure 1 15˚/25% dashed line USE THIS SLOPE GAUGE TO DETERMINE IF A SLOPE IS TOO STEEP FOR SAFE OPERATION! To check the slope, proceed as follows: 1. Remove this page and fold along the dashed line. 2. Locate a vertical object on or - Cub Cadet XT1 LT42e | Operation Manual - Page 7
(b) secure one side of the seat and seat bracket. While supporting the seat, remove the Phillips screwdriver and secure the other side 3. Lower Deck Discharge Chute Deflector Figure 3 • Standard screwdriver Manually Moving the Tractor CAUTION Never tow your tractor. Towing the tractor - Cub Cadet XT1 LT42e | Operation Manual - Page 8
wheels are an anti-scalp feature of the deck and are not designed to support the weight of the cutting deck. Move the tractor to a firm and level to-back and side-to-side. See the Service and Maintenance section for deck leveling information and instructions. 3. Select the height position of the - Cub Cadet XT1 LT42e | Operation Manual - Page 9
shoulder bolt to 25-30 ft-lbs (33.9-40.7 N-m). Note: Refer to Adjusting the Deck in the Service and Maintenance section of this manual for more detailed instructions regarding various deck adjustments. Charging the Battery WARNING • California Proposition 65: Cancer and reproductive harm - www - Cub Cadet XT1 LT42e | Operation Manual - Page 10
CAUTION Prior to operating the tractor, refer to both Safety Interlock Switches and Starting The Tractor in the Operation section of this manual for detailed instructions regarding the VCM and operating the tractor in REVERSE CAUTION MODE. Start/Stop Button Located on the VCM, the start/stop button - Cub Cadet XT1 LT42e | Operation Manual - Page 11
brake. Refer to the Engaging the Parking Brake section of this manual for detailed instructions regarding the parking brake. Storage Tray (G) The storage tray is malfunction, do not operate the tractor. Contact an authorized service dealer. • The safety interlock system prevents the operator from - Cub Cadet XT1 LT42e | Operation Manual - Page 12
run time. When this message is displayed, the blade should be checked and sharpened or replaced if worn. For instructions, see Sharpening or Replacing the blades in the Service and Maintenance section of this manual. Note: The operator MUST be seated in the seat. 1. Start the tractor as previously - Cub Cadet XT1 LT42e | Operation Manual - Page 13
the key. Follow the maintenance schedule given below. This chart describes service guidelines only. Use the Service Log column to keep track of completed maintenance tasks. Contact an authorized service dealer to schedule a service. Clean Top and Underside of Deck Check/Clean Around fuses, Wiring - Cub Cadet XT1 LT42e | Operation Manual - Page 14
SERVICE AND the Deck Leveling the Deck (Front-To-Rear) The front of the deck is supported by a stabilizer bar that can be adjusted to level the deck from front to rear can result in fire. Always follow the instructions in this manual regarding lubrication locations and intervals. Contact your - Cub Cadet XT1 LT42e | Operation Manual - Page 15
designed to support the instructions. Seat Adjustment Refer to the Assembly section of this manual for seat adjustment instructions problem persists, the front axle tie rods may be out of alignment. Take your tractor to an authorized service dealer to have the front wheels properly aligned. Service - Cub Cadet XT1 LT42e | Operation Manual - Page 16
install the deck, reverse the Deck Removal instructions on page 15. Blade(s) WARNING • 24. 3. Remove the hex screw (a) and the blade bell support (b) which holds the blade (c) and the blade adapter (d) Fully recharge the battery before returning to service. Battery Disposal Disposing of Damaged or - Cub Cadet XT1 LT42e | Operation Manual - Page 17
SERVICE AND MAINTENANCE Troubleshooting Problem Excessive Vibration Cause instructed in the battery charger manual 2. Raise deck LCD Screen Messages Message Description Brake Switch Fault: The deck and drive shut off. Power off and restart tractor. If problem persists contact qualified service - Cub Cadet XT1 LT42e | Operation Manual - Page 18
, se pueden provocar lesiones personales. ADVERTENCIA Proposición 65 de California Cáncer y Daños Reproductivos - www.P65Warnings.ca.gov. NOTA: Este Manual del Operador corresponde a varios modelos. Las características pueden variar según los modelos. No todas las características que se incluyen en - Cub Cadet XT1 LT42e | Operation Manual - Page 19
EN CUENTA LA ADVERTENCIA! PELIGRO Este tractor fue diseñado para ser utilizado respetando las prácticas de operación seguras que figuran en este manual. Al igual que con cualquier tipo de equipo motorizado, un descuido o error por parte del operador puede producir lesiones graves. Este tractor es - Cub Cadet XT1 LT42e | Operation Manual - Page 20
este tractor. Los niños de 14 años en adelante deben leer y entender las instrucciones y las prácticas de operación seguras contenidas en este manual y sobre el tractor, y deben ser entrenados y supervisados por un adulto. 8. No permita que se transporte a ningún niño por diversión en el tractor. El - Cub Cadet XT1 LT42e | Operation Manual - Page 21
para asegurarse que la máquina se encuentra en condiciones seguras de operación. Revise la tabla del Cronograma de Mantenimiento que figura en este manual para obtener información sobre el intervalo de servicio. 11. Después de golpear un objeto extraño, detenga el tractor, presione el botón de - Cub Cadet XT1 LT42e | Operation Manual - Page 22
PRÁCTICAS DE OPERACIÓN SEGURAS 15. No pruebe el cargador con material conductor. Existe el riesgo de descarga eléctrica. 16. No cubra el cargador de baterías. El cargador de baterías se puede sobrecalentar. 17. No permita que la batería o el cargador de baterías se sobrecalienten. Si se calientan, - Cub Cadet XT1 LT42e | Operation Manual - Page 23
tractor deben ser reparados únicamente por un distribuidor de servicio autorizado. Antes de intentar realizar un servicio a este tractor, lea el Manual del Operador. ADVERTENCIA - GUARDE EL TRACTOR BAJO TECHO Siempre cuando el tractor bajo techo cuando no esté en uso. ADVERTENCIA Su Responsabilidad - Cub Cadet XT1 LT42e | Operation Manual - Page 24
Slope Gauge INDICADOR DE PENDIENTE 7 (OK) 15˚/25% Slope (TOO STEEP) 15˚/25% Slope Figure 1 Figure 2 15˚/25% dashed line USE THIS SLOPE GAUGE TO DETERMINE IF A SLOPE IS TOO STEEP FOR SAFE OPERATION! To check the slope, proceed as follows: 1. Remove this page and fold along the dashed line. 2. - Cub Cadet XT1 LT42e | Operation Manual - Page 25
" y/o de cubo • Llave de 7/16" y/o de cubo • Llave de 1/2" y/o de cubo • Llave de 5/8" y/o de cubo • Destornillador Phillips • Destornillador estándar Movimiento manual del tractor PRECAUCIÓN Nunca remolque su tractor. Si se remolca el tractor con las ruedas traseras apoyadas en el suelo se pueden - Cub Cadet XT1 LT42e | Operation Manual - Page 26
MONTAJE 3. Con los tornillos traseros en su lugar, alinee los orificios de la tapa del capó (a) con los orificios del capó (c) y fije en su lugar con los restantes dos tornillos (d). Consulte la Figura 5. 4. Ajuste los cuatro tornillos hasta 16-24 pulgadas-libras (1.8-2.7 N-m). 2. Asegure el - Cub Cadet XT1 LT42e | Operation Manual - Page 27
. • No cargue ni haga funcionar el tractor bajo la lluvia o en condiciones húmedas. Consulte más información e instrucciones sobre cómo cargar la batería en el manual que se incluye con su cargador de batería. El puerto de carga del tractor se ubica en el lado izquierdo del tablero. Para cargar la - Cub Cadet XT1 LT42e | Operation Manual - Page 28
el botón de control de velocidad crucero, el pedal de freno o el pedal de marcha adelante. Consulte la sección Funcionamiento de este manual para ver instrucciones detalladas sobre la función control de velocidad crucero. Nota: El control de velocidad crucero no se activará a la velocidad absoluta - Cub Cadet XT1 LT42e | Operation Manual - Page 29
del tractor , debajo del volante, se utiliza para activar el freno de mano. Consulte la sección Aplicación del Freno de Mano de este manual para ver instrucciones detalladas sobre el freno de mano. Nota: Para volver a encender el tractor, siga los procedimientos de encendido que se encuentran en - Cub Cadet XT1 LT42e | Operation Manual - Page 30
si estuviera desgastada. Para consultar instrucciones, vea los títulos Afilado o Reemplazo de Cuchillas en la sección Servicio y Mantenimiento de este manual. Recordatorio de Controlar la Presión de los Neumáticos: aparece cada 5 horas. Cuando aparezca este mensaje, controle y ajuste la presi - Cub Cadet XT1 LT42e | Operation Manual - Page 31
SERVICIO Y MANTENIMIENTO ADVERTENCIA Antes de inspeccionar, limpiar o reparar el tractor, apáguelo y retire la llave. Siga el cronograma de mantenimiento que se presenta a continuación. En esta tabla sólo se describen pautas de servicio. Utilice la columna Registro de Servicio para hacer el - Cub Cadet XT1 LT42e | Operation Manual - Page 32
de incendio. Lubricación PELIGRO Los desperfectos de cojinetes y el sobrecalentamiento podrían provocar un incendio. Siempre siga las instrucciones de este manual en cuanto a dónde lubricar y su frecuencia. Contáctese con su distribuidor autorizado si tiene alguna pregunta sobre dónde y cada cu - Cub Cadet XT1 LT42e | Operation Manual - Page 33
ajustar las ruedas de la plataforma, consulte las instrucciones en la sección Montaje. Ajuste del Asiento Consulte en la sección Montaje de este manual las instrucciones para el ajuste del asiento. ADVERTENCIA Antes de hacer funcionar el tractor, compruebe que el asiento esté enganchado en el tope - Cub Cadet XT1 LT42e | Operation Manual - Page 34
SERVICIO Y MANTENIMIENTO Mirando la plataforma desde el lado izquierdo del tractor, ubique el pasador de 3. chaveta en el lado posterior izquierdo de la plataforma. Consulte la Figura 22. 4. Retire el pasador y saque el pasador de la plataforma del brazo de elevación de la misma. Consulte la - Cub Cadet XT1 LT42e | Operation Manual - Page 35
al cargador 1. Vuelva a encender las cuchillas (PTO) Asegúrese de que esté activado el Modo Precaución Marcha Atrás. 1. Cargue la batería según las instrucciones del manual del cargador de la batería 2. Eleve la plataforma 18 - Cub Cadet XT1 LT42e | Operation Manual - Page 36
SERVICIO Y MANTENIMIENTO Mensajes de la Pantalla LCD Mensaje Descripción Falla en Interruptor de Freno: Plataforma y transmisión apagadas. Apague y vuelva a encender el tractor. Si el problema persiste, póngase en contacto con personal de servicio calificado. Falla en Sensor de Pedal de
-
 1
1 -
 2
2 -
 3
3 -
 4
4 -
 5
5 -
 6
6 -
 7
7 -
8
-
9
-
10
-
11
-
12
-
13
-
14
-
15
-
16
-
17
-
18
-
19
-
20
-
21
-
22
-
23
-
24
-
25
-
26
-
27
-
28
-
29
-
30
-
31
-
32
-
33
-
34
-
35
-
36
 |
 |
O
PERATOR
’
S
M
ANUAL
Battery-Powered Lithium-Ion Tractor
WARNING
Read and follow all safety rules and instructions in this manual before attempting to operate this machine.
Failure to comply with these instructions may result in personal injury.
WARNING
California Proposition 65
Cancer and Reproductive Harm – www.P65Warnings.ca.gov.
NOTE:
This Operator’s Manual covers several models. Features may vary by model. Not all features in this manual are applicable to all
models and the model depicted may differ from yours.
Safe Operation Practices
........................................
2
Assembly
..................................................................
7
Operation
................................................................
10
Service and Maintenance
......................................
13
Troubleshooting
.....................................................
17
Parts/Warranty
..............
See Separate Supplement
Table of Contents
3
3
A
7
S
Record Product Information
Before setting up and operating your new equipment,
please locate the model plate on the equipment and
record the information in the provided area to the right.
You can locate the model plate by lifting up the seat
and looking under the seat pan. This information will be
necessary, should you seek technical support via our web
site or with your local authorized service dealer.
M
ODEL
N
UMBER
S
ERIAL
N
UMBER
Form No. 769-19551A
(October 11, 2019)