Cub Cadet XT1 LT42e Operation Manual - Page 11
USB Charging Ports If Equipped K
 |
View all Cub Cadet XT1 LT42e manuals
Add to My Manuals
Save this manual to your list of manuals |
Page 11 highlights
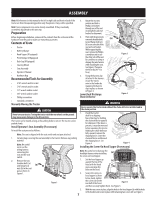
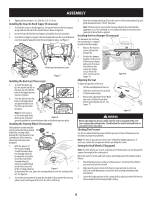
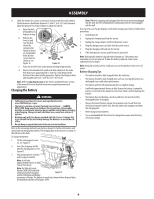
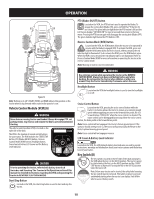
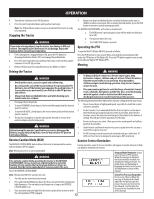
OPERATION Forward Drive Pedal (C) Seat Adjustment Lever (Not Shown) The forward drive pedal is located on the right side of the tractor, along the running board. Press the forward drive pedal forward to allow the tractor to travel forward. Ground speed is also controlled with the forward drive pedal. The further forward the pedal is depressed, the faster the tractor will travel. The pedal will return to its original/neutral position when it's not pressed. The seat adjustment lever is located below the left side of the seat. The lever allows the seat to move both forward and backward. Refer to the Assembly section for instructions on adjusting the seat position. Operation Reverse Drive Pedal (D) The reverse drive pedal is located on the right side of the tractor along the running board. Ground speed is also controlled with the reverse drive pedal. The further downward the pedal is depressed, the faster the tractor will travel. The pedal will return to its original/neutral position when it's not depressed. Brake Pedal (E) The brake pedal is located on the left side of the tractor, along the running board. The brake pedal can be used for stopping the tractor or setting the parking brake. Note: The brake pedal must be fully depressed to start the tractor. Refer to Safety Interlock Switches for more information. Park Brake Lever (F) Located in the center of the tractor's dash panel below the steering wheel, the park brake lever is used to engage the parking brake. Refer to the Engaging the Parking Brake section of this manual for detailed instructions regarding the parking brake. Storage Tray (G) The storage tray is located to the left of the operator's seat. Cup Holder (H) The cup holder is located to the left of the operator's seat. Headlight (I) The headlights will turn ON whenever the key is ON and the headlight button is pressed. To turn the headlights OFF, press the headlight button again. Charging Port (J) The charging port is located on the left side of the dash. To access the charging port, lift up on the charging port cover. USB Charging Ports (If Equipped) (K) If equipped, a pair of USB power sources are located on the right side of the dash. The two USB ports are both rated 2.1A. The ports can be used to charge your phone or power up other USB devices. Safety Interlock System This tractor is equipped with a safety interlock system for the protection of the operator. If the interlock system should ever malfunction, do not operate the tractor. Contact an authorized service dealer. • The safety interlock system prevents the operator from turning the tractor ON unless the operator is in the seat with the parking brake engaged or brake pedal fully depressed and the drive pedal in the neutral position. • The tractor will not operate with the charger cord plugged into the charging port and/or the charging port cover open or removed. • The tractor will automatically shut off the blade(s) and drive motors if the operator leaves the seat. Note: To restart the tractor, follow the proper starting procedures as instructed below in Starting the Tractor section. WARNING Do not operate the tractor if the safety interlock system is malfunctioning. This system was designed for your safety and protection. Engaging the Parking Brake To engage the parking brake: 1. Fully depress the brake pedal and hold it down with your foot. 2. Depress the parking brake lever. 3. Release the brake pedal to allow the parking brake to engage. To release the parking brake: 1. Depress the brake pedal and the parking brake will release. Setting the Cutting Height Select the height position of the cutting deck by placing the deck lift lever in any of the twelve (12) different cutting height notches on the right side of the rear fender. To use the deck lift lever, move the lever to the left, then place it in the notch best suited for your application. WARNING Keep hands and feet away from the discharge opening of the cutting deck. WARNING Do not have any devices plugged into your USB charging port when starting the tractor. Doing so may cause damage to your device. Deck Lift Lever (L) Starting the Tractor 1. Unplug the charging cord (if necessary). If the cord is still plugged in a reminder will display on the VCM when the key switch is turned on. 2. Sit in the operator's seat. Insert the key into the key switch. The deck lift lever is located in the right rear fender and is used to raise and lower the deck. Pull the lever to the left out of the index notch and push downward 3. to lower the deck, or pull upward to raise the deck. When the desired height is attained, move the lever to the right until fully engaged in the index notch. 11 Note: A reminder will display on the VCM if the operator is not in the seat when the key switch is turned on. Fully depress the brake pedal or set the parking brake. Note: If the brake is not engaged a reminder will display on the VCM when the key switch is turned on.
-
 1
1 -
2
-
3
-
4
-
5
-
 6
6 -
 7
7 -
 8
8 -
 9
9 -
 10
10 -
 11
11 -
 12
12 -
 13
13 -
 14
14 -
 15
15 -
 16
16 -
17
-
18
-
19
-
20
-
21
-
22
-
23
-
24
-
25
-
26
-
27
-
28
-
29
-
30
-
31
-
32
-
33
-
34
-
35
-
36
 |
 |
