Cub Cadet XT1 LT42e Operation Manual - Page 8
Installing the Snap-On Hood Topper If necessary
 |
View all Cub Cadet XT1 LT42e manuals
Add to My Manuals
Save this manual to your list of manuals |
Page 8 highlights
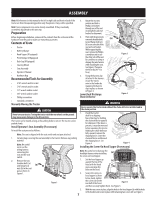
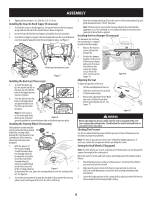
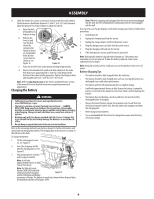
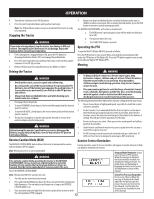
ASSEMBLY 4. Tighten all four screws to 16-24 in-lbs (1.8-2.7 N-m). Installing the Snap-On Hood Topper (If necessary) 1. To install the snap-on hood topper (a), line up the holes on the hood topper (a) up with the tabs (b) in the hood frame as shown in Figure 6. 2. Insert the tabs (b) into the hood topper and pull back to lock into place. 3. Once the hood topper is in place, the two locking tabs near the rear of the hood need to be pushed upward to lock the hood topper in place. See Figure 7. (a) (b) (b) (b) Hood Topper Not Shown for Clarity (b) Figure 6 Figure 7 Installing the Dash Cap (If necessary) 1. To install the dash cap (a) (a), line up the tabs (b) on the dash cap (a) with the holes in the upper dash as shown in Figure 8. (a) 2. Slide the tabs (b) into the holes in the upper dash and push forward (c) on the dash cap (a) to lock into place. (b) (b) Note: Be sure to press (b) (b) on the lower part of the dash cap (a) facing the Figure 8 operator position to ensure the lower tabs on the dash cap are in place. Installing the Steering Wheel (If necessary) The hardware for attaching the steering wheel has been packed (f) within the steering wheel, beneath the steering wheel cap. Carefully pry off the steering wheel cap and remove the (a) hardware. (e) (b) 1. With the wheels of the tractor pointing (c) straight forward, align the steering wheel (a) by using the center-line (b) on the front of the steering wheel (a) (d) pointing straight ahead and the flat section (c) of the steering wheel (a) Figure 9 facing toward the seat, place the steering wheel (a) over the steering shaft (d). See Figure 9. 2. Secure the steering wheel (a) with the hex bolt (e) from under the steering wheel cap (f) and torque to 18-22 ft.-lbs (24.4-29.8 N-m). 3. Place the steering wheel cap (f) over the center of the steering wheel (a) and push downward until it "clicks" into place. Note: The hex bolt (e) securing the steering wheel (a) has thread locker applied to it, so if it is removed, it is recommended that the hex bolt (a) be replaced or thread lock re-applied. Installing the Front Bumper (If necessary) The hardware for attaching the front bumper is shipped installed into the bumper. 1. Remove the four hex (b) screws (a) from the bumper (b). 2. Position the bumper (a) brackets to the inside of the tractor's frame and secure it in place with the four hex screws (a). Torque to 332-405 in-lbs (37.5-45.75 N-m).See Figure 10. Adjusting the Seat (a) Figure 10 To adjust the position of the seat: 1. Lift the seat adjustment lever up. 2. Slide the seat forward or rearward to the desired position. 3. Release the adjustment lever. Make sure seat is locked into position before operating the tractor. See Figure 11. Figure 11 WARNING Before operating the tractor, make sure the seat is engaged in the seatstop. Engage the parking brake. Stand behind the tractor and pull back on seat until it clicks into place. Checking Tire Pressure See the tire sidewall for the proper inflation pressure. Proper inflation pressure should be maintained at all times. Note: The tires on your tractor may be over-inflated for shipping purposes. If necessary, reduce the tire pressure before operating the tractor. Setting the Deck Wheels (If Equipped) Note: The deck wheels are an anti-scalp feature of the deck and are not designed to support the weight of the cutting deck. Move the tractor to a firm and level surface, preferably pavement, and proceed as follows: 1. Check the tire pressure, make sure the pressure is correct per the inflation pressure listed on the sidewall. 2. Make sure the deck is level, both front-to-back and side-to-side. See the Service and Maintenance section for deck leveling information and instructions. 3. Select the height position of the cutting deck by placing the deck lift lever in the normally desired mowing height setting. 8
-
 1
1 -
2
-
 3
3 -
 4
4 -
 5
5 -
 6
6 -
 7
7 -
 8
8 -
 9
9 -
 10
10 -
 11
11 -
 12
12 -
 13
13 -
14
-
15
-
16
-
17
-
18
-
19
-
20
-
21
-
22
-
23
-
24
-
25
-
26
-
27
-
28
-
29
-
30
-
31
-
32
-
33
-
34
-
35
-
36
 |
 |
