Cuisinart DFP-3 DFP-3 Manual - Page 9
Slicing And, Shredding Less, Than 3 Cups, Of Food, Shredding More
 |
UPC - 086279004413
View all Cuisinart DFP-3 manuals
Add to My Manuals
Save this manual to your list of manuals |
Page 9 highlights
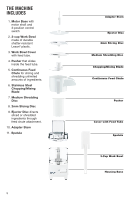
Slicing And Shredding Less Than 3 Cups Of Food 1. Assemble clear work bowl on base in usual way. 2. Pick up adapter stem. Note that round base is notched at one end. Center section is hexagonal (six-sided) and top section is flat on both sides. Hold stem firmly by flat top and push it down as far as it will go on motor shaft. 3. Hold slicing or shredding disc with its longer collar down (the side that reads "THIS SIDE DOWN"). Always handle slicing or shredding discs by rims. Never touch sharp cutting blades. Slide disc over stem and push it down until its center collar is flush with hexagonal section of stem. 4. Put cover on work bowl, lock it into place and insert food in feed tube. (If you are slicing, first cut one end of food flat. Place in feed tube flat side down.) See page 11 for guidelines on how to get consistent slices and shreds. 5. Insert pusher. Use moderate pressure to push down on pusher with one hand while holding control switch in PULSE position with other hand until food is sliced or shredded. This will only take a few seconds. Wait until disc stops spinning before removing cover. When it stops, remove cover before removing work bowl. Never try to remove cover and work bowl together; this could damage work bowl. 6. Remove slicing or shredding disc before removing work bowl. To remove it, grasp flat top section of adapter stem and lift it straight up. Then turn bowl clockwise to remove it from base and lift it straight up. Slicing And Shredding More Than 3 Cups Of Food 1. Substitute chute attachment for clear work bowl. Pick up empty work bowl, holding it in both hands with handle toward you and chute toward right. Put bowl on base, fitting center tube over motor shaft and placing handle slightly to left of front center (7 o'clock). Hold bowl by handle and turn bowl counterclockwise as far as it will go. It will click into locked position. 2. Pick up adapter stem. Note that round base is notched at one end; center section is hexagonal (six-sided) and top section is flat on both sides. Hold stem firmly by flat top and push it down as far as it will go on motor shaft. 3. Hold ejector disc with side that reads "THIS SIDE DOWN" down. Slide ejector disc over adapter stem, pushing it down so it fits over notched top of round section of stem. 4. Hold slicing or shredding disc with its longer collar down (the side that reads "THIS SIDE DOWN.") Always handle slicing or shredding discs by rims. Never touch sharp cutting blades. Slide disc over stem and push it down until its center collar is flush with hexagonal section of stem. 5. Put cover on work bowl and turn it counterclockwise to lock it into place. Place receptacle for processed food on counter under chute. You can use bowls or saucepans. Those with high (up to 6 inches, 21cm) straight sides work best. 6. Put food in feed tube. Remember to cut one end of food flat if you are slicing, and to insert in feed tube flat side down. Insert pusher and push down on it with one hand while holding control switch in PULSE position with other hand. Ejector disc will direct food through chute into receptacle. Total amount of food you can slice or 8
-
 1
1 -
2
-
3
-
 4
4 -
 5
5 -
 6
6 -
 7
7 -
 8
8 -
 9
9 -
 10
10 -
 11
11 -
 12
12 -
 13
13 -
 14
14 -
15
-
16
-
17
-
18
-
19
-
20
-
21
-
22
-
23
-
24
-
25
-
26
-
27
-
28
-
29
-
30
-
31
-
32
 |
 |
