D-Link DCS-5300G Product Manual - Page 15
Installation Wizard Screen - d link dcs
 |
UPC - 790069269530
View all D-Link DCS-5300G manuals
Add to My Manuals
Save this manual to your list of manuals |
Page 15 highlights
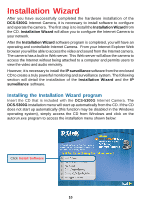
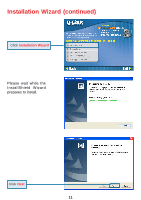
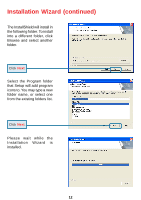
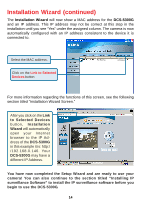
Installation Wizard Screen The following options are available on the Installation Wizard screen by clicking on the corresponding tab: Search Click to search for any available cameras to connect to the network. Add - Click to manually add a camera to the network. A window will appear, prompting you to enter the camera's IP address or domain name. A second window will appear, prompting you to enter the port number. DCS-5300G Remove Click to remove the selected camera(s) from the network. Uncheck All Click to uncheck all selected cameras. Links to Selected Devices Click to link all selected devices to the network. Setup - On the initial Setup Screen you can configure System and Date/Time settings for each camera. Click Next to configure Network settings for the camera. System Settings Enter a Camera Name and create a Root password for the camera. Date/Time Settings Enter the Date and Time for each camera. These settings can also be configured on the Tools > System screen (page 56) when configuring the camera via a Web browser. 15
-
 1
1 -
2
-
3
-
4
-
5
-
6
-
7
-
8
-
9
-
 10
10 -
 11
11 -
 12
12 -
 13
13 -
 14
14 -
 15
15 -
 16
16 -
 17
17 -
 18
18 -
 19
19 -
 20
20 -
21
-
22
-
23
-
24
-
25
-
26
-
27
-
28
-
29
-
30
-
31
-
32
-
33
-
34
-
35
-
36
-
37
-
38
-
39
-
40
-
41
-
42
-
43
-
44
-
45
-
46
-
47
-
48
-
49
-
50
-
51
-
52
-
53
-
54
-
55
-
56
-
57
-
58
-
59
-
60
-
61
-
62
-
63
-
64
-
65
-
66
-
67
-
68
-
69
-
70
-
71
-
72
-
73
-
74
-
75
-
76
-
77
-
78
-
79
-
80
-
81
-
82
-
83
-
84
-
85
-
86
-
87
-
88
-
89
-
90
-
91
-
92
-
93
-
94
-
95
-
96
-
97
-
98
-
99
-
100
-
101
-
102
-
103
-
104
-
105
-
106
-
107
-
108
-
109
-
110
-
111
-
112
-
113
-
114
-
115
-
116
-
117
-
118
-
119
-
120
-
121
-
122
-
123
-
124
-
125
-
126
-
127
-
128
-
129
-
130
-
131
-
132
-
133
-
134
-
135
-
136
-
137
-
138
-
139
-
140
-
141
-
142
-
143
-
144
-
145
 |
 |
