D-Link DNS-726-4 Product Manual - Page 14
Rear Panel (Connections
 |
UPC - 790069320200
View all D-Link DNS-726-4 manuals
Add to My Manuals
Save this manual to your list of manuals |
Page 14 highlights
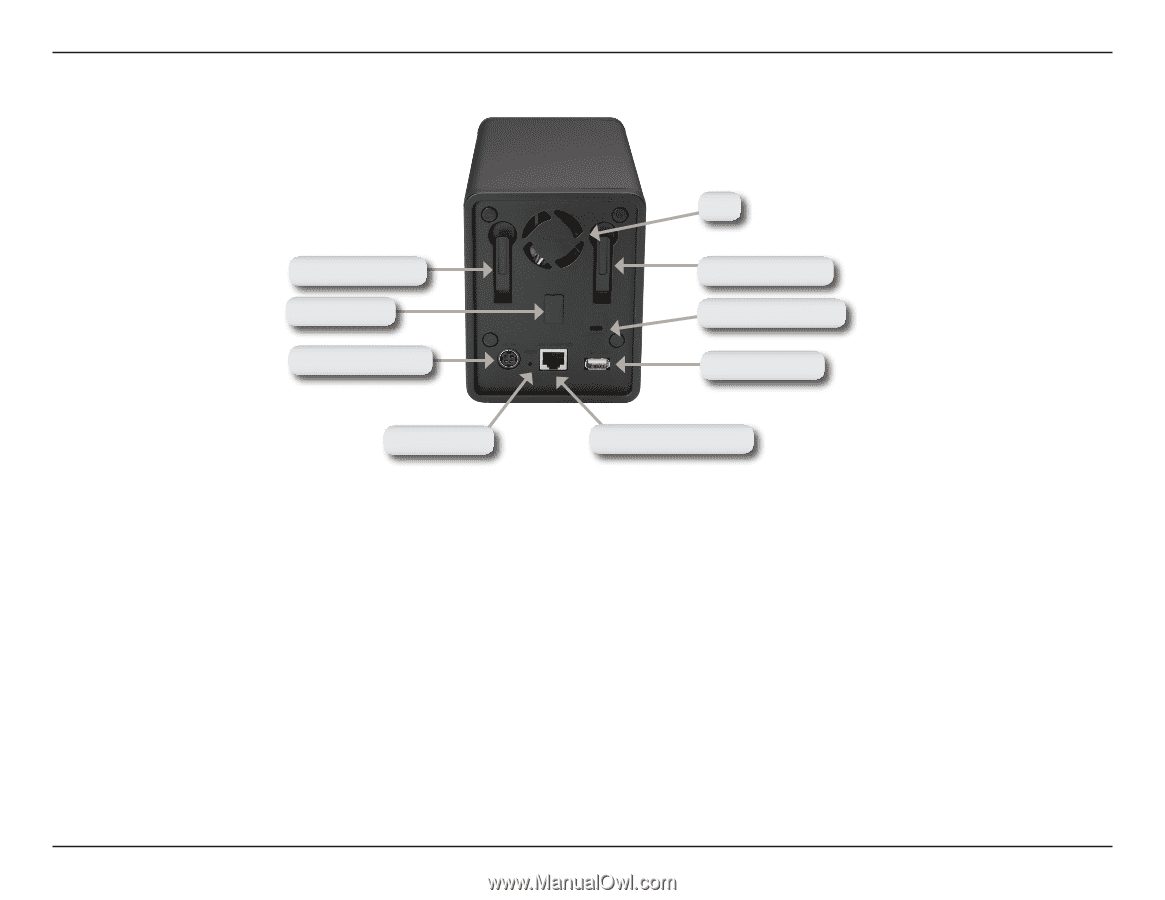
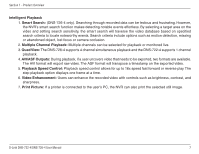
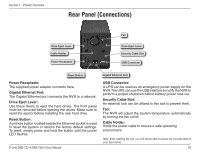
Section 1 - Product Overview Rear Panel (Connections) Drive Eject Lever Cable Holder Power Receptacle Fan Drive Eject Lever Security Cable Slot USB Connector Reset Button Power Receptacle: The supplied power adapter connects here. Gigabit Ethernet Port: The Gigabit Ethernet port connects the NVR to a network. Drive Eject Lever: Use these levers to eject the hard drives. The front panel must be removed before ejecting the drives. Make sure to reset the ejector before installing the new hard drive. Reset Button: A pinhole button located beside the Ethernet socket is used to reset the system or restore the factory default settings. To reset, simply press and hold the button until the power LED flashes. D-Link DNS-722-4/DNS-726-4 User Manual Gigabit Ethernet Port USB Connector: A UPS can be used as an emergency power supply for the NVR. The UPS can use the USB interface to notify the NVR to perform a proper shutdown before battery power runs out. Security Cable Slot: An external lock can be affixed to this slot to prevent theft. Fan: The NVR will adjust the system temperature automatically by turning the fan on/off. Cable Holder: Holds the power cable to ensure a safe operating environment. Note: After resetting the unit, you will still be able to access the recorded data on your hard drives. 10
-
 1
1 -
2
-
3
-
4
-
5
-
6
-
7
-
8
-
 9
9 -
 10
10 -
 11
11 -
 12
12 -
 13
13 -
 14
14 -
 15
15 -
 16
16 -
 17
17 -
 18
18 -
 19
19 -
20
-
21
-
22
-
23
-
24
-
25
-
26
-
27
-
28
-
29
-
30
-
31
-
32
-
33
-
34
-
35
-
36
-
37
-
38
-
39
-
40
-
41
-
42
-
43
-
44
-
45
-
46
-
47
-
48
-
49
-
50
-
51
-
52
-
53
-
54
-
55
-
56
-
57
-
58
-
59
-
60
-
61
-
62
-
63
-
64
-
65
-
66
-
67
-
68
-
69
-
70
-
71
-
72
-
73
-
74
-
75
-
76
-
77
-
78
-
79
-
80
-
81
-
82
-
83
-
84
-
85
-
86
-
87
-
88
-
89
-
90
-
91
-
92
-
93
 |
 |