Dell 2135cn User Guide - Page 151
Jam/Alignment Problems
 |
UPC - 884116001980
View all Dell 2135cn manuals
Add to My Manuals
Save this manual to your list of manuals |
Page 151 highlights
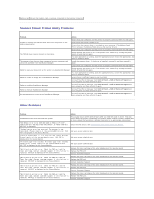
Does the noise generated from the printer match with the noise from the Play of Sound button? 1. On the Machine Check page, select Dispense Motor Check (Yellow), Dispense Motor Check (Magenta), Dispense Motor Check (Cyan), or Dispense Motor Check (Black) from the drop-down list box, and click the Start button. 2. Click the Play of Sound button to check the motor sound. 3. Repeat steps 1 and 2 to perform Dispense Motor Check for the rest of the toner cartridges. 3 NOTE: You can perform Dispense Motor Check for CMYK in any order you desire. Contact Dell. Go to action 4. NOTE: Do not check the operation of the dispense motor repeatedly. Does the noise generated from the printer match with the noise from the Play of Sound button? 1. Reinstall the fuser. 2. Perform action 3 again. 4 Does the noise generated from the printer match with the noise from the Play of Sound button? 1. Reinstall the PHD unit. 2. Perform action 3 again. 5 Does the noise generated from the printer match with the noise from the Play of Sound button? 1. Reinstall the toner cartridges. 2. Perform action 3 again. 6 Does the noise generated from the printer match with the noise from the Play of Sound button? Contact Dell. Go to action 5. Contact Dell. Go to action 6. Contact Dell. Contact Dell. Jam/Alignment Problems NOTE: Some of the following procedures that use the Tool Box can also be performed using the operator panel or Dell Printer Configuration Web Tool. For information on how to use the operator panel and Dell Configuration Web Tool, see "Understanding the Menus" and "Dell Printer Configuration Web Tool". The top and side margins are incorrect. Action Yes No Ensure that the margins are set correctly on the application being used. 1 The task is complete. Contact Dell. Is the problem resolved? The color registration is out of alignment. Action Execute auto color registration adjustment. 1. Launch the Tool Box, and click Registration Adjustment on the Printer Maintenance tab. 1 2. Click Auto Correct under Color Registration Adjustments. Is the problem resolved? Yes No The task is complete. Go to action 2.
-
 1
1 -
2
-
3
-
4
-
5
-
6
-
7
-
8
-
9
-
10
-
11
-
12
-
13
-
14
-
15
-
16
-
17
-
18
-
19
-
20
-
21
-
22
-
23
-
24
-
25
-
26
-
27
-
28
-
29
-
30
-
31
-
32
-
33
-
34
-
35
-
36
-
37
-
38
-
39
-
40
-
41
-
42
-
43
-
44
-
45
-
46
-
47
-
48
-
49
-
50
-
51
-
52
-
53
-
54
-
55
-
56
-
57
-
58
-
59
-
60
-
61
-
62
-
63
-
64
-
65
-
66
-
67
-
68
-
69
-
70
-
71
-
72
-
73
-
74
-
75
-
76
-
77
-
78
-
79
-
80
-
81
-
82
-
83
-
84
-
85
-
86
-
87
-
88
-
89
-
90
-
91
-
92
-
93
-
94
-
95
-
96
-
97
-
98
-
99
-
100
-
101
-
102
-
103
-
104
-
105
-
106
-
107
-
108
-
109
-
110
-
111
-
112
-
113
-
114
-
115
-
116
-
117
-
118
-
119
-
120
-
121
-
122
-
123
-
124
-
125
-
126
-
127
-
128
-
129
-
130
-
131
-
132
-
133
-
134
-
135
-
136
-
137
-
138
-
139
-
140
-
141
-
142
-
143
-
144
-
145
-
 146
146 -
 147
147 -
 148
148 -
 149
149 -
 150
150 -
 151
151 -
 152
152 -
 153
153 -
 154
154 -
 155
155 -
 156
156 -
157
-
158
-
159
-
160
-
161
-
162
-
163
-
164
-
165
-
166
-
167
-
168
-
169
-
170
-
171
-
172
-
173
-
174
-
175
-
176
-
177
-
178
-
179
-
180
-
181
-
182
-
183
-
184
-
185
-
186
-
187
-
188
-
189
-
190
-
191
-
192
-
193
-
194
-
195
-
196
-
197
-
198
-
199
-
200
-
201
-
202
-
203
-
204
-
205
-
206
-
207
-
208
-
209
-
210
-
211
-
212
-
213
-
214
-
215
-
216
-
217
-
218
-
219
-
220
-
221
-
222
-
223
-
224
-
225
-
226
-
227
-
228
-
229
-
230
-
231
-
232
-
233
-
234
-
235
-
236
-
237
-
238
-
239
-
240
-
241
-
242
-
243
-
244
-
245
-
246
-
247
-
248
-
249
-
250
-
251
-
252
-
253
-
254
-
255
-
256
-
257
-
258
-
259
-
260
 |
 |
