Dell Alienware M11x R3 Mobile Manual - Page 74
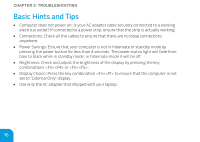
Remove the four screws that secure the hard drive to the hard drive bracket., Lift the hard drive
 |
View all Dell Alienware M11x R3 manuals
Add to My Manuals
Save this manual to your list of manuals |
Page 74 highlights
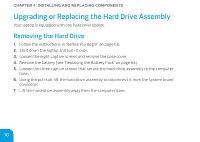
CHAPTER 4: INSTALLING AND REPLACING COMPONENTS 8. Remove the four screws that secure the hard drive to the hard drive bracket. 9. Lift the hard drive bracket of the hard drive according to the illustration. 2 3 1 1 hard drive bracket 2 screws (4) 72 3 hard drive
-
 1
1 -
2
-
3
-
4
-
5
-
6
-
7
-
8
-
9
-
10
-
11
-
12
-
13
-
14
-
15
-
16
-
17
-
18
-
19
-
20
-
21
-
22
-
23
-
24
-
25
-
26
-
27
-
28
-
29
-
30
-
31
-
32
-
33
-
34
-
35
-
36
-
37
-
38
-
39
-
40
-
41
-
42
-
43
-
44
-
45
-
46
-
47
-
48
-
49
-
50
-
51
-
52
-
53
-
54
-
55
-
56
-
57
-
58
-
59
-
60
-
61
-
62
-
63
-
64
-
65
-
66
-
67
-
68
-
 69
69 -
 70
70 -
 71
71 -
 72
72 -
 73
73 -
 74
74 -
 75
75 -
 76
76 -
 77
77 -
 78
78 -
 79
79 -
80
-
81
-
82
-
83
-
84
-
85
-
86
-
87
-
88
-
89
-
90
-
91
-
92
-
93
-
94
-
95
-
96
-
97
-
98
-
99
-
100
-
101
-
102
-
103
-
104
-
105
-
106
-
107
-
108
-
109
-
110
-
111
-
112
-
113
-
114
-
115
-
116
-
117
-
118
 |
 |

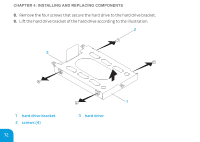
CHAPTER 4: IN°TALLING AND REPLACING COMPONENT°
72
8.
Remove the four screws that secure the hard drive to the hard drive bracket.
9.
Lift the hard drive bracket of the hard drive according to the illustration.
1
2
3
1
hard drive bracket
3
hard drive
2
screws (4)