Dell DR4300 IBM Tivoli Storage Manager - Setting Up Tivoli Storage Manager wit
Dell DR4300 Manual
 |
View all Dell DR4300 manuals
Add to My Manuals
Save this manual to your list of manuals |
Dell DR4300 manual content summary:
- Dell DR4300 | IBM Tivoli Storage Manager - Setting Up Tivoli Storage Manager wit - Page 1
Setting up the Dell DR Series System with IBM Tivoli Storage Manager Dell Engineering May 2016 A Dell Technical White Paper - Dell DR4300 | IBM Tivoli Storage Manager - Setting Up Tivoli Storage Manager wit - Page 2
recommendations Updated with ISCSI VTL support and instructions THIS WHITE PAPER IS Dell's recommendation of those products. Please consult your Dell representative for additional information. Trademarks used in this text: Dell™, the Dell logo, and PowerVault™ are trademarks of Dell Inc. Other Dell - Dell DR4300 | IBM Tivoli Storage Manager - Setting Up Tivoli Storage Manager wit - Page 3
iSCSI VTL...41 3.6 Creating the client node for iSCSI VTL ...41 4 Using the Backup & Archive GUI ...42 5 Setting up the DR Series system cleaner...43 6 Monitoring ...47 C Configuring the tape library devices on Linux ...48 3 Setting up the Dell DR Series System with IBM Tivoli Storage Manager - Dell DR4300 | IBM Tivoli Storage Manager - Setting Up Tivoli Storage Manager wit - Page 4
DR Series system as a backup to disk target for IBM Tivoli Storage Manager (TSM). For additional information, see the DR Series system documentation and other data management application best practices whitepapers for your specific DR Series system at: http://www.dell.com/support/home NOTE: The DR - Dell DR4300 | IBM Tivoli Storage Manager - Setting Up Tivoli Storage Manager wit - Page 5
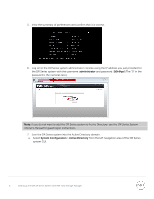
Dell DR Series System Administrator Guide, refer to the sections "iDRAC Connection", "Logging in and Initializing the DR Series System", and "Accessing IDRAC6/Idrac7 Using RACADM" for information about using the iDRAC connection and initializing the appliance. 2. Log on to iDRAC using the default - Dell DR4300 | IBM Tivoli Storage Manager - Setting Up Tivoli Storage Manager wit - Page 6
and password: St0r@ge! (The "0" in the password is the numeral zero.). Note: if you do not want to add the DR Series system to Active Directory, see the DR Series System Owner's Manual for guest logon instructions. 7. Join the DR Series system into the Active Directory domain. a. Select System - Dell DR4300 | IBM Tivoli Storage Manager - Setting Up Tivoli Storage Manager wit - Page 7
b. Enter your Active Directory credentials. 7 Setting up the Dell DR Series System with IBM Tivoli Storage Manager - Dell DR4300 | IBM Tivoli Storage Manager - Setting Up Tivoli Storage Manager wit - Page 8
Create and mount the container by selecting Containers in the left navigation area and then clicking Create at the top of the page. 2. Enter a Container Name, and click Next. 3. Select the storage access protocol as NAS, and then click Next. 8 Setting up the Dell DR Series System with IBM Tivoli - Dell DR4300 | IBM Tivoli Storage Manager - Setting Up Tivoli Storage Manager wit - Page 9
type as Auto. Click Next. 5. Configure access by doing one of the following: • For NFS, select the preferred client access credentials, and click Next. • For CIFS, select the preferred client access credentials, and click Next. 9 Setting up the Dell DR Series System with IBM Tivoli Storage Manager - Dell DR4300 | IBM Tivoli Storage Manager - Setting Up Tivoli Storage Manager wit - Page 10
an iSCSI connection 1. Create and mount the container by selecting Containers in the left navigation area and then clicking Create at the top of the page. 2. Enter a container name, select the VTL option, and then click Next. 10 Setting up the Dell DR Series System with IBM Tivoli Storage Manager - Dell DR4300 | IBM Tivoli Storage Manager - Setting Up Tivoli Storage Manager wit - Page 11
3. Select the required tape size, the access protocol as iSCSI, and the marker type. Also, enter the initiator details as appropriate. Click Next. 4. Click Create a New Container. 11 Setting up the Dell DR Series System with IBM Tivoli Storage Manager - Dell DR4300 | IBM Tivoli Storage Manager - Setting Up Tivoli Storage Manager wit - Page 12
5. Confirm that the container is successfully added on the Containers page. 12 Setting up the Dell DR Series System with IBM Tivoli Storage Manager - Dell DR4300 | IBM Tivoli Storage Manager - Setting Up Tivoli Storage Manager wit - Page 13
containers 2.1 Configuring the device class for CIFS & NFS protocols The following instructions describe a basic configuration for connecting a DR Series system to the Windows Storage Classes. 3. Click Create a Device Class. 13 Setting up the Dell DR Series System with IBM Tivoli Storage Manager - Dell DR4300 | IBM Tivoli Storage Manager - Setting Up Tivoli Storage Manager wit - Page 14
Select the FILE device type, and click Next. (This device type is optimized for writing to disk mount limit. The DR Series system supports up to 32 concurrent CIFS connections. system supports very large files, such as 1TB. Note: The service account service account correctly. An example for the - Dell DR4300 | IBM Tivoli Storage Manager - Setting Up Tivoli Storage Manager wit - Page 15
An example for the NFS container path follows. 6. Click Finish. 15 Setting up the Dell DR Series System with IBM Tivoli Storage Manager - Dell DR4300 | IBM Tivoli Storage Manager - Setting Up Tivoli Storage Manager wit - Page 16
2.2 Configuring the storage pool for CIFS & NFS protocols 1. Click Storage Devices > View Storage Pools. 2. Click Create Storage Pools. 16 Setting up the Dell DR Series System with IBM Tivoli Storage Manager - Dell DR4300 | IBM Tivoli Storage Manager - Setting Up Tivoli Storage Manager wit - Page 17
Pool Name: Enter a descriptive name for the DR Series system pool. • Storage Pool Description: Enter a description for the DR Series system pool. • Storage Pool Type: Select Sequential Access as the DR Series system is integrated as a FILE type device. 17 Setting up the - Dell DR4300 | IBM Tivoli Storage Manager - Setting Up Tivoli Storage Manager wit - Page 18
, accept the defaults selections, and click Next. (Ensure that the Identify the duplicate data in the storage pool check box is not selected as the DR Series system uses inline deduplication and already identifies and removes duplicate data.) 18 Setting up the Dell - Dell DR4300 | IBM Tivoli Storage Manager - Setting Up Tivoli Storage Manager wit - Page 19
7. Review the settings and click Finish. 2.3 Creating a policy domain for the backup job 1. Click Policy Domains > View Policy Domains. 19 Setting up the Dell DR Series System with IBM Tivoli Storage Manager - Dell DR4300 | IBM Tivoli Storage Manager - Setting Up Tivoli Storage Manager wit - Page 20
Next. • Name: Enter a descriptive name for the DR Series system policy domain. • Description: Enter a description for the DR Series policy domain. 20 Setting up the Dell DR Series System with IBM Tivoli Storage Manager - Dell DR4300 | IBM Tivoli Storage Manager - Setting Up Tivoli Storage Manager wit - Page 21
for data and storage pool settings, and then click Next. • Specify default management class: Select the DR Series system pool that was set up previously. • Number of are set based on company policies. 6. Select Yes to assign this policy domain to clients, and click Next. 21 Setting up the - Dell DR4300 | IBM Tivoli Storage Manager - Setting Up Tivoli Storage Manager wit - Page 22
of clients to move to the DR Series system, and click Next. Note: You can choose to limit if you have a lot of client computers. 8. Select the check boxes next to the clients you want to back up to the DR Series system, and click Next. 22 Setting up the - Dell DR4300 | IBM Tivoli Storage Manager - Setting Up Tivoli Storage Manager wit - Page 23
9. Click Finish. 2.4 Creating client node and backup sets 1. Open the client nodes and backup sets from TSM to register the client machine. 23 Setting up the Dell DR Series System with IBM Tivoli Storage Manager - Dell DR4300 | IBM Tivoli Storage Manager - Setting Up Tivoli Storage Manager wit - Page 24
2. Provide the client name, policy name, and password to connect. 3. Confirm that the client node is successfully registered. 24 Setting up the Dell DR Series System with IBM Tivoli Storage Manager - Dell DR4300 | IBM Tivoli Storage Manager - Setting Up Tivoli Storage Manager wit - Page 25
1. In the Windows TSM Server, open iSCSI initiator software, and then enter the DR IP/Hostname as target. Click Quick Connect. 25 Setting up the Dell DR Series System with IBM Tivoli Storage Manager - Dell DR4300 | IBM Tivoli Storage Manager - Setting Up Tivoli Storage Manager wit - Page 26
Quick connect will discovers the targets. 2. Click Done. 3. Then, select the required targets and click Connect. 26 Setting up the Dell DR Series System with IBM Tivoli Storage Manager - Dell DR4300 | IBM Tivoli Storage Manager - Setting Up Tivoli Storage Manager wit - Page 27
Advanced. 5. Select the option, Enable CHAP log on, enter the following credentials, and click OK: • Name: iscsi_user • Password: St0r@ge!iscsi Note: The iSCSI user name can be found by entering the following command on the DR Series system: # iscsi --show --user 27 Setting up the Dell DR Series - Dell DR4300 | IBM Tivoli Storage Manager - Setting Up Tivoli Storage Manager wit - Page 28
6. Click OK. 7. Verify that the Status shows as "Connected," and click OK. 28 Setting up the Dell DR Series System with IBM Tivoli Storage Manager - Dell DR4300 | IBM Tivoli Storage Manager - Setting Up Tivoli Storage Manager wit - Page 29
b. Modify the following lines: # To set a CHAP username and password for initiator # authentication by the target(s), uncomment the following lines: -m session = tcp: [8] 10.8.230.108:3260,1 iqn.198405.com.dell:dr4000.3071067.interoprhel52n1.30 5. Review dmesg or /var/log/messages for details - Dell DR4300 | IBM Tivoli Storage Manager - Setting Up Tivoli Storage Manager wit - Page 30
Series system VTL for Windows and Linux TSM servers Note: Refer to the following instructions for viewing the tape devices and IDs, which you will need to configure the the library # audit library TSM-iscsi checklabel=barcode 30 Setting up the Dell DR Series System with IBM Tivoli Storage Manager - Dell DR4300 | IBM Tivoli Storage Manager - Setting Up Tivoli Storage Manager wit - Page 31
library # Audit library TSM-iscsi checklabel=barcode 3.2.2.6 Checkin the library volumes # checkin libvolume TSM-iscsi search=yes checklabel=barcode status=scratch 31 Setting up the Dell DR Series System with IBM Tivoli Storage Manager - Dell DR4300 | IBM Tivoli Storage Manager - Setting Up Tivoli Storage Manager wit - Page 32
VTL. 2. Under General Information, provide the name and select the library configured. Under Drive-level data encryption, select the Do not allow drives to encrypt data option, and under Logical block protection, click None. 32 Setting up the Dell DR Series System with IBM Tivoli Storage Manager - Dell DR4300 | IBM Tivoli Storage Manager - Setting Up Tivoli Storage Manager wit - Page 33
the previous Storage Pool creation section 2.2 2. Under General storage pool settings, provide the pool name and type, and then click Next. 33 Setting up the Dell DR Series System with IBM Tivoli Storage Manager - Dell DR4300 | IBM Tivoli Storage Manager - Setting Up Tivoli Storage Manager wit - Page 34
4. Provide the necessary Device name and maximum number of Scratch volumes and click Next. 5. Click Finish. 34 Setting up the Dell DR Series System with IBM Tivoli Storage Manager - Dell DR4300 | IBM Tivoli Storage Manager - Setting Up Tivoli Storage Manager wit - Page 35
3.4.1 Adding volumes to a library 1. After creating a storage pool, click Storage Devices in the Left Pane, and then select the library that was configured earlier. 2. Select the column (which was default earlier) and disable the target reset option when the server is restarted. 35 Setting up the - Dell DR4300 | IBM Tivoli Storage Manager - Setting Up Tivoli Storage Manager wit - Page 36
3. In the Volumes section, click Add Volumes. 4. Select the option, All of the volumes are labeled. Just check them in. Click Next. 36 Setting up the Dell DR Series System with IBM Tivoli Storage Manager - Dell DR4300 | IBM Tivoli Storage Manager - Setting Up Tivoli Storage Manager wit - Page 37
for all eligible volumes in the library's regular slots. Click Next. 7. On the Check in Volumes page, do the following: a. Select the option, Read bar codes and check in all eligible volumes. b. Select Scratch as the pool to check in volumes to the scratch pool. c. Click Next. 37 Setting up the - Dell DR4300 | IBM Tivoli Storage Manager - Setting Up Tivoli Storage Manager wit - Page 38
8. For Advanced Options, select the option, Do not prompt me to insert the tape volumes into the library. Click Next. 9. Click Finish. 38 Setting up the Dell DR Series System with IBM Tivoli Storage Manager - Dell DR4300 | IBM Tivoli Storage Manager - Setting Up Tivoli Storage Manager wit - Page 39
10. Check that all the volumes are created. 3.4.2 Adding volumes to a storage pool 1. Go to the Storage Pool section (which was created earlier for the iSCSI target), and click Volumes. 39 Setting up the Dell DR Series System with IBM Tivoli Storage Manager - Dell DR4300 | IBM Tivoli Storage Manager - Setting Up Tivoli Storage Manager wit - Page 40
name column. Note: Provide exactly the same volume name as present in the LIBRARY for volume name for the storage pool. 40 Setting up the Dell DR Series System with IBM Tivoli Storage Manager - Dell DR4300 | IBM Tivoli Storage Manager - Setting Up Tivoli Storage Manager wit - Page 41
, Section 2.3. 3.6 Creating the client node for iSCSI VTL Follow the steps described earlier in the section for creating a client node, Section 2.4. 41 Setting up the Dell DR Series System with IBM Tivoli Storage Manager - Dell DR4300 | IBM Tivoli Storage Manager - Setting Up Tivoli Storage Manager wit - Page 42
, open the Backup-Archive GUI. Provide the user ID and password details that were described previously. When you have logged on, the Backup button will be enabled. The Backup and Restore Manager for additional best practices. 42 Setting up the Dell DR Series System with IBM Tivoli Storage Manager - Dell DR4300 | IBM Tivoli Storage Manager - Setting Up Tivoli Storage Manager wit - Page 43
system cleaner Performing scheduled disk space reclamation operations are recommended as a method for recovering disk space from system containers per week when backups are not taking place, and generally after a backup job has completed. Schedule Cleaner 43 Setting up the Dell DR Series System - Dell DR4300 | IBM Tivoli Storage Manager - Setting Up Tivoli Storage Manager wit - Page 44
Monitoring deduplication, compression, and performance After backup jobs have run, the DR Series system 2-4x reduction (25-50% total savings) on the initial backup. As additional full backup jobs are completed, the ratios will increase. Backup jobs with a 12-week retention will average a 15x ratio, - Dell DR4300 | IBM Tivoli Storage Manager - Setting Up Tivoli Storage Manager wit - Page 45
an authentication method has been selected, set the TSM service account to use that account. 1. Launch the Microsoft Services Snap-in. (Start > Run > Services.msc > Enter). 2. Locate the TSM Server Service (Right-click > Properties > Logon tab.) 45 Setting up the Dell DR Series System with IBM - Dell DR4300 | IBM Tivoli Storage Manager - Setting Up Tivoli Storage Manager wit - Page 46
'ed accounts instead of an Active Directory account, make sure that there is a ".\"in front of the user name. 3. Click OK. 4. Right-click the TSM Service process, and click Stop/Start to restart the process. 46 Setting up the Dell DR Series System with IBM Tivoli Storage Manager - Dell DR4300 | IBM Tivoli Storage Manager - Setting Up Tivoli Storage Manager wit - Page 47
the data before the data is stored on disk. Enabling deduplication before the data stream is sent Series system. Encryption The DR Series system supports encryption-at-rest; hence there is no backup and space reclamations jobs should be scheduled to happen at different times. 47 Setting up the Dell - Dell DR4300 | IBM Tivoli Storage Manager - Setting Up Tivoli Storage Manager wit - Page 48
working, you need to define library manually in the TSM server as described below To configure the TSM device drivers for selected tape drives and libraries, do the the device driver to probe for supported tape drives, and for each autochanger Dell DR Series System with IBM Tivoli Storage Manager - Dell DR4300 | IBM Tivoli Storage Manager - Setting Up Tivoli Storage Manager wit - Page 49
777 /dev/IBM* chown tsminst1:tsmsrvrs /dev/IBM* Note: tsminst1 and tsmsrvrs are the user and group created for TSM installation. 49 Setting up the Dell DR Series System with IBM Tivoli Storage Manager
-
 1
1 -
 2
2 -
 3
3 -
 4
4 -
 5
5 -
 6
6 -
 7
7 -
8
-
9
-
10
-
11
-
12
-
13
-
14
-
15
-
16
-
17
-
18
-
19
-
20
-
21
-
22
-
23
-
24
-
25
-
26
-
27
-
28
-
29
-
30
-
31
-
32
-
33
-
34
-
35
-
36
-
37
-
38
-
39
-
40
-
41
-
42
-
43
-
44
-
45
-
46
-
47
-
48
-
49
 |
 |

A Dell Technical White Paper
Setting up the Dell DR Series System with
IBM Tivoli Storage Manager
Dell Engineering
May 2016