Dell GX260 Service Manual - Page 47
Attaching Power and Drive Cables
 |
UPC - 683728163389
View all Dell GX260 manuals
Add to My Manuals
Save this manual to your list of manuals |
Page 47 highlights
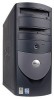
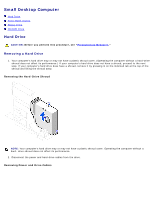
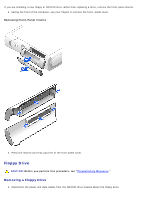
1. Check the documentation for the drive to verify that it is configured for your computer. NOTICE: To avoid damage to the drive, do not set it on a hard surface. Instead, set the drive on a surface, such as a foam pad, that will sufficiently cushion it. 2. Unpack the replacement hard drive, and prepare it for installation. 3. If the replacement drive does not have the bracket rails attached, see step 2 in the previous section for instructions on attaching rails. 4. Install the hard drive into the computer by gently sliding the drive into place until you hear it securely click. NOTICE: Match the colored strip on the cable with pin 1 on the drive (pin 1 is marked as "1"). 5. Connect the power and hard-drive cables to the drive. Attaching Power and Drive Cables 1 hard-drive cable 2 power cable 6. Check all connectors to be certain that they are properly cabled and firmly seated. 7. If your computer has a hard-drive shroud, replace the shroud by inserting the two tabs on the bottom into the holes in the computer and snapping the top into place. (Operating the computer without a hard-drive shroud does not affect its performance.) 8. Close the computer cover. 9. Attach the computer stand (optional). Front-Panel Inserts
-
 1
1 -
2
-
3
-
4
-
5
-
6
-
7
-
8
-
9
-
10
-
11
-
12
-
13
-
14
-
15
-
16
-
17
-
18
-
19
-
20
-
21
-
22
-
23
-
24
-
25
-
26
-
27
-
28
-
29
-
30
-
31
-
32
-
33
-
34
-
35
-
36
-
37
-
38
-
39
-
40
-
41
-
 42
42 -
 43
43 -
 44
44 -
 45
45 -
 46
46 -
 47
47 -
 48
48 -
 49
49 -
 50
50 -
 51
51 -
 52
52 -
53
-
54
-
55
-
56
-
57
-
58
-
59
-
60
-
61
-
62
-
63
-
64
-
65
-
66
-
67
-
68
-
69
-
70
-
71
-
72
-
73
-
74
-
75
-
76
-
77
-
78
-
79
-
80
-
81
-
82
-
83
-
84
-
85
-
86
-
87
-
88
-
89
-
90
-
91
-
92
-
93
-
94
-
95
-
96
-
97
-
98
-
99
-
100
 |
 |