Dell Inspiron 15z 1570 Service Manual - Page 22
Replacing the Hard Drive
 |
View all Dell Inspiron 15z 1570 manuals
Add to My Manuals
Save this manual to your list of manuals |
Page 22 highlights
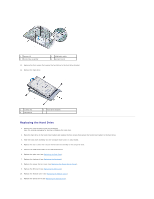
1 screws (4) 3 hard drive assembly 2 USB/audio cable 4 system board 12. Remove the four screws that secure the hard drive to the hard drive bracket. 13. Remove the hard drive. 1 screws (4) 3 hard drive 2 hard drive bracket Replacing the Hard Drive 1. Remove the new hard drive from its packaging. Save the original packaging for storing or shipping the hard drive. 2. Place the hard drive in the hard drive bracket and replace the four screws that secure the hard drive bracket to the hard drive. 3. Slide the hard drive assembly into the computer base until it is fully seated. 4. Replace the four screws that secure the hard drive assembly to the computer base. 5. Connect the USB/audio cable to the USB/audio board. 6. Replace the palm rest (see Replacing the Palm Rest). 7. Replace the keyboard (see Replacing the Keyboard). 8. Replace the power button cover (see Replacing the Power Button Cover). 9. Replace the Mini-Card (see Replacing the Mini-Card). 10. Replace the module cover (see Replacing the Module Cover). 11. Replace the optical drive (see Replacing the Optical Drive).
-
 1
1 -
2
-
3
-
4
-
5
-
6
-
7
-
8
-
9
-
10
-
11
-
12
-
13
-
14
-
15
-
16
-
 17
17 -
 18
18 -
 19
19 -
 20
20 -
 21
21 -
 22
22 -
 23
23 -
 24
24 -
 25
25 -
 26
26 -
 27
27 -
28
-
29
-
30
-
31
-
32
-
33
-
34
-
35
-
36
-
37
-
38
-
39
-
40
-
41
-
42
-
43
-
44
-
45
 |
 |
