Dell PowerEdge 4400 Activating the PERC 3/Di - Page 5
Dell™ PowerEdge™ 4400 Systems—Activating the PERC 3/Di, Activating the RAID Controller - hard drives
 |
View all Dell PowerEdge 4400 manuals
Add to My Manuals
Save this manual to your list of manuals |
Page 5 highlights
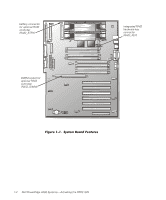
(Rev. 11/3/98) FILE LOCATION: S:\SYSTEMS\opal\ts\Romb\8648Reb0.fm Dell™ PowerEdge™ 4400 Systems-Activating the PERC 3/Di support.dell.com This document explains how to activate the integrated PowerEdge Expandable RAID Controller (PERC) 3/Di redundant arrays of independent disks (RAID) controller and change the System Setup settings. Activating the RAID Controller To activate the integrated PERC 3/Di RAID controller, perform the following steps. NOTICE: To prevent damage to your computer system, see "Protecting Against Electrostatic Discharge" in your system User's Guide. NOTICE: You will lose existing data on hard-disk drives attached to the integrated Adaptec AIC-7899 small computer system interface (SCSI) controller after you activate the integrated PERC 3/Di and configure the hard-disk drives as RAID. CAUTION: To prevent bodily injury, before you activate the integrated RAID controller, you must turn off the computer and disconnect it from its AC power source. For more information, see "Safety First-For You and Your Computer" in your system User's Guide. 1. Turn off the system, including any attached peripherals and disconnect the AC power cable from its power source. 2. Remove the computer cover. See "Checking Inside the Computer" in your system Installation and Troubleshooting Guide for more information. 3. Remove the cooling shroud. See "Checking Inside the Computer" in your system Installation and Troubleshooting Guide for more information. 4. Press the ejectors on the RAID DIMM socket (see Figure 1-1 for the location) down and outward to allow the DIMM to be inserted into the socket (see Figure 1-2). DELL CONFIDENTIAL - Preliminary 1/14/00 Dell PowerEdge 4400 Systems-Activating the PERC 3/Di 1-1
-
 1
1 -
 2
2 -
 3
3 -
 4
4 -
 5
5 -
 6
6 -
 7
7 -
 8
8 -
 9
9 -
 10
10 -
 11
11 -
12
-
13
-
14
-
15
-
16
-
17
-
18
-
19
-
20
-
21
-
22
-
23
-
24
-
25
-
26
-
27
-
28
-
29
-
30
-
31
-
32
-
33
-
34
-
35
-
36
-
37
-
38
-
39
-
40
-
41
-
42
 |
 |
