Dell PowerEdge 4400 Activating the PERC 3/Di - Page 7
Installing a DIMM, Rev. 11/3/98 FILE LOCATION - memory
 |
View all Dell PowerEdge 4400 manuals
Add to My Manuals
Save this manual to your list of manuals |
Page 7 highlights
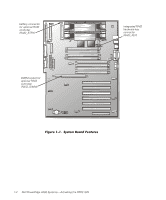
(Rev. 11/3/98) FILE LOCATION: S:\SYSTEMS\opal\ts\Romb\8648Reb0.fm DIMM socket ejectors (2) alignment keys (2) B A Figure 1-2. Installing a DIMM 5. Align the RAID DIMM's edge connector with the slot in the center of the DIMM socket, and insert the DIMM in the socket (see step A in Figure 1-2). The DIMM socket has two alignment keys that allow the DIMM to be installed in the socket in only one way. NOTE: The RAID controller DIMM must be an unbuffered DIMM, rated to run at 100 megahertz (MHz) or faster. Do not substitute registered DIMMs such as those used for system memory. 6. Press down on the DIMM with your thumbs while pulling up on the ejectors with your index fingers to lock the DIMM into the socket (see step B in Figure 1-2). 7. Install the RAID hardware key. Insert the hardware key into the socket (see Figure 1-1) and secure the key with the latches on each end of the socket (see Figure 1-3). The key is designed so that you can only insert it one way and is labeled "PE4400." support.dell.com DELL CONFIDENTIAL - Preliminary 1/14/00 Dell PowerEdge 4400 Systems-Activating the PERC 3/Di 1-3
-
 1
1 -
 2
2 -
 3
3 -
 4
4 -
 5
5 -
 6
6 -
 7
7 -
 8
8 -
 9
9 -
 10
10 -
 11
11 -
 12
12 -
13
-
14
-
15
-
16
-
17
-
18
-
19
-
20
-
21
-
22
-
23
-
24
-
25
-
26
-
27
-
28
-
29
-
30
-
31
-
32
-
33
-
34
-
35
-
36
-
37
-
38
-
39
-
40
-
41
-
42
 |
 |
