Dell PowerEdge 4600 Removing the Back Fan Assembly - Page 3
Replacing the Back Fan Assembly - memory
 |
View all Dell PowerEdge 4600 manuals
Add to My Manuals
Save this manual to your list of manuals |
Page 3 highlights
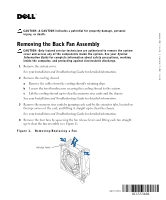
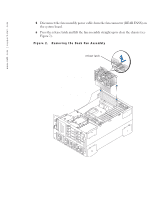
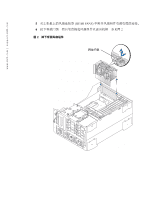
www.dell.com | support.dell.com Replacing the Back Fan Assembly 1 Align the new fan assembly with the fan assembly guide on the back panel, and push down until the fan assembly is firmly seated and the latch is engaged (see Figure 2). 2 Connect the fan assembly power cable to the fan connector (REAR FANS) on the system board. 3 Lower each fan into the fan assembly until the fan snaps into position (see Figure 1). 4 Install the memory riser cards. 5 Install the cooling shroud. a Lower the cooling shroud into the chassis, ensuring that the cooling shroud is aligned with the back fan assembly and the memory riser card cage. b Tighten the two thumbscrews securing the cooling shroud to the system. c Reroute the cables over the cooling shroud using the retaining clips. 6 Replace the system cover. Information in this document is subject to change without notice. © 2003 Dell Computer Corporation. All rights reserved. Printed in the U.S.A. Reproduction in any manner whatsoever without the written permission of Dell Computer Corporation is strictly forbidden. Trademarks used in this text: Dell and the DELL logo are trademarks of Dell Computer Corporation. Other trademarks and trade names may be used in this document to refer to either the entities claiming the marks and names or their products. Dell Computer Corporation disclaims any proprietary interest in trademarks and trade names other than its own.
-
 1
1 -
 2
2 -
 3
3 -
 4
4 -
 5
5 -
 6
6 -
 7
7 -
 8
8 -
 9
9 -
10
-
11
-
12
-
13
-
14
-
15
-
16
-
17
-
18
-
19
-
20
-
21
-
22
-
23
-
24
-
25
-
26
-
27
-
28
 |
 |