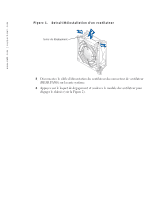
Dell PowerEdge 4600 Removing the Back Fan Assembly - Page 7
更换背面风扇组件
 |
View all Dell PowerEdge 4600 manuals
Add to My Manuals
Save this manual to your list of manuals |
Page 7 highlights
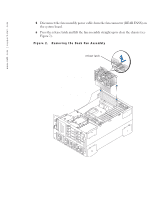
www.dell.com | support.dell.com 1 2 2 REAR FANS) 3 1 4 5 a b c 6 2003 Dell Computer Corporation Dell Computer Corporation Dell 和 DELL 徽标是 Dell Computer Corporation Dell Computer Corporation
-
 1
1 -
 2
2 -
 3
3 -
 4
4 -
 5
5 -
 6
6 -
 7
7 -
 8
8 -
 9
9 -
 10
10 -
 11
11 -
 12
12 -
13
-
14
-
15
-
16
-
17
-
18
-
19
-
20
-
21
-
22
-
23
-
24
-
25
-
26
-
27
-
28
 |
 |
www.dell.com | support.dell.com
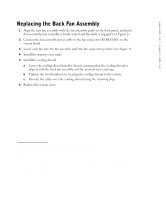
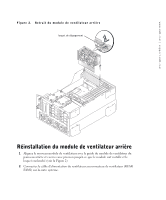
更换背面风扇组件
1
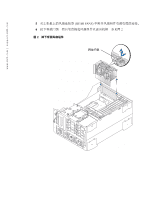
将新风扇组件与背面板上的风扇组件导轨对齐并向下推动
直至风扇组件稳定就
位且闩锁啮合
参见图
2
2
将风扇组件电源电缆连接至主机板上的风扇连接器
(REAR FANS)
3
将每个风扇向下放入风扇组件
直至风扇卡入到位
参见图
1
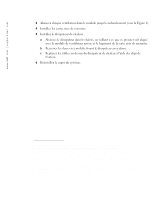
4
安装内存提升卡
5
安装冷却通风罩
a
将冷却通风罩向下放入机箱
确保冷却通风罩与背面风扇组件和内存提升卡固
定框架对齐
b
拧紧将冷却通风罩固定至系统的两颗指旋螺钉
c
使用固定夹
在冷却通风罩上方重新布线电缆
6
装回主机盖
____________________
本文件中的信息如有更改
恕不另行通知
©
2003 Dell Computer Corporation
版权所有
翻印必究
美国印制
未经
Dell Computer Corporation
书面许可
不准以任何形式进行复制
本文件中使用的商标
Dell
和
DELL
徽标是
Dell Computer Corporation
的商标
本文件中述及的其它商标和产品名称是指拥有相应商标和名称的公司或其制造的产品
Dell Computer
Corporation
对其它公司的商标和产品名称不拥有任何专利权