Dell PowerEdge PDU Metered LCD Cabling PowerEdge R520 - Page 7
Right-side mounting instructions
 |
View all Dell PowerEdge PDU Metered LCD manuals
Add to My Manuals
Save this manual to your list of manuals |
Page 7 highlights
Cable Routing Procedures for the Dell PowerEdge R520 System 6. Extend the system out of the rack to verify that there is sufficient slack in the cables on both ends of the CMA. See Figure 6 for an example of a completed left-side mounted CMA installation. Figure 6. Left-side mounted CMA installation (preferred) 1.3.3. Right-side mounting instructions Install the CMA on the rear right side of the rails by attaching both CMA housings to the attachment brackets on the rails. The remaining steps are the same as for left-side mounting as described in Section 1.3.2. See Figure 7 for an example of a completed right-side mounted CMA installation. Figure 7. Right-side mounted CMA installation (CMA shown in service position) 7
-
 1
1 -
 2
2 -
 3
3 -
 4
4 -
 5
5 -
 6
6 -
 7
7 -
 8
8 -
 9
9 -
 10
10 -
 11
11
 |
 |

Cable Routing Procedures for the Dell PowerEdge R520 System
7
6.
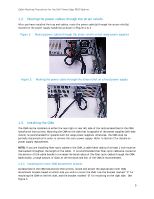
Extend the system out of the rack to verify that there is sufficient slack in the cables on both ends
of the CMA.
See Figure 6 for an example of a completed left-side mounted CMA installation.
Left-side mounted CMA installation (preferred)
Figure 6.
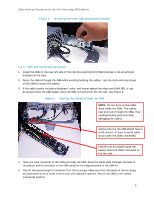
1.3.3.
Right-side mounting instructions
Install the CMA on the rear right side of the rails by attaching both CMA housings to the attachment
brackets on the rails.
The remaining steps are the same as for left-side mounting as described in
Section 1.3.2.
See Figure 7 for an example of a completed right-side mounted CMA installation.
Right-side mounted CMA installation (CMA shown in service position)
Figure 7.