Dell PowerVault LTO-5-140 Storage User's Guide - Page 28
Setting Up the Tape Drive: Dell, PowerVault, LTO5-140HH Tape Drive User's Guide
 |
View all Dell PowerVault LTO-5-140 Storage manuals
Add to My Manuals
Save this manual to your list of manuals |
Page 28 highlights
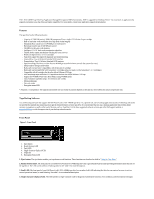
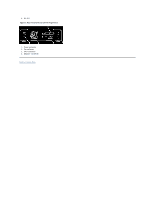
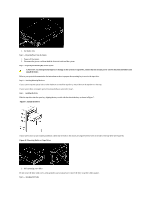
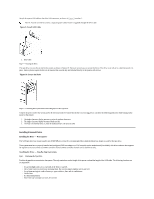
Back to Contents Page Setting Up the Tape Drive: DellTM PowerVaultTM LTO5-140HH Tape Drive User's Guide Pre-installed Internal Drives Installing Internal Drives Installing External Drives Loading Device Drivers Verifying Drive Operation Pre-installed Internal Drives Dell performs the installation and setup of internal tape drives that are shipped as part of a system. If tape backup software is included in your system, refer to the installation instructions included with the software. For the latest supported software versions, go to the Dell support website support.dell.com or visit the support site of your backup software vendor. Installing Internal Drives If your internal tape drive is not pre-installed, the installation instructions are described in the following sections: Installing the Drive - Prerequisites The Dell PowerVault LTO5-140HH tape drive is a 6 Gb SAS device with a burst transfer rate of 600 MB per second. It is recommended that you use a dedicated SAS host bus adapter for this tape drive. Mounting Bay You need one industry-standard, 5 1/4 inch, half-height bay in which to install the PowerVault LTO5-140HH tape drive. The drive may be mounted vertically or horizontally. Install and configure the drive according to the instructions provided in the Dell documentation for your system. Mounting Hardware Most systems use trays or rails to mount the tape drive. If the mounting hardware is pre-installed, you can simply slide the drive into the mounting bay. Some systems do not use slides or rails and drives must be fixed in place with screws. Installing the Drive - Step-By-Step Instructions Step 1 - Unpacking the Drive Unpack the tape drive and store the packaging. You may need the packaging if you return the unit for service. A period of time is required if the temperature of the drive when unpacked is different than the temperature of its operating environment (measured at the front of the bezel near the air intake area; see number 1 in Figure 6). The recommended time is 4 hours after the drive has been unpacked or 1 hour after any condensation that you can see has evaporated, whichever is greater. To allow the drive to adjust to its new environment, apply the following measures: l If the drive is colder than its operating environment and the air contains sufficient humidity, condensation may occur in the drive and damage it. When the drive has warmed to the operating temperature range (greater than 10 degrees C or 50 degrees F) and no danger of condensation is present (the air is dry), warm the drive more quickly by powering it on for 30 minutes. Use a scratch tape to test the drive before inserting a tape that contains data. l If the drive is hotter than its operating environment, the tape can stick to the drive head. When the drive has cooled to the operating temperature range (less than 40 degrees C or 104 degrees F), cool the drive more quickly by applying airflow for 30 minutes. Power on the drive and use a scratch tape to test it before inserting a tape that contains data. If you are uncertain about whether the temperature of the drive is within the recommended operating range or the humidity is sufficient to cause condensation, allow the drive to adjust to its new environment for the full 4 hours. Figure 6. Air Intake Area
-
 1
1 -
2
-
3
-
4
-
5
-
6
-
7
-
8
-
9
-
10
-
11
-
12
-
13
-
14
-
15
-
16
-
17
-
18
-
19
-
20
-
21
-
22
-
 23
23 -
 24
24 -
 25
25 -
 26
26 -
 27
27 -
 28
28 -
 29
29 -
 30
30 -
 31
31 -
 32
32 -
 33
33 -
34
-
35
-
36
-
37
-
38
-
39
-
40
-
41
-
42
-
43
-
44
-
45
-
46
-
47
-
48
-
49
-
50
 |
 |
