Dell XPS L501X Setting Up and Using 3D TV - Page 2
Enable stereoscopic 3D, NVIDIA Control Panel - display
 |
View all Dell XPS L501X manuals
Add to My Manuals
Save this manual to your list of manuals |
Page 2 highlights
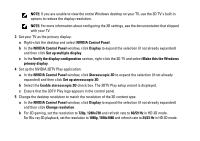
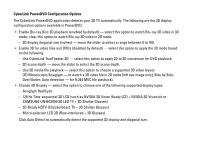
NOTE: If you are unable to view the entire Windows desktop on your TV, use the 3D TV's built-in options to reduce the display resolution. NOTE: For more information about configuring the 3D settings, see the documentation that shipped with your TV. 3 Set your TV as the primary display: a Right-click the desktop and select NVIDIA Control Panel. b In the NVIDIA Control Panel window, click Display to expand the selection (if not already expanded) and then click Set up multiple display. c In the Verify the display configuration section, right-click the 3D TV and select Make this the Windows primary display. 4 Set up the NVIDIA 3DTV Play application: a In the NVIDIA Control Panel window, click Stereoscopic 3D to expand the selection (if not already expanded) and then click Set up stereoscopic 3D. b Select the Enable stereoscopic 3D check box. The 3DTV Play setup wizard is displayed. c Ensure that the 3DTV Play logo appears in the control panel. 5 Change the desktop resolution to match the resolution of the 3D content type: a In the NVIDIA Control Panel window, click Display to expand the selection (if not already expanded) and then click Change resolution. b For 3D gaming, set the resolution to 720p, 1280x720 and refresh rate to 60/59 Hz in HD 3D mode. For Blu-ray 3D playback, set the resolution to 1080p, 1920x1080 and refresh rate to 24/23 Hz in HD 3D mode.
-
 1
1 -
 2
2 -
 3
3 -
 4
4 -
 5
5 -
 6
6 -
 7
7 -
 8
8 -
9
-
10
-
11
-
12
-
13
-
14
-
15
-
16
-
17
-
18
-
19
-
20
-
21
-
22
-
23
-
24
-
25
-
26
-
27
-
28
-
29
-
30
-
31
-
32
 |
 |
