Denon DN-A7100 User Guide - Page 15
General Information Of Rc-1065 To Dn-a7100
 |
UPC - 081757507554
View all Denon DN-A7100 manuals
Add to My Manuals
Save this manual to your list of manuals |
Page 15 highlights
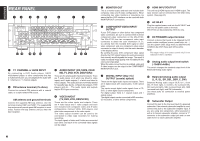
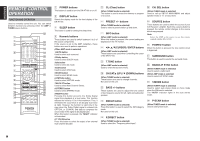
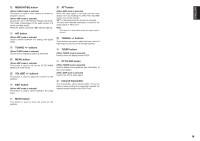
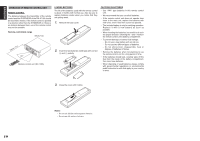
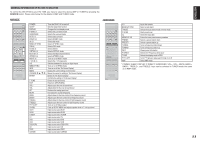
GENERAL INFORMATION OF RC-1065 TO DN-A7100 To control the DN-A7100 by your RC-1065, you have to select the device AMP or TUNER by pressing the SOURCE button. Please refer below for the details in AMP and TUNER mode. AMP MODE POWER SLEEP DISPLAY P-DIRECT SURROUND AUTO (1) DOLBY (2) dts (3) BAND/LIP SYNC CSII (4) EX/ES (5) VIRTUAL (6) M-CH ST (7) STEREO (8) NIGHT (9) 7.1ch IN (0) A/D MEMO/HT-EQ INFO MENU CURSOR 1 / 3 / 4 / 2 ENTER T-TONE EXIT VOL+ VOLATT MUTE BASSBASS+ TREBLETREBLE+ PTY/V-OFF CH-SEL AUX1 AUX2 TUNER TV DVD VCR DSS/VCR2 CD TAPE CDR/MD Turns the DN-A7100 on and off Sets the sleep timer function Changes the front display mode Selects the pure direct mode Selects the surround mode Selects auto surround Selects DOLBY mode Selects dts mode Select LIP SYNC mode Selects CS2 mode Selects EX/ES Selects VIRTUAL mode Selects the Multi Channel Stereo Selects STEREO mode Turns on or off NIGHT mode Selects the 7.1ch input ports Switches between the analog or digital inputs Turns on or off HT-EQ mode Turns on or off the "On Screen Display" Display the current setting on the monitor Moves the cursor for setting in "On Screen Display" Enters the "On Screen Display" Confirms the setting in "On Screen Display" Enters the test tone menu Exits from SETUP MENU Adjusts up to the over all sound level Adjusts down to the over all sound level Reduces the analog input level Decreases the sound temporarily Adjusts down to the tone control of low frequency sound Adjusts up to the tone control of low frequency sound Adjusts down to the tone control of high frequency sound Adjusts up to the tone control of high frequency sound Turns on or off Video output Calls up SETUP MENU and adjusts speaker level or 7.1ch input level Input source select AUX1 Input source select AUX2 Input source select TUNER Input source select TV Input source select DVD Input source select VCR Input source select DSS/VCR2 Input source select CD Input source select TAPE Input source select CDR/MD TUNER MODE 0-9 BAND/LIP SYNC T-MODE P-SCAN CL MEMO/HT-EQ PRESETPRESET+ TUNINGTUNING+ INFO F-DIRECT T-DISP PTY/V-OFF AMP Inputs the numeric Select a radio band Selects the auto stereo mode or mono mode Starts preset scan Clears the input data Enters the tuner preset memory numbers Selects a preset station down Selects a preset station up Tunes a frequency station down Tunes a frequency station up Shows preset information Selects the "Frequency direct input" Selects the display mode in RDS Turns PTY group or type search mode on or off Select AMP mode * POWER, SLEEP, DISPLAY, P-DIRECT, SURROUND, VOL+, VOL-, MUTE, BASS+, BASS-, TREBLE+, and TREBLE- keys can be selected in TUNER mode the same as in AMP mode. 11 ENGLISH
-
 1
1 -
2
-
3
-
4
-
5
-
6
-
7
-
8
-
9
-
 10
10 -
 11
11 -
 12
12 -
 13
13 -
 14
14 -
 15
15 -
 16
16 -
 17
17 -
 18
18 -
 19
19 -
 20
20 -
21
-
22
-
23
-
24
-
25
-
26
-
27
-
28
-
29
-
30
-
31
-
32
-
33
-
34
-
35
-
36
-
37
-
38
-
39
-
40
-
41
-
42
-
43
-
44
-
45
-
46
-
47
-
48
 |
 |
